A finished acrylic painting can lose its color and collect grime within months if left unprotected.
Knowing how to seal an acrylic painting properly is the difference between a piece that holds up for decades and one that dulls, yellows, or traps dust into the paint surface permanently.
This guide covers everything from choosing the right varnish or sealant to applying an isolation coat, picking your finish, and avoiding the mistakes that cause cloudy or streaky results.
By the end, you’ll know exactly which products to use, how long to wait before sealing, and how the process changes depending on whether you’re working on canvas, wood panel, or a poured acrylic surface.
What Is Sealing an Acrylic Painting

Sealing an acrylic painting means applying a protective topcoat over dried paint to shield it from dust, UV light, moisture, and surface abrasion. It’s the last step before a painting is considered finished.
A lot of beginners mix up varnishing and sealing. They’re related, but not identical.
Sealing is the broader act of applying any protective coating over acrylic paint, including permanent coatings, resin, or spray sealants.
Varnishing is a specific type of sealing that uses removable acrylic polymer varnish. Professional conservators prefer removable varnishes because they can be stripped and reapplied later.
Acrylic surfaces are naturally porous and act like dust magnets over time. Without a sealant, that surface keeps collecting grime and becomes harder to clean safely.
Sealing is optional for paintings stored flat or framed under glass. For anything displayed in the open, hung on a wall, or sold, it’s a step worth taking seriously.
What sealing does NOT do
It won’t fix cracks in dried paint, fill uneven textures, or make a poorly primed surface adhere better. Those problems need to be solved before the topcoat goes on.
One thing people get wrong: Mod Podge. It’s a craft adhesive, not an archival sealant. It yellows over time and goes tacky in humidity. Fine for hobby projects. Not for anything you want to last decades.
Types of Sealants for Acrylic Paintings
The acrylic paint market is projected to reach USD 218.2 million by 2035, with heavy body acrylics alone holding a 54.2% share in 2025 (Future Market Insights). More painters means more demand for quality finishing products.
Choosing the wrong sealant is one of the most common finishing mistakes. Here’s what actually matters.
| Sealant Type | Finish Options | Removable? | Best For |
|---|---|---|---|
| Golden Polymer Varnish | Gloss, Satin, Matte | Yes | Fine art, gallery work |
| Golden MSA Varnish | Gloss, Satin, Matte | Yes | Paintings needing strong UV protection |
| Liquitex Varnish | Gloss, Satin, Matte | Yes | All-around use, beginner-friendly |
| Krylon UV-Resistant Spray | Gloss, Matte | No | Quick sealing, textured surfaces |
| Mod Podge | Gloss, Matte | No | Craft projects only |
For anything you’re selling or planning to keep long-term, stick with archival-grade products from Golden Artist Colors or Liquitex.
Spray Sealants
Best for: textured surfaces, large canvases, and situations where brush marks would show.
Spray sealants deposit a uniform film without touching the surface. That matters a lot with heavy impasto textures where a brush would flatten raised edges.
Krylon’s UV Archival Varnish uses a blend of UV absorbers (UVA) and Hindered Amine Light Stabilizers (HALS) to slow color fading. Golden’s Archival Aerosol MSA Varnish uses the same HALS system and is fully reversible with mineral spirits.
Spray application needs space. You’re working 12 to 18 inches from the surface, which means you need ventilation or outdoor conditions. Fumes from solvent-based sprays are not something to ignore.
Brush-On Sealants
Best for: smaller works, precise edge control, and indoor application.
Water-based brush-on varnishes like Golden Polymer Varnish are much easier to use indoors without ventilation concerns. They dry clear, remain flexible on stretched canvas, and don’t yellow over time.
The downside is brush marks. Overworking the surface, or going back over a spot that’s started drying, leaves streaks that are hard to fix. The fix: use a wide, soft flat brush and work in one direction only.
Liquitex’s brush-on varnish is a solid starting point for beginners. It applies cleanly and is widely available.
Tools and Materials You Need Before Sealing

Getting the tools ready before starting saves a lot of frustration. Stopping mid-application to find a clean brush or a lint-free cloth is how mistakes happen.
Over 40 million DIY artists purchase art supplies annually (360 Research Reports, 2024). Most sealing failures come from skipping prep, not from product quality.
- Wide flat varnish brush: 2 to 3 inches wide, soft synthetic bristles. Foam rollers also work for flat surfaces
- Lint-free cloths: for removing surface dust before application
- Golden Soft Gel Gloss: for the isolation coat step
- Chosen varnish or sealant: matched to your finish preference
- Ventilated workspace: required for all spray applications, recommended for brush-on too
- Distilled water: for diluting water-based varnishes if needed
One thing that gets skipped: testing. Always apply your chosen sealant to a scrap piece with similar paint layers before touching the actual painting. Golden Artist Colors specifically recommends this, and it’s good advice.
If you’re working with a painting on a rigid surface like a wood panel, you may also want painter’s tape to protect the edges. It keeps drips clean and gives the finished piece a neater look from the sides.
How To Apply an Isolation Coat
Most tutorials skip this step. That’s a problem.
An isolation coat is a permanent, non-removable layer applied between the dried painting and the final varnish. Its job is to protect the paint surface when the varnish is eventually removed for conservation or reapplication.
Without it, removing a varnish layer later risks pulling up paint along with it.
Standard product: Golden Soft Gel Gloss, diluted 2:1 with water (two parts gel, one part distilled water). Stir gently. Aggressive mixing creates bubbles in the coat.
Application steps:
- Make sure the painting is fully dry, at minimum 24 hours, ideally longer for thicker paint layers
- Remove all dust with a dry lint-free cloth
- Apply the diluted gel gloss in thin, even strokes moving in one direction across the surface
- Allow 24 hours to cure before applying any varnish on top
The isolation coat will look slightly shiny when dry. That’s normal. It creates a consistent, sealed surface that helps the varnish go on more evenly.
Golden recommends this step specifically for acrylic paintings before using their MSA Varnish. Their technical documentation makes clear that skipping it can cause adhesion issues with solvent-based varnishes.
How To Apply a Brush-On Sealant

Brush-on application is the most controlled method. It also has the most room for error if you rush it.
Water-based acrylics are the preferred medium for 32% of global art paint volume in 2024 (Art Paint Market Report). Most of those painters will eventually deal with this exact process.
Before you start:
- Confirm the isolation coat (if applied) has cured for at least 24 hours
- Wipe the surface with a dry lint-free cloth to remove any dust
- Work in a space with low humidity and stable temperature
Load the brush generously and start at one edge, working across in long, parallel strokes. Don’t go back over a section once it starts drying. That’s the main cause of visible brush marks and streaks.
Two to three thin coats always beat one thick coat. A heavy single layer takes longer to dry, traps air bubbles, and risks an uneven surface. Allow each coat to dry fully before adding the next, at least an hour for water-based products.
If bubbles appear, they usually pop on their own as the coat levels out. If they don’t, a light pass with a dry brush across the surface while still wet usually fixes it. Trying to fix bubbles after the coat has dried is much harder.
Fixing streaks in dried varnish
Light streaks in a water-based varnish can sometimes be fixed by adding another thin coat on top. Heavier streaking usually means sanding lightly with very fine grit (1000+) once fully dry, then recoating. This is the kind of thing that’s faster to prevent than to fix.
How To Apply a Spray Sealant
Spray sealants apply faster than brush-on and work better on textured surfaces. The technique is simple, but getting it wrong creates problems that are hard to reverse.
Setup first:
- Work outdoors or in a space with strong ventilation
- Lay the painting flat or prop it at a slight angle
- Shake the can for at least two minutes before spraying
Hold the can 12 to 18 inches from the surface. Closer than that and the coating goes on too heavy, creating drips and an uneven film. Farther away and the spray dries before it lands, leaving a rough, powdery texture.
Move in steady, overlapping passes. Each pass should cover roughly half the width of the previous one. Keep moving. Stopping mid-pass creates a heavier deposit in that spot.
| Common Spray Mistake | What Happens | How To Avoid |
|---|---|---|
| Spraying too close | Drips, pooling, uneven film | Hold 12-18 inches away |
| One heavy coat | Cloudy, slow-drying surface | Two to three light coats |
| Painting propped vertically | Varnish drips downward | Lay flat or at slight angle |
| Cold or humid conditions | Milky, blush finish | Apply above 60°F, below 75% humidity |
Allow 20 to 30 minutes between coats for most aerosol products. Full cure typically takes 24 hours, though some solvent-based sprays like Golden MSA Aerosol need longer before the painting can be handled safely.
Temperature matters more than most people expect. Spraying in cold conditions or high humidity causes a white, milky haze called blushing. If this happens, a warm and dry environment will sometimes let the haze clear on its own. If it doesn’t clear, the coat may need to come off.
For paintings you plan to keep long-term or sell, the acrylic painting materials you started with matter as much as the sealant you finish with. Quality paints and grounds make the whole preservation process more reliable.
Choosing the Right Finish
Finish choice affects how a painting reads in a room more than most people expect. It’s not just aesthetics. The wrong finish under certain lighting conditions can make a piece nearly impossible to view from certain angles.
Acrylics account for 32% of global art paint unit volume in 2024, with the market projected to reach USD 218.2 million by 2035 (Future Market Insights). More painters working across more styles means finish choice has become a real decision, not a default.
| Finish | Effect on Color | Glare Risk | Best Match |
|---|---|---|---|
| Gloss | Maximum Saturation: Deepens blacks and intensifies pigments to their “wet” appearance. | High: Creates a “mirror” effect under direct spotlights or near windows. | Abstracts, high-contrast pieces, and palettes with heavy jewel tones. |
| Satin | Subtle Enhancement: Maintains color depth without the overwhelming shine of full gloss. | Low to Moderate: Diffuses light softly, making it the most versatile for varied room lighting. | The “Gallery Standard”; works for landscapes, still lifes, and modern decor. |
| Matte | Softens/Flattens: Can slightly “grey out” dark values but creates a velvety, uniform surface. | Minimal: Ideal for rooms with many windows or harsh overhead lighting. | Portraits, vintage-style illustrations, and soft, pastel-heavy palettes. |
Gloss Finish
Gloss deepens dark values and makes colors appear more saturated. Works well for abstract painting techniques where color impact is the point.
The downside is spotlighting. Under track lighting or direct window light, gloss creates enough reflection to obscure parts of the image. That’s a real problem in gallery settings with fixed lighting positions.
Also worth knowing: gloss shows fingerprints and dust more visibly than other finishes. Not a dealbreaker, but something to factor in for pieces that will be handled or displayed without glass.
Matte Finish
Best for photographing work. Matte removes glare entirely, which makes it far easier to capture accurate colors in digital images without post-processing adjustments.
The trade-off is that matte varnish slightly lightens dark tones and flattens color contrast. Paintings with strong value ranges can lose some of their punch. Test on a scrap piece first if you’re working with deep shadows or rich blacks.
Matte varnishes also tend to build up a white haze faster than gloss if applied too thickly. Two thin coats, not one heavy coat, applies here even more than with gloss.
Satin Finish
Satin is what most artists land on after experimenting with both extremes. It’s not a compromise so much as a genuinely good all-around option.
It adds slight color enhancement without gloss-level glare, and holds up well under varied lighting conditions. Artist Jed Dorsey, who works across multiple acrylic styles, notes that he often mixes a small amount of matte into high gloss to land somewhere in the satin range when a specific sheen isn’t available.
For anyone planning to display work in spaces with mixed or unpredictable lighting, satin is the most forgiving choice.
How Long To Wait Before Sealing an Acrylic Painting
This is one of the most searched questions around the sealing process, and the answers online range widely. Some of that variation is legitimate. Some of it is just bad advice.
Here’s the actual issue: dry to the touch is not the same as cured. Acrylic paint dries through evaporation. The surface skins over first, sometimes within 20 to 30 minutes for thin layers, but the paint underneath can still contain moisture for days or weeks.
Dry Time vs. Cure Time
Dry to the touch: 20 minutes to a few hours, depending on layer thickness and humidity.
Surface cured (safe for isolation coat): 24 to 48 hours for thin layers. 1 to 2 weeks for thick impasto passages.
Full film cure: Up to 30 days for complete cross-linking and maximum hardness.
Golden Artist Colors’ technical documentation is specific on this. For paintings with thin layers, they recommend waiting 1 to 2 days before applying an isolation coat, then another 2 to 7 days before varnishing. For thick impasto areas, they recommend waiting 1 to 2 weeks before even applying the isolation coat.
What Happens When You Seal Too Early
Varnishing over paint that hasn’t fully cured traps moisture in the film. The most common result is a cloudy or milky finish that may not clear on its own.
With solvent-based varnishes like Golden MSA, the risk is higher because the tight, non-permeable film prevents moisture from escaping at all. Water-based varnishes like Golden Polymer Varnish are slightly more forgiving, but the same principle applies.
A simple test: press a fingernail gently into an inconspicuous area of the painting. If it leaves an indent, the paint hasn’t cured. No indent, and it feels firm, it’s ready.
| Paint Application | Wait Before Isolation Coat | Wait Before Varnish |
|---|---|---|
| Thin Washes / Fluid Layers | 1 to 2 Days: Minimal volume allows for rapid water evaporation. | 2 to 7 Days: Ensures the polymer chain is fully locked before sealing. |
| Standard Heavy Body | 3 to 7 Days: Surface may feel dry in hours, but internal moisture needs time to exit. | 1 to 2 Weeks: Prevents “clouding” trapped under the varnish layer. |
| Thick Impasto Passages | 1 to 2 Weeks: The “skin” dries first; the core remains soft and chemically active. | 2 to 4 Weeks: Prevents “crazing” or cracking as the thick paint continues to shrink. |
| Pouring Medium Layers | 1 Week Minimum: PMs contain high levels of additives that slow the cure. | 2 to 3 Weeks: Vital for ensuring “leveling” is 100% complete. |
High humidity significantly slows curing. Artists working in humid climates, or during summer months, should add extra time to all of these estimates.
Common Sealing Mistakes and How To Fix Them

Most varnishing problems come from two sources: rushing the process or using the wrong product. Both are fixable, though some fixes are easier than others.
Cloudy or Milky Finish
The most common problem. Usually caused by one of three things: varnishing over paint that wasn’t fully cured, working in high humidity, or agitating the varnish too much before application.
If the coat is still wet: move the painting to a warm, dry environment and let it sit. Many cloudy coats clear on their own as moisture escapes and the film levels out.
If the coat has dried cloudy: for water-based varnishes, apply a fresh thin coat of gloss varnish on top. This often clears the haze. For a stubborn cloudy patch in a water-based removable varnish, a diluted ammonia solution applied carefully will remove the coat so you can start over.
Visible Brush Marks and Streaks
Caused by overworking the varnish, going back over a section that’s started to dry, or using a brush that’s too stiff.
Light streaks in a fully dried water-based coat can sometimes be fixed by applying another thin gloss coat on top, which self-levels as it dries. Heavier streaking usually requires very fine sanding (1000+ grit) once fully dry, removing all dust carefully, then recoating.
Prevention beats repair here. Use a wide, soft flat brush, load it well, and work in one direction only per coat. Alternate directions between coats.
Yellowing Over Time
Almost always the result of using a solvent-based varnish that wasn’t formulated for fine art use, or of using an industrial-grade coating instead of an artist-grade product.
Products like Mod Podge and many hardware store clear coats yellow over time. Archival-grade acrylic polymer varnishes from Golden Artist Colors, Liquitex, and Winsor and Newton are formulated to stay non-yellowing and clear for decades.
Yellowed removable varnish can be stripped with ammonia and recoated. Permanent varnishes and non-art sealants that have yellowed are much harder to address without risking damage to the paint beneath. This is why removable archival varnish is the standard recommendation for anything meant to last.
Removing and Reapplying Varnish

Removable archival varnishes like Golden MSA Varnish can be stripped with full-strength mineral spirits. Golden Polymer Varnish is water-based and removable with a diluted ammonia solution.
This process is most straightforward when an isolation coat was applied first. Without it, the solvent used to remove the varnish can interact directly with the paint surface, which risks lifting or softening the underlying layers. Golden’s technical team specifically notes that varnish removal without an isolation coat should generally be left to a professional conservator for work of significant value.
Sealing Acrylic Paintings on Different Surfaces

Canvas is the default, but a lot of painters work on wood panels, paper, and poured surfaces. Each one behaves differently during sealing and needs a slightly adjusted approach.
Canvas
Flexible support. Water-based polymer varnishes work well because they stay elastic with the canvas as it expands and contracts with humidity and temperature changes.
Polyurethane varnishes are not suitable for stretched canvas. They form a hard, rigid film that cracks over time as the canvas moves. This is the most common cause of cracking in improperly sealed acrylic paintings on canvas.
Golden Artist Colors specifically developed their Polymer Varnish to maintain flexibility on canvas surfaces. For anything displayed long-term, their waterborne or MSA options are the standard professional choice. If you want to explore more about acrylic mediums that can be used alongside varnish, it’s worth understanding how each product interacts with the paint film.
Wood Panel
Rigid support. Different prep requirements.
Wood needs a sealer coat before painting, typically Golden GAC 100 or gloss medium, to prevent Support Induced Discoloration (SID). This is a yellowing effect caused by natural compounds in wood migrating into the paint layers.
For the final varnish, rigid supports like wood panel can tolerate slightly harder film-forming products without cracking risk. The surface doesn’t flex, so polyurethane varnishes can work here, though archival polymer varnishes remain the better long-term choice.
Moisture migration is the main risk. Wood panels sealed only on the front can warp over time as moisture enters through the unprotected back. Sealing all edges and the back of the panel with at least one coat of gloss medium reduces this significantly.
Paper
Paper is the most delicate surface for sealing. Most of the standard brush-on varnishes are too heavy for thin paper supports and will cause buckling or warping on contact.
The practical approach: mount the paper on a rigid backing first, or use a very diluted water-based varnish applied in extremely thin layers. Archival quality matters more here than with canvas or panel, since non-archival paper will yellow and become brittle from internal acid degradation regardless of what’s applied on top.
Acrylic varnish applied over non-archival paper won’t reverse the paper’s degradation. It may slow the visual effects slightly, but the underlying fibers continue to break down. If you’re painting on paper for archival purposes, start with acid-free or cotton rag paper.
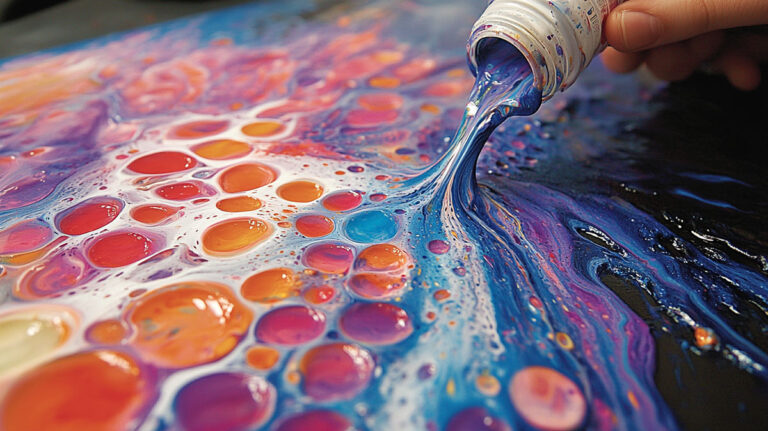
Poured Acrylic Surfaces
Poured acrylic paintings cure differently from traditionally applied paint. The silicone cells and fluid movement in a poured acrylic painting create an uneven surface with peaks and valleys that can trap air during sealing.
Wait longer before sealing. Poured layers are often thicker than traditional paint, and silicone-based pouring mediums can take 2 to 4 weeks to fully cure, sometimes longer.
Spray sealants work better than brush-on for poured surfaces because they deposit an even film without the drag and pressure of a brush. A light coat of spray varnish over the cured pour locks in the finish without disturbing the surface texture.
One issue specific to poured paintings: if silicone was used in the pour, any residual silicone on the surface will cause the varnish to bead and not adhere evenly. Wiping the surface gently with isopropyl alcohol and a lint-free cloth before sealing removes surface silicone and helps the varnish bond properly.
FAQ on How To Seal an Acrylic Painting
Do I need to seal an acrylic painting?
Not strictly required, but strongly recommended for any painting displayed without glass. Acrylic paint is porous and acts as a dust magnet over time. A protective varnish keeps the surface cleanable and shields against UV fading and moisture damage.
What is the best sealant for acrylic paintings?
Archival-grade acrylic polymer varnishes from Golden Artist Colors or Liquitex are the standard choice. Both offer removable, non-yellowing protection in gloss, satin, and matte finishes. For spray application, Krylon UV Archival Varnish is a reliable and widely available option.
Can I use Mod Podge to seal an acrylic painting?
Only for craft projects. Mod Podge yellows over time and goes tacky in humidity. It’s not an archival sealant and isn’t suitable for fine art or any piece meant to last more than a few years.
How long should I wait before sealing an acrylic painting?
At minimum, 24 to 48 hours for thin paint layers. Thick impasto passages need 1 to 2 weeks. Sealing too early traps moisture, which causes a cloudy or milky finish that may not clear on its own.
What is an isolation coat and do I need one?
An isolation coat is a permanent layer applied between the paint and the final varnish. It protects the paint surface if the varnish is ever removed. Golden Soft Gel Gloss diluted 2:1 with water is the standard product for this step.
What is the difference between gloss, satin, and matte varnish?
Gloss deepens color and adds shine but creates glare under direct light. Matte gives a flat, non-reflective finish that photographs well. Satin sits between the two and works well across most painting styles and display conditions.
How do I fix a cloudy varnish finish?
If still wet, move the painting to a warm, dry space. Many cloudy coats clear as moisture escapes. If dried cloudy, apply a thin gloss coat on top. Persistent cloudiness on a removable varnish can be stripped with diluted ammonia and recoated.
Can I use spray varnish on textured acrylic paintings?
Yes. Spray sealants are actually better for textured or impasto surfaces because they deposit an even film without the drag of a brush. Hold the can 12 to 18 inches away and apply two to three thin coats rather than one heavy coat.
How do I seal an acrylic pour painting?
Wait 2 to 4 weeks for the poured layers to fully cure. Wipe the surface with isopropyl alcohol to remove residual silicone, which prevents varnish adhesion. Apply a spray sealant in thin, even passes to avoid disturbing the surface texture.
Does varnish change the look of an acrylic painting?
It can. Gloss varnish saturates colors and adds depth. Matte varnish slightly flattens contrast. Satin has minimal visual impact. All three even out sheen inconsistencies across the paint surface, which is one of the practical reasons to varnish even when protection isn’t the primary concern.
Conclusion
Sealing an acrylic painting is not a complicated process, but the details matter.
This conclusion is for an article presenting the full picture of acrylic painting protection, from applying a proper isolation coat to choosing between gloss, satin, and matte finishes.
The right archival varnish, applied at the right time, keeps pigments stable, surfaces cleanable, and UV damage minimal for decades.
Use removable products. Wait for full paint film cure. Test on scrap before touching the final piece.
Whether you are working with a brush-on polymer varnish or a spray sealant, the process is the same: thin coats, proper drying time, and no shortcuts.
Your finished painting deserves that last step done right.