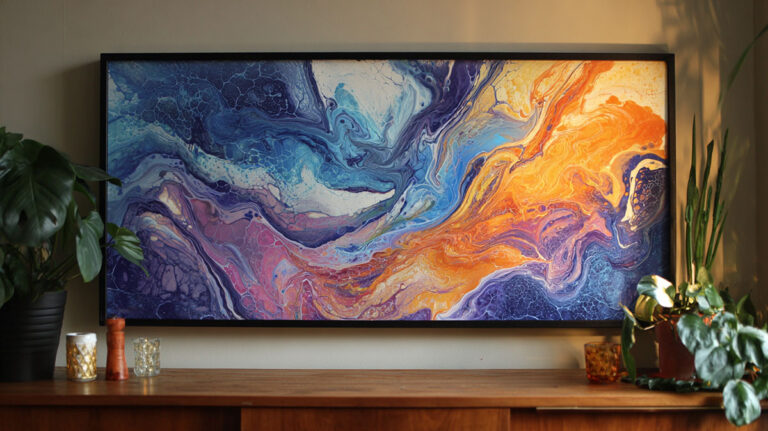
You do not need to know how to draw, mix colors on a palette, or hold a brush to make something worth hanging on a wall.
Acrylic pouring art is a fluid painting technique where diluted acrylic paint is poured directly onto a surface and guided by gravity, tilt, and paint density to create abstract patterns. Every result is one of a kind.
This guide covers everything: how the technique works, the core acrylic pouring techniques, what materials you actually need, and how it compares to other fluid art methods like alcohol ink and resin art.
Whether you are picking up a cup for the first time or trying to get consistent cells, the answers are here.
What Is Acrylic Pouring Art

Acrylic pouring art is a fluid painting technique where diluted acrylic paint is poured, tilted, or manipulated across a surface to create abstract patterns. No brushes, no sketching, no prior drawing skills needed.
The result is always a one-of-a-kind piece. That is not a selling point. It is literally how the physics work.
Unlike traditional acrylic painting, where you control every mark, acrylic pouring hands most of the decision-making to gravity, paint density, and fluid dynamics. You choose the colors. The pour decides the rest.
The global fine art materials market sits at an estimated $15 billion in 2025, with acrylic pouring listed among the techniques driving demand growth, according to Market Report Analytics.
How It Differs from Traditional Painting
Most painting techniques rely on some form of application tool: a brush, a knife, a sponge. Acrylic pouring skips all of that.
Key difference: paint consistency controls everything. The fluid acrylic mix needs to be thin enough to flow but thick enough to hold its color layers without going completely transparent.
That puts this technique closer to abstract art traditions than to any kind of representational or technical painting. Artists like Jackson Pollock and Mark Rothko explored paint behavior in similar ways, trusting the medium to do work that a brush never could.
Why It Counts as Painting
There is an ongoing debate about whether acrylic pouring qualifies as “real” art. Honestly? The debate is not that interesting.
Every pour involves deliberate decisions: color selection, layering order, technique choice, medium ratios, surface choice. Those decisions shape the outcome as much as any brushstroke would in a traditional piece.
The unpredictability is part of the form, not a flaw in it.
How Acrylic Pouring Works
The basic process runs like this: mix acrylic paint with a pouring medium, pour it onto a surface, and tilt the canvas to move the paint around. That is the core of it.
What happens in between those steps is where it gets specific.
| Stage | What Happens | What to Watch |
|---|---|---|
| Mixing | Paint combined with pouring medium until smooth | Consistency: like warm honey |
| Pouring | Colors layered or combined in a cup, then poured | Color order affects what surfaces first |
| Tilting | Canvas tilted to guide paint flow | Edge coverage and pattern direction |
| Settling | Paint self-levels as it finds its natural flow | Cells forming, colors separating |
| Drying | Paint cures over 24-72 hours | Flat surface, no dust contamination |
Paint Consistency: The Most Important Variable

Most guides describe the target consistency as “skim milk.” That is close, but slightly off. It is more like runny syrup: it should flow freely when you tilt the cup but not just pour straight off the canvas the second it touches the surface.
Too thick: paint crawls and does not blend. Too thin: colors bleed into each other and turn muddy fast.
The ratio: most pours use roughly 1 part paint to 1-2 parts pouring medium, adjusted based on the specific brand and paint body weight.
How Cells Form

Cells are those circular bubble-like shapes that appear in a finished pour. They happen because of density differences between paint colors.
Heavier pigments sink. Lighter ones rise. When silicone oil is added, it breaks the surface tension of the paint and forces those density interactions to happen faster and more dramatically.
The physics behind this is called Rayleigh-Taylor instability. It is the same phenomenon that happens when two fluids of different densities interact under gravity. Art historians note that David Alfaro Siqueiros hired a physicist in the 1930s to explain exactly this effect after observing it in his own experimental pours.
Types of Acrylic Pouring Techniques
There are a handful of core techniques, and then about thirty variations on each. For anyone starting out, these are the five that actually matter.
Dirty Pour
All colors are layered into a single cup, then poured together onto the canvas in one motion. The order you add colors into the cup determines which ones appear most prominently at the top of the finished pour.
This is the most forgiving technique for beginners. Results are unpredictable in a good way. Every dirty pour looks different even when using the exact same colors and ratios.
- Colors mixed in sequence inside one cup
- Poured in a single controlled stream or zigzag
- Canvas tilted to spread paint to the edges
Flip Cup
Process: Colors layered in a cup, placed upside-down on the canvas, then lifted. Paint floods outward from a central point.
Cell production: High. The sudden pressure release when lifting the cup accelerates color separation.
Best for: Controlled starburst or bloom patterns. Very popular in videos because the lift reveal is satisfying to watch.
One thing to know: the cup needs to be pressed firmly against the canvas before lifting or paint will bleed underneath unevenly.
Swipe Technique
A base layer of paint is poured first, typically white or a neutral tone. Then accent colors are added in lines across the surface. A palette knife, card, or paper towel is dragged across the wet paint in a single, smooth motion.
The swipe pulls the lighter base color across the accent colors, which triggers cell formation through the sudden color displacement. Palette knife technique enthusiasts tend to love this one because it gives slightly more directional control over the final result.
Dutch Pour
Paint is poured and then moved using air from a hairdryer or a straw. This technique creates lacy, feathered patterns along the paint edges, which you simply cannot get from tilting alone.
It is messier than the other methods. Air can scatter paint in directions you did not plan for.
Tip: use lower heat settings and hold the dryer at least 30cm from the surface. High heat dries the top layer of paint too fast and kills cell formation.
Which Technique Produces Cells
Not every technique reliably produces cells. Here is what actually works.
Cells most likely: flip cup, swipe, Dutch pour (with silicone oil added to at least one color).
Cells unlikely without silicone: dirty pour and tree ring pour tend to produce gradients and marbled patterns instead of distinct cells.
Silicone oil is the single biggest factor. Without it, you are relying entirely on paint density differences, which works but is inconsistent.
Materials Needed for Acrylic Pouring

You do not need much to start. Realistically, a first pour can be done for under $40 if you use student-grade materials. The list below covers what is actually required versus what is just nice to have.
Paints: Student-Grade vs. Artist-Grade

The artist-grade acrylic paints market was valued at $1.2 billion in 2023 and is projected to reach $2.3 billion by 2032 (DataIntelo). A lot of that growth is being driven by hobbyists upgrading from craft-store options.
But you do not need to start there.
| Paint Type | Example Brands | Best For | Main Trade-off |
|---|---|---|---|
| Student/craft grade | Folk Art, Apple Barrel | Learning, experimenting | Less pigment density |
| Artist grade (soft body) | Golden, Liquitex | Final pieces, gallery work | Higher cost per ounce |
| Fluid acrylics | Golden Fluid, Liquitex Basics | Pouring with less medium needed | Can be harder to find locally |
Pouring Mediums
Floetrol is the default recommendation because it is cheap, widely available, and produces consistent results. It is technically a paint conditioner for latex house paint, not an art product, but the acrylic pouring community adopted it years ago and it works reliably.
Purpose-made options like Liquitex Pouring Medium and GAC 800 tend to produce slightly better color clarity and archival longevity. Worth the upgrade if you are making pieces to sell or display long-term.
Everything Else You Need
- Silicone oil or dimethicone hair serum (for cell formation)
- Stretched canvas, wood panel, or ceramic tiles
- Plastic cups and stir sticks
- Nitrile gloves (paint stains everything)
- A level surface and a drying rack to elevate the canvas
- Plastic sheeting or newspaper for the floor
The drying rack matters more than most guides mention. If the canvas sits flat on a table, the wet paint edges drip back underneath and dry as hard ridges that can crack later.
The Role of Color in Acrylic Pouring
Color planning in acrylic pouring is different from traditional painting. You are not blending on the canvas deliberately. You are setting up conditions where the colors will blend in ways you can mostly predict but never fully control.
Color Scheme Basics
Complementary colors (opposite on the color wheel) create high-contrast results with crisp visual separation between colors. Think deep blue and burnt orange, or violet and yellow. They read as dramatic and bold.
Analogous schemes (colors sitting adjacent to each other, like blue, teal, and green) blend softly into each other and produce cohesive, calming results. These are easier to work with because the colors cannot really clash.
For first pours, analogous color combinations are much more forgiving. You might not get a dramatic result, but you also will not end up with mud.
Why Paint Opacity Changes Everything
Opaque colors dominate. Transparent colors get buried.
If you pour titanium white (very opaque) into a cup with a transparent quinacridone magenta, the white will cover most of what appears on the surface. The magenta will show up as thin ribbons at best.
This is worth planning around. Alternating opaque and transparent colors in your cup produces more layered, complex results than stacking five opaques together.
Color Order and Paint Density
Dark colors tend to be denser than light ones due to their pigment load. In a dirty pour, denser colors have a tendency to sink while lighter ones rise. This means:
- White and yellow often surface prominently
- Black and deep reds tend to appear at the base layer
- Gold and metallic paints behave differently again, often separating into isolated pools
Understanding how color interacts with surface and medium goes a long way toward predicting your results before the pour even starts. You will never fully predict it, but you can stack the odds.
Common Problems and How to Fix Them
Every poured painting has something go wrong, especially in the first dozen attempts. Most problems have clear causes and straightforward fixes.
Paint Consistency Issues
Too thick: paint does not flow when the canvas is tilted. Fix by adding more pouring medium in small amounts and stirring thoroughly before testing again.
Too thin: paint runs straight off the canvas and colors bleed into a single muddy tone. Add a small amount of undiluted paint and re-mix.
A quick field test: pour a small stream of mixed paint back into the cup. It should ribbon off the stir stick and take about two seconds to settle back flat. Faster than that is too thin. Slower is too thick.
Muddy Colors
This one is almost always a color theory problem, not a technique problem.
Mixing complementary colors without separation creates brown or gray. Avoid pairing direct complements (red with green, blue with orange) in the same cup unless you specifically want that earthy neutralized result.
Also: over-stirring kills color separation. Mix each color individually with the medium, then layer them into the cup without stirring together. The layering does the work.
Cracking During Drying
Cracking happens when the outer surface of the paint dries faster than the layers underneath. This is usually caused by:
- Paint applied too thick in one area
- Drying in direct sunlight or near a heat source
- Using too much water instead of proper pouring medium
Water as a thinning agent is a common beginner shortcut. It weakens the paint film. Over time, a water-heavy pour will crack, yellow, and separate from the surface. Use a dedicated pouring medium instead. Worth knowing before you ruin a piece you liked.
No Cells Forming
The most common question in any acrylic pouring community. Without silicone oil, cells depend entirely on paint density differences. Some color combinations produce them naturally; most do not.
Add 2-3 drops of silicone oil (or dimethicone-based hair serum) to one or two of your paint mixes, not all of them. Too much silicone creates oversized cells that look artificial and can cause adhesion problems when you varnish later.
Finishing and Protecting Acrylic Pours
A finished pour is not actually finished when it looks dry. The surface may feel solid within 24 hours, but the paint film underneath can take two to four weeks to fully cure depending on thickness, humidity, and the pouring medium used.
Applying varnish too early is one of the most common ways to ruin a piece you liked.
Drying vs. Curing: The Timeline That Most Guides Skip
Dry to touch: 24-72 hours, depending on paint thickness and room temperature.
Fully cured: 3-4 weeks minimum before applying any final varnish or resin coat, according to acrylgiessen.com and multiple acrylic pouring conservators.
Applying resin over uncured paint traps moisture inside the paint film. That moisture has nowhere to go. Over weeks, it causes bubbling, yellowing, and in some cases, the top coat separates entirely from the surface below it.
Varnish Options and What They Actually Do
Water-based finishes are the default choice for most acrylic pours. They are low-odor, easy to clean up, and apply in thin coats without brush marks when done correctly.
Liquitex Gloss Varnish and Minwax Polycrylic are the most widely used options in the acrylic pouring community. Polycrylic self-levels, which reduces brush marks, and does not amber over time.
A minimum of two to three thin coats is recommended. Three coats thin is always better than one coat thick.
UV-resistant varnish is worth the extra cost for pieces hung near windows. Without UV protection, vibrant colors, especially blues, magentas, and yellows, will fade noticeably within a few years of sun exposure.
Resin as a Top Coat
Epoxy resin gives the most professional finish available for an acrylic pour. The result is glass-like, high-gloss, and significantly more durable than any varnish.
The trade-offs are real, though.
- Resin requires a precise 1:1 mix ratio to cure correctly
- Any silicone residue on the surface causes fish-eye craters in the resin layer
- Cure time is 24-72 hours and requires a completely dust-free environment
- Cost per application is significantly higher than varnish
Before applying resin, the dried pour surface must be cleaned of silicone oil residue using cornstarch worked gently across the surface, then wiped clean. Skip this step and the resin will crater.
Silicone Residue Removal Before Sealing

This step is skipped by most beginners and is the cause of most resin failures.
Method: sprinkle cornstarch lightly across the surface, rub in gently with a soft cloth, leave for 12 hours, then wipe clean with a lightly damp lint-free cloth.
The cornstarch absorbs the silicone oil sitting on top of the dried paint. Without this step, any finish, including varnish, can bead or separate where silicone remains on the surface.
Once cleaned and sealed, storing acrylic paintings correctly extends their lifespan significantly. Keep work flat or upright in a cool, dry space away from direct light until ready to display or ship.
Acrylic Pouring vs. Other Fluid Art Techniques

Acrylic pouring sits within a broader category of fluid art, which also includes alcohol ink painting, watercolor flow techniques, and epoxy resin art. They look similar to outsiders. They are quite different in practice.
The acrylic pouring art community online is large and active, with the #acrylicpouring hashtag accumulating hundreds of thousands of posts across Instagram alone, according to Nova Color Paint’s 2025 social media trends analysis.
| Technique | Base Medium | Surface | Skill Barrier | Cost to Start |
|---|---|---|---|---|
| Acrylic pouring | Acrylic paint + medium | Canvas, wood, tile | Low | Low-medium |
| Alcohol ink | Dye-based alcohol ink | Yupo paper, glass, tile | Low-medium | Low-medium |
| Epoxy resin art | Two-part epoxy resin | Wood panels, rigid boards | Medium-high | High |
| Watercolor flow | Watercolor pigment | Watercolor paper | Medium | Low |
Acrylic Pouring vs. Alcohol Ink Painting

These two techniques get confused constantly online. The results can look similar. The process is completely different.
Alcohol ink is dye-based and transparent. It works on non-porous surfaces like Yupo paper, glass, ceramic tile, and metal. The dye reacts with isopropyl alcohol and a blower or straw to create its characteristic wispy, translucent patterns.
Acrylic pouring uses opaque or semi-transparent pigments on porous surfaces. Colors in a pour tend to stay more defined and cellular. Alcohol ink blends create softer, more fluid gradients.
One practical note: alcohol ink fumes are toxic. Working with alcohol inks requires proper ventilation and a respirator. Acrylic pouring is non-toxic and safe to do indoors without special equipment.
Acrylic Pouring vs. Epoxy Resin Art

Resin art uses a two-part epoxy mixed with pigments, poured into moulds or across rigid surfaces. The cured result is hard, glass-like, and three-dimensional in a way that acrylic pouring simply is not.
Resin is more demanding across every dimension: cost, safety, skill, and time.
- Epoxy resin requires precise mixing ratios or it will not cure correctly
- Fumes during mixing are stronger and require ventilation
- Rigid surfaces only, which rules out stretched canvas
For someone brand new to fluid painting, acrylic pouring is the obvious starting point. Resin makes more sense once you have a feel for how fluid mediums behave and what you want your finished pieces to look like.
Why Acrylic Pouring Is Considered Beginner-Accessible
It genuinely is, and not just as marketing language.
A 2023 APA survey found that 46% of Americans use creative activities to relieve stress, with painting among the most cited. The fact that acrylic pouring requires no drawing ability and produces visually strong results on a first attempt makes it one of the lowest-friction entry points into art-making available.
Research published in Frontiers in Psychiatry (2023) links creative activities broadly to improved self-awareness, lower distress levels, and better emotional regulation. Fluid painting specifically is cited by ClassBento and similar workshop providers as a mindfulness tool because the technique actively requires letting go of control rather than fighting for it.
Art teachers and workshop facilitators, including those featured on YouTube channels like Olga Soby and Caren Goodrich, consistently note that students with no prior painting experience produce display-worthy work in a single session. That is unusual in almost any other art medium. Compare that to oil painting, where technique fundamentals alone can take months to develop, or watercolor painting, which is notoriously unforgiving for beginners.
The accessibility is real. Well, it has some limits: getting cells consistently, controlling pour direction, and achieving clean color separation all take practice. But the floor is genuinely low, and that matters.
The Online Community Around Acrylic Pouring
The fluid art community is built primarily on YouTube, Instagram, Pinterest, and dedicated Facebook groups with hundreds of thousands of members.
Key figures and channels:
- Olga Soby: process-focused tutorials, strong on technique explanation
- Caren Goodrich: beginner-friendly, covers color theory and materials in depth
- Acrylic Pouring World: aggregator site covering technique tutorials and artist features
The community is notably sharing-heavy. Technique tutorials, product tests, and mistake-breakdown videos are posted constantly. It is one of the few art communities where documenting failures is as common as sharing finished work, which makes it genuinely useful for learning.
The arts and crafts market is projected to grow at a 10% CAGR from 2024 to 2029, reaching USD 42.34 billion, according to Technavio. Fluid acrylic pouring methods are specifically listed among the techniques driving demand growth in that forecast. That growth is not just hobbyist spending, either. It shows up in art market data as increased participation across all age groups, with 46% of collectors now aged 18-39 per the Avant Arte Collector Report 2024.
FAQ on What Is Acrylic Pouring Art
What is acrylic pouring art?
Acrylic pouring is a fluid painting technique where acrylic paint is mixed with a pouring medium, poured onto a surface, and manipulated through tilting or air movement.
No brushes, no drawing skills required. The paint density and gravity do most of the work.
Where did acrylic pouring originate?
The technique traces back to Mexican muralist David Alfaro Siqueiros in the 1930s, who called his experiments “accidental painting.”
Jackson Pollock later built on those ideas, and the modern acrylic pouring community grew largely through social media in the 2010s.
Do I need artistic experience to start?
No. Acrylic pouring is one of the most beginner-accessible fluid art techniques available.
You choose the colors. The pour handles the composition. Most beginners produce display-worthy results in their first session.
What supplies do I need for acrylic pouring?
The basics: acrylic paint, a pouring medium like Floetrol or Liquitex, silicone oil, plastic cups, stir sticks, gloves, and a canvas or wood panel.
A drying rack to elevate the canvas during curing is also important.
What is a pouring medium and why do I need it?
A pouring medium thins acrylic paint without weakening the paint film the way water does.
It adjusts paint viscosity to a flowable consistency while maintaining color vibrancy and preventing cracking during the drying and curing process.
How do cells form in acrylic pouring?
Cells form because of density differences between paint colors. Lighter pigments rise, heavier ones sink.
Adding silicone oil to one or more colors accelerates this separation and produces the circular cell formations most people associate with fluid acrylic painting.
How long does an acrylic pour take to dry?
Surface dry happens within 24 to 72 hours. Full cure takes three to four weeks.
Applying varnish or resin before the paint is fully cured traps moisture inside the paint film, which causes bubbling and cracking over time.
What are the most popular acrylic pouring techniques?
The five core methods are the dirty pour, flip cup, swipe, Dutch pour, and tree ring pour.
Each produces different pattern types. The flip cup and swipe techniques are most reliable for generating cells on a first attempt.
How is acrylic pouring different from resin art?
Acrylic pouring uses water-based paint on canvas or wood. Resin art uses two-part epoxy mixed with pigments, cured on rigid surfaces.
Resin produces a harder, glass-like finish but costs more and requires stricter safety precautions than standard acrylic techniques.
How do I protect a finished acrylic pour?
Apply two to three thin coats of a water-based varnish like Liquitex or Minwax Polycrylic after the pour is fully cured.
For a glass-like finish, epoxy resin works well, but the surface must be cleaned of silicone residue first using cornstarch before application.
Conclusion
This conclusion is for an article presenting acrylic pouring art as one of the most accessible fluid painting techniques available today, from dirty pour and flip cup methods to finishing with varnish or resin.
Paint viscosity, color density, and silicone oil interaction are what drive every result. Understanding those three variables puts you in control of most of the process.
Student-grade paints like Folk Art work fine to start. Upgrading to artist-grade acrylic mediums makes a noticeable difference once you know what you are doing.
The cell formation, the unpredictable color blending, the abstract patterns that look different from every angle. That is what keeps people coming back to it.
Pick a technique, mix the paint, and pour.