

Nothing destroys expensive paintbrushes faster than poor storage habits. Professional artists and weekend painters alike watch their brush collections deteriorate from simple mistakes that cost hundreds in replacements.
Proper brush care extends tool life dramatically while maintaining paint application quality. Learning how to store paintbrushes correctly protects your investment and keeps bristles performing like new for years.
This guide covers everything from immediate post-painting cleanup to long-term storage systems. You’ll discover proven techniques for different brush types, storage solutions for any budget, and common mistakes that ruin even quality brushes.
Whether you work with watercolor painting, oils, or acrylics, these storage methods will transform how you care for your painting tools.
Immediate Post-Painting Cleaning and Preparation
Quick Cleaning Techniques
Paint Removal Methods by Paint Type

The type of paint you’re using determines your cleaning approach. Oil painting requires different solvents than water-based mediums.
Oil-based paints need turpentine or mineral spirits for initial cleaning. Never use water first – it’ll push the paint deeper into the bristles. Start by wiping excess paint on a rag, then swirl brushes in solvent.
Acrylic painting cleanup is simpler but time-sensitive. Acrylics dry fast, so clean immediately after each session. Warm water works for fresh paint, but dried acrylic becomes permanent.
Watercolor painting brushes need gentle handling. Cool water prevents bristle damage, and soap removes pigment residue that can affect future color mixing.
Solvent Selection and Safety
Choose the right solvent for your paint type. Turpentine works well for oils but creates fumes – work near a window or fan.
Mineral spirits are less toxic than turpentine. They clean oil paints effectively while producing fewer vapors. Keep containers covered when not in use.
Water-based cleaners work for acrylics and watercolors. Add a drop of dish soap to break down stubborn pigments without harsh chemicals.
Brush Spinner Usage
A brush spinner removes excess liquid quickly. Hold the ferrule firmly and spin at moderate speed – too fast damages bristles.
Spin over a container to catch flying droplets. This tool works for all paint types and cuts drying time significantly.
Clean brushes first, then spin to remove cleaning solution. Follow with a final rinse if needed.
Paper Towel Blotting Techniques
Blot, don’t wipe. Dragging paper towels across bristles splays them permanently.
Press the brush flat against towels to absorb moisture. Rotate the brush to hit all sides of the bristle bundle.
Use separate towels for different color families. This prevents muddy mixes in your next painting session.
Deep Cleaning Methods
Soap and Water Washing Procedures
Regular dish soap cuts through most paint residue. Work up a lather in your palm using circular motions.
Rinse thoroughly under lukewarm water. Hot water can loosen the ferrule, while cold water doesn’t dissolve soap effectively.
Check the water running off the brush. When it runs clear, the brush is clean. This might take several soap-and-rinse cycles.
Brush Cleaning Solutions
Commercial brush cleaners work faster than soap alone. Masters Brush Cleaner removes dried paint that regular soap can’t touch.
Murphy’s Oil Soap conditions natural bristles while cleaning. It’s gentler than dish soap for expensive brushes.
The Pink Soap (specifically designed for artists) restores brush tips and removes paint buildup. Wet the brush, work in the soap, then rinse clean.
Stubborn Paint Removal
Dried paint requires patience. Soak brushes in appropriate solvent for 10-15 minutes before scrubbing.
For acrylic buildup, try isopropyl alcohol. It softens dried acrylic without damaging synthetic bristles.
Never use harsh scrapers on bristles. Instead, work cleaning solution through the paint with your fingers, starting at the ferrule.
Conditioning Treatments
Natural bristle brushes benefit from occasional conditioning. Hair conditioner keeps them soft and flexible.
Work conditioner through clean, damp bristles. Leave for 2-3 minutes, then rinse thoroughly.
Synthetic brushes don’t need conditioning, but a drop of fabric softener in the final rinse prevents static buildup.
Proper Drying Preparation

Water Removal Techniques
Gentle pressure removes excess water without damaging bristles. Press the brush between paper towels, working from ferrule to tip.
Shake brushes gently to remove trapped water. A few sharp flicks of the wrist does the job – don’t overdo it.
Blot again after shaking. This two-step process removes most moisture quickly.
Bristle Reshaping Methods
Shape bristles while they’re damp. Use your fingers to reform the original brush shape – round, flat, or angular.
Twist round brushes to a point while damp. This prevents the tip from drying splayed or bent.
For flat brushes, press the bristles flat and square off the edges. Check that all bristles lie in the same plane.
Drying Position Setup
Lay brushes flat on a clean towel. This prevents water from seeping into the ferrule and loosening the bristles.
Position them so air circulates around the bristles. Don’t stack wet brushes – they’ll develop mold or mildew.
Avoid standing wet brushes upright. Gravity pulls moisture into the ferrule, weakening the adhesive that holds bristles in place.
Time Requirements Before Storage
Most brushes dry completely in 2-4 hours at room temperature. Natural bristles take longer than synthetic ones.
Test dryness by touching the ferrule area. Any coolness indicates remaining moisture.
Completely dry brushes before long-term storage. Trapped moisture leads to mold, rust, and bristle damage.
Short-Term Storage Solutions

Daily Storage Between Sessions
Horizontal Laying Techniques
Flat storage protects brush tips during active painting periods. Use a clean cloth or paper towel as a base layer.
Space brushes so they don’t touch each other. Wet paint can transfer between brushes, contaminating colors.
Roll larger brushes in paper towels for extra protection. This prevents accidental contact with other studio materials.
Brush Rest Positioning
A proper brush rest keeps bristles off surfaces while you paint. Position it within easy reach of your palette.
Angle slots prevent brushes from rolling. The ferrule should rest in the slot with bristles extending into open air.
Clean your brush rest regularly. Paint buildup can contaminate clean brushes during storage.
Temporary Protective Covers
Plastic caps protect brush tips during short breaks. Remove them after painting to prevent trapped moisture.
Aluminum foil works as emergency protection. Shape it loosely around bristles – tight wrapping damages tips.
Never leave covers on wet brushes overnight. The trapped moisture creates perfect conditions for mold growth.
Studio Organization Systems
Designate specific areas for different brush stages – dirty, cleaning, and clean. This prevents mix-ups that can ruin brushes.
Use separate containers for each painting medium. Oil-contaminated water ruins watercolor brushes.
Label everything clearly. When you’re focused on painting, obvious organization prevents costly mistakes.
Weekly Project Storage
Brush Roll Methods
Canvas brush rolls protect multiple brushes efficiently. Lay brushes in individual slots with tips pointing the same direction.
Roll loosely to avoid crushing bristles. Tight rolling creates permanent bends that ruin brush performance.
Secure with ties, not rubber bands. Elastic can degrade and snap, potentially damaging your brush collection.
Container Storage Options
Wide-mouth jars work well for short-term storage. Choose containers slightly taller than your longest brushes.
Mason jars are ideal – they’re clear, stable, and come in various sizes. The wide opening prevents bristle contact with sides.
Avoid narrow containers that force bristles together. Compressed bristles lose their shape permanently.
Humidity Control
Monitor studio humidity levels during extended storage periods. High humidity promotes mold and rust formation.
Use silica gel packets in storage containers for problem areas. They absorb excess moisture without affecting brushes.
Dehumidifiers help in consistently damp environments. Aim for 30-50% relative humidity for optimal brush storage.
Paint Protection Strategies
Clean all visible paint before weekly storage. Even tiny amounts can harden and ruin bristles.
Check the ferrule area carefully. Paint hiding near the metal band is easy to miss but causes major problems.
Separate oil and water-based tools completely. Cross-contamination ruins water-based paint consistency.
Travel and Transport Storage

Portable Brush Cases
Hard cases protect valuable brushes during transport. Look for foam inserts that hold each brush individually.
Soft cases work for occasional travel. Choose ones with individual brush sleeves to prevent contact damage.
Size matters – cases should fit your brushes without forcing them. Bent bristles from tight cases never fully recover.
Travel Roll Techniques
Secure each brush in its own section before rolling. This prevents movement that can damage bristles during transport.
Pack additional padding around delicate natural bristle brushes. Synthetic brushes handle travel stress better.
Unroll immediately upon arrival. Extended compression can permanently deform bristles.
Protection During Movement
Never transport wet brushes. They’ll damage each other and potentially leak in your equipment.
Cushion brush cases inside larger bags. Direct impacts can break ferrules or crack handles.
Keep cases upright when possible. This minimizes stress on the bristle-ferrule connection.
Quick Setup Methods
Organize brushes by painting style or size before travel. This speeds setup at your destination.
Pack cleaning supplies separately from brushes. Leaked solvents can dissolve brush adhesives.
Pre-plan your workspace layout. Knowing where everything goes saves time and reduces brush handling.
Long-Term Storage Systems

Vertical Storage Methods
Brush Holder Designs
Vertical storage keeps bristles naturally shaped and prevents tip damage. Purpose-built holders offer the best protection for your brush collection.
Ceramic crocks work well for studio storage. Their weight prevents tipping, and the smooth interior won’t catch bristles.
Bamboo holders provide natural antimicrobial properties. The slots keep brushes separated while allowing air circulation around each brush.
Jar and Container Systems
Wide-mouth mason jars create budget-friendly vertical storage. Choose heights that accommodate your longest brushes without touching the bottom.
Glass containers let you see brush conditions at a glance. Cloudy or discolored jars indicate cleaning problems that need attention.
Separate containers by paint type. Oil painting tools shouldn’t mix with watercolor brushes – cross-contamination affects paint performance.
Wall-Mounted Solutions
Pegboard systems maximize studio space efficiently. Hook placement allows customization as your brush collection grows.
Magnetic strips hold ferrules securely without pressure on bristles. Mount them at comfortable working height for easy access.
Rail systems with sliding hooks adapt to different brush sizes. Position them near your easel for convenient brush changes during painting.
Desktop Organizers
Multi-compartment organizers keep brushes sorted by size or function. Look for designs with graduated slots for different brush lengths.
Rotating organizers work well in small studios. Turn the holder to access specific brushes without moving other tools.
Wooden organizers complement traditional studio aesthetics. Cedar varieties provide natural pest deterrence for long-term storage.
Horizontal Storage Options
Flat Drawer Systems
Shallow drawers protect brushes from dust while keeping them easily accessible. Line drawers with felt to prevent rolling and scratching.
Custom dividers organize brushes by different types of paintbrushes. Group similar shapes and sizes together for quick selection.
Label each section clearly. When you’re focused on painting, obvious organization prevents time-wasting searches.
Box Storage Techniques
Cigar boxes make excellent brush storage containers. Their flat design protects tips while providing portable organization.
Padded compartments prevent brush contact during storage. Use foam inserts or fabric dividers to create individual spaces.
Stack boxes for efficient space usage. Choose uniform sizes that nest properly without crushing stored brushes.
Padded Compartments
Foam inserts custom-cut for specific brush shapes provide maximum protection. Each brush sits in its own fitted space.
Egg crate foam works for budget solutions. Cut slots to match your brush ferrule sizes and depths.
Velvet lining prevents scratches and adds cushioning. The smooth surface won’t catch or pull bristles during removal.
Stacking Methods
Modular storage systems expand with your collection. Add levels as you acquire more brushes without reorganizing existing storage.
Ensure adequate weight distribution. Heavy brush collections can crush lower storage levels if not properly supported.
Clear containers in stacking systems let you identify contents without opening each level. This reduces handling and potential damage.
Climate-Controlled Storage
Temperature Considerations
Stable temperatures prevent handle expansion and contraction that loosens ferrules. Aim for 65-75°F for optimal brush preservation.
Avoid storage near heat sources. Radiators, heating vents, and direct sunlight can warp wooden handles and dry out natural bristles.
Cold storage areas can make brush handles brittle. Basements and unheated spaces aren’t ideal for valuable brush collections.
Humidity Management
Maintain 30-50% relative humidity for best results. Higher levels promote mold growth, while lower levels can crack wooden handles.
Hygrometers monitor moisture levels accurately. Digital versions provide precise readings and often include temperature data.
Silica gel packets absorb excess moisture in enclosed storage systems. Replace them when they stop working effectively.
Air Circulation Needs
Stagnant air promotes mold and mildew growth around stored brushes. Ensure some air movement in storage areas.
Avoid airtight containers for long-term storage. Brushes need some air exchange to prevent moisture buildup.
Small fans improve air circulation in closed storage rooms. Set them on low speed to avoid creating dust that settles on brushes.
Seasonal Adjustments
Summer humidity often requires additional moisture control. Increase silica gel usage or add small dehumidifiers to storage areas.
Winter heating can over-dry storage environments. Monitor humidity levels and add moisture sources if needed.
Check storage conditions monthly during seasonal transitions. Small adjustments prevent major brush damage from environmental changes.
Storage Tools and Equipment
Commercial Storage Products
Brush Cases and Rolls
Professional brush rolls protect valuable collections during transport and storage. Canvas versions withstand years of studio use.
Leather rolls offer premium protection for expensive natural bristle brushes. They develop character while maintaining functionality over time.
Synthetic roll materials resist moisture and clean easily. Choose versions with individual brush sleeves for maximum protection.
Standing Holders and Racks
Tiered racks display brushes while keeping them organized by size. Multiple levels maximize storage in limited studio space.
Rotating stands provide 360-degree access to brush collections. Ball bearing mechanisms ensure smooth operation even when fully loaded.
Adjustable holders accommodate different brush lengths without forcing shorter brushes to sit too low in containers.
Drawer Organizers
Modular drawer systems adapt to changing brush collections. Add or remove dividers as your painting tools evolve.
Felt-lined organizers protect brush ferrules from scratches and dings. The soft material cushions brushes during drawer movement.
Spring-loaded dividers adjust automatically to fit different brush sizes. This flexibility works well for mixed brush collections.
Professional Storage Cabinets
Multi-drawer cabinets organize large brush collections efficiently. Look for models with varying drawer depths for different brush types.
Locking mechanisms protect valuable brushes from unauthorized access. This matters in shared studio spaces or teaching environments.
Mobile cabinets roll to different work areas as needed. Sturdy casters support loaded cabinets without wobbling or jamming.
DIY Storage Solutions

Homemade Brush Rolls
Canvas fabric creates durable brush rolls at fraction of commercial costs. Use heavy-weight material that won’t tear under regular use.
Measuring and cutting individual brush pockets requires precision. Make them slightly wider than your largest brush ferrules.
Bias tape finishing prevents fraying and adds professional appearance. Choose colors that complement your studio decor.
Repurposed Containers
Coffee cans work well for large brush storage. Remove labels completely and sand rough edges smooth.
Mason jars provide clear storage with tight-fitting lids. Wide-mouth versions accommodate larger brushes without forcing.
Shoe boxes lined with fabric create organized horizontal storage. Choose sturdy boxes that won’t collapse under brush weight.
Custom Rack Construction
PVC pipe creates lightweight, customizable brush racks. Drill holes sized for your specific brush ferrules.
Wood construction offers traditional studio aesthetics. Use hardwoods that resist denting from repeated brush insertion and removal.
Metal racks provide industrial strength for heavy brush collections. Powder coating prevents rust in humid studio environments.
Budget-Friendly Options
Plastic cups in drawer organizers separate brushes by type. This simple system costs little but works effectively.
Toilet paper tubes cut to length create individual brush sheaths. Cover them with decorative paper for improved appearance.
Ice cube trays organize small detail brushes efficiently. Each compartment holds one brush securely without overcrowding.
Protective Materials
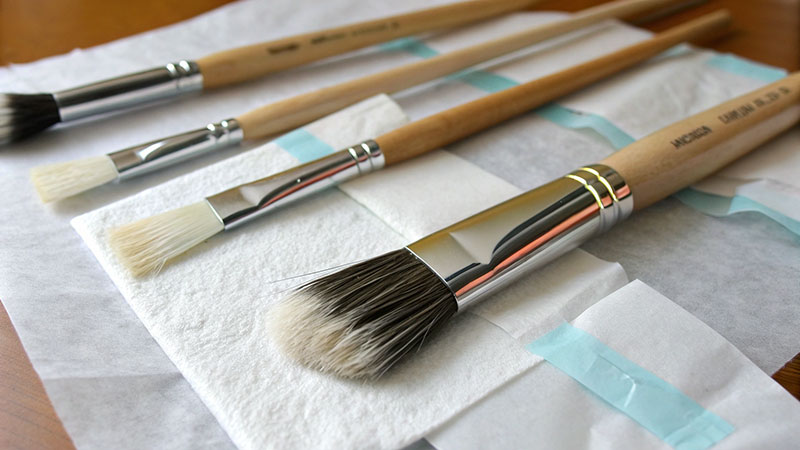
Tissue Paper Wrapping
Acid-free tissue protects valuable brushes from environmental damage. Regular tissue paper can discolor brushes over extended periods.
Wrap each brush individually for maximum protection. Overlap the paper to prevent bristles from poking through during handling.
Secure wrapping with small pieces of tape. Avoid adhesive contact with brush handles or ferrules.
Plastic Sleeve Guards
Clear plastic sleeves protect brush tips while allowing visual inspection. Choose sleeves slightly larger than brush diameter.
Perforated sleeves allow air circulation while providing protection. Solid sleeves can trap moisture around bristles.
Remove sleeves periodically to check brush condition. Long-term plastic contact can sometimes affect natural bristle brushes.
Moth Prevention
Cedar blocks deter moths naturally without harsh chemicals. Place them near but not touching stored brushes.
Lavender sachets provide pleasant fragrance while repelling insects. Replace them annually for continued effectiveness.
Diatomaceous earth creates barriers against crawling insects. Sprinkle food-grade versions around storage area perimeters.
Dust Covers
Cloth covers protect displayed brush collections from studio dust. Choose breathable fabrics that don’t trap moisture.
Custom-fitted covers look professional while providing maximum protection. Measure storage systems carefully before ordering or making covers.
Remove and wash covers regularly. Dirty covers can transfer grime to clean brushes during placement or removal.
Special Considerations by Brush Size and Type

Large Brush Storage
Space Requirements
Large brushes need proportionally bigger storage systems. Standard containers won’t accommodate 2-inch flat brushes or large wash brushes properly.
Custom storage solutions work best for oversized brushes. Build vertical holders with deeper slots or use wide-mouth containers.
Support Methods
Heavy brushes stress ferrule connections when stored vertically. Support the ferrules rather than letting brushes hang by bristles alone.
Horizontal storage often works better for large brushes. Use drawer systems with adequate depth to prevent bristle crushing.
Padded rests distribute weight evenly. This prevents pressure points that can permanently deform large brush shapes.
Weight Distribution
Balance is critical when storing heavy brush collections. Top-heavy storage systems tip over easily and damage brushes.
Wide bases provide stability for tall storage containers. Choose holders with low centers of gravity for safety.
Wall-mounted systems need secure anchoring. Large brush collections create significant weight loads that can pull mounting hardware loose.
Handle Protection
Long handles break easily when knocked over. Protective sleeves prevent cracking and splintering during storage.
Store large brushes away from high-traffic areas. Accidental contact can snap extended handles or bend ferrules.
Group similar-sized brushes together. This prevents smaller brushes from getting lost among larger tools.
Detail Brush Care
Tip Protection Techniques
Fine brush tips damage easily and rarely recover completely. Individual protective caps prevent accidental contact with other brushes.
Never store detail brushes loose in containers with larger tools. The delicate tips get crushed or bent beyond repair.
Paper sleeves create custom protection for valuable detail brushes. Cut them slightly longer than brush length for complete coverage.
Fine Bristle Preservation
Natural bristle detail brushes need extra moisture protection. Dry environments make fine bristles brittle and prone to breaking.
Store detail brushes in slightly humid conditions. Small humidity packs maintain ideal moisture levels without promoting mold.
Check detail brushes monthly for bristle condition. Early intervention prevents minor damage from becoming major problems.
Magnification Storage
Organize detail brushes where you can see them clearly. Poor visibility leads to grabbing wrong sizes and wasting painting time.
Clear storage containers work well for small brush collections. Label compartments with brush sizes for quick identification.
Adequate lighting helps during brush selection. LED strips in storage areas prevent eye strain when choosing fine tools.
Delicate Handling
Never force detail brushes into tight storage spaces. The pressure damages bristles and loosens ferrule connections.
Handle by the ferrule when possible. Gripping bristles transfers oils from your fingers and affects paint application.
Use tweezers for extremely fine brushes. This eliminates hand pressure that can damage delicate bristle arrangements.
Specialty Brush Storage

Fan Brush Positioning
Fan brushes need special storage to maintain their spread pattern. Flat storage prevents bristles from clumping together.
Individual slots sized for fan brush width work best. Standard round storage holes compress the bristles incorrectly.
Paper wrapping maintains fan shape during long-term storage. Wrap loosely to preserve the natural bristle spread.
Angular Brush Care
Angular brushes lose their chisel edge easily when stored improperly. Edge protection maintains the precise angle that makes these brushes valuable.
Store angular brushes on their sides rather than tip-down. This prevents the angled edge from flattening against container bottoms.
Custom foam inserts hold angular brushes at proper angles. Cut slots that match each brush’s specific angle and size.
Palette Knife Storage
Flexible palette knives bend easily when stored with heavier tools. Separate storage prevents damage from weight pressure.
Magnetic strips hold palette knives securely without stress on the blade. Position strips to support the tang, not the flexible blade area.
Blade guards prevent accidental cuts during storage access. Rubber or plastic covers slip over knife edges safely.
Mixed Media Tools
Different tool materials require different storage approaches. Metal tools need rust prevention, while wood handles need moisture control.
Separate storage by material type prevents chemical interactions. Some metal cleaners can damage wooden handles on nearby tools.
Climate control becomes more complex with mixed materials. Find storage conditions that work for all tool types in your collection.
Maintenance During Storage

Regular Inspection Schedule
Monthly Check Procedures
Inspect stored brushes monthly for signs of damage or deterioration. Early detection prevents minor problems from becoming major ones.
Check ferrule tightness by gently wiggling bristle bundles. Loose ferrules need immediate attention before bristles fall out.
Look for pest activity around storage areas. Moths and other insects can damage natural bristle brushes significantly.
Damage Assessment
Document brush conditions during inspections. Photo records help track deterioration patterns over time.
Test brush flexibility by gently bending bristles. Brittle or inflexible bristles indicate environmental problems.
Examine handles for cracks or splits. Wood damage often starts small but spreads quickly if ignored.
Cleaning Touch-ups
Remove dust buildup with soft brushes or compressed air. Accumulated debris can harbor pests and moisture.
Spot-clean handles with appropriate materials. Wood handles need different care than plastic or metal versions.
Address paint residue immediately. Dried paint becomes increasingly difficult to remove as time passes.
Reorganization Timing
Reassess storage systems quarterly as brush collections change. New acquisitions may require different organization approaches.
Seasonal reorganization helps adapt to changing studio conditions. Temperature and humidity fluctuations affect storage needs.
Replace worn storage materials before they damage brushes. Frayed fabric dividers can catch and pull bristles.
Preventive Care
Moth and Pest Prevention
Cedar blocks deter moths naturally without harsh chemicals that might affect brush materials.
Regular vacuuming around storage areas removes potential pest food sources. Pay attention to corners and hidden spaces.
Sealed storage containers provide barrier protection against flying insects. Ensure containers still allow some air circulation.
Moisture Control
Monitor humidity levels in storage areas with reliable hygrometers. Sudden changes indicate ventilation problems.
Silica gel packets absorb excess moisture in enclosed storage systems. Replace them when they stop working effectively.
Ventilation fans help maintain consistent air circulation. Set them on low speeds to avoid creating dust problems.
Bristle Conditioning
Natural bristle brushes benefit from occasional conditioning treatments. Hair conditioner keeps them flexible and responsive.
Apply conditioner sparingly to clean, damp bristles. Work it through gently, then rinse thoroughly.
Never condition synthetic brushes. The treatment can make synthetic bristles too soft for effective paint application.
Handle Maintenance
Wood handles need periodic treatment with appropriate oils. Linseed oil works well for most wooden brush handles.
Apply oil sparingly with soft cloths. Excess oil can seep into ferrules and loosen bristle attachments.
Plastic handles need only occasional cleaning with mild soap. Harsh cleaners can cloud or crack plastic surfaces.
Restoration Techniques
Bent Bristle Repair
Steam treatment can restore shape to bent natural bristles. Hold brushes in steam for 30 seconds, then reshape immediately.
Never use direct heat sources like hair dryers. High temperatures can melt synthetic bristles or damage natural ones permanently.
Work with bristles while they’re warm and pliable. Once cooled, the new shape becomes more permanent.
Loose Ferrule Fixes
Epoxy adhesive can secure loose ferrules temporarily. Clean all old adhesive before applying new bonding agents.
Clamp repaired brushes until adhesive cures completely. Premature use can cause ferrules to separate again.
Professional brush repair services handle valuable brush restoration. Consider professional help for expensive natural bristle brushes.
Handle Refinishing
Sand damaged wood handles lightly before applying new finish. Start with fine grits to avoid removing too much material.
Match original finish types when possible. Oil finishes penetrate wood, while lacquer sits on the surface.
Allow complete curing time before using refinished brushes. Uncured finishes can transfer to paintings.
When to Replace
Evaluate repair costs against replacement value. Sometimes buying new brushes makes more economic sense.
Ferrule separation often signals end-of-life for brushes. Once the bond fails completely, repairs rarely last long.
Keep damaged brushes for rough work if they’re still functional. Texture brushes and experimental work don’t require perfect tools.
Common Storage Mistakes and Solutions
Bristle Damage Prevention
Tip Crushing Avoidance
Standing brushes tip-down destroys brush points permanently. The bristles bend under the brush’s weight, creating flat or splayed tips.
Store brushes horizontally or in holders that support the ferrule. Never let bristles bear the weight of the entire brush.
Check storage containers for adequate depth. Shallow containers force bristles to touch the bottom, causing constant pressure damage.
Splaying Prevention
Overcrowded storage causes bristles to push against each other. Individual storage spaces prevent this common problem.
Round brushes lose their points when compressed sideways. Use slots or tubes sized for each brush to maintain proper shape.
Remove brushes carefully from tight spaces. Yanking them out pulls bristles in different directions and ruins the tip formation.
Pressure Point Elimination
Hard surfaces create permanent dents in soft bristles. Line storage containers with felt or foam to cushion contact points.
Avoid stacking brushes directly on top of each other. The weight creates pressure marks that show up in paint application.
Rubber bands and tight clips damage ferrules and bristles. Use loose ties that hold without crushing the brush structure.
Support Positioning
Support brushes at their balance point, not at the extremes. Ferrule support distributes weight properly without stressing bristles or handles.
Wall-mounted holders should cradle the ferrule area. Hanging brushes by their handles stresses the ferrule connection.
Adjustable supports accommodate different brush sizes without forcing improper positioning. One-size-fits-all holders rarely work well.
Environmental Hazards
Heat Source Avoidance
Direct sunlight warps wooden handles and dries out natural bristles beyond recovery. Position storage away from south-facing windows.
Heating vents create hot, dry conditions that crack handles and make bristles brittle. Find cooler locations for brush storage.
Radiators and space heaters generate extreme temperature fluctuations. These changes repeatedly expand and contract brush materials, causing failures.
Direct Sunlight Protection
UV radiation degrades both natural and synthetic bristle materials. Covered storage prevents sun damage completely.
Even indirect sunlight can cause problems over time. Consider window treatments in studios with extensive natural light.
Rotate exposed brush collections periodically. This prevents uneven fading and deterioration from consistent light exposure.
Moisture Prevention
Damp basements promote mold growth on natural bristles and rust formation on ferrules. Choose dry storage locations above ground level.
Bathroom storage exposes brushes to humidity spikes from showers. The moisture swells wooden handles and loosens ferrule bonds.
Kitchen storage near dishwashers and sinks creates similar humidity problems. Steam and splashing water damage brush materials gradually.
Chemical Exposure Risks
Cleaning solvents stored near brushes can off-gas and damage bristle materials. Separate chemical storage from brush collections.
Paint fumes affect stored brushes over time. Ventilate studios well and avoid storing clean brushes near active painting areas.
Adhesives and glues emit vapors that can make bristles sticky or stiff. Keep these materials in different storage areas.
Organization Pitfalls
Overcrowding Issues
Too many brushes in one container leads to bristle damage and difficulty accessing specific tools. Expand storage as collections grow.
Cramped conditions make brush selection frustrating and time-consuming. Adequate spacing improves studio workflow significantly.
Overcrowded drawers trap brushes underneath others. This creates pressure damage and makes inventory management impossible.
Mixed Paint Contamination
Oil and water-based brushes stored together create contamination problems. Separate storage systems prevent paint compatibility issues.
Even cleaned brushes retain microscopic paint residues. Cross-contamination affects color purity in subsequent painting sessions.
Label storage areas clearly by paint type. Rushed painters often grab wrong brushes when systems aren’t obvious.
Size Sorting Importance
Random brush organization wastes time during painting sessions. Group similar sizes together for quick selection.
Progressive sizing from small to large creates intuitive organization. This system works well for both horizontal and vertical storage.
Mix brushes by function rather than just size. Detail work brushes, wash brushes, and texture brushes serve different purposes.
Access Problems
Deep storage containers hide brushes at the bottom. Tiered systems keep all brushes visible and accessible.
High shelves require step stools and increase dropping risks. Position frequently used brushes at comfortable working heights.
Locked storage protects valuable brushes but slows workflow. Balance security needs with practical access requirements.
FAQ on How To Store Paintbrushes
Should I store paintbrushes vertically or horizontally?
Store brushes horizontally for best results. Vertical storage can allow water to seep into the ferrule, loosening bristles. Horizontal positioning protects brush tips and prevents moisture damage. Use flat surfaces or drawer systems for optimal brush preservation.
How do I store wet paintbrushes overnight?
Never store wet brushes long-term. Clean immediately with appropriate solvents, reshape bristles while damp, then lay flat to dry completely. For short breaks, use brush rests that keep bristles elevated off surfaces.
What’s the best way to store natural bristle brushes?
Natural bristle brushes need climate control and individual protection. Store in 30-50% humidity with stable temperatures. Use tissue paper wrapping or individual sleeves. Condition occasionally with hair conditioner to maintain flexibility and prevent brittleness.
Can I store oil and watercolor brushes together?
Separate storage prevents cross-contamination. Oil residues can ruin watercolor brushes permanently. Use different containers or clearly labeled sections. Even microscopic paint traces affect color purity in future painting sessions, especially with watercolor painting techniques.
How do I prevent moths from damaging stored brushes?
Use cedar blocks or lavender sachets near storage areas. These natural deterrents repel moths without harsh chemicals. Check brushes monthly for pest activity. Store in sealed containers if moth problems persist in your studio area.
What storage mistakes ruin paintbrushes fastest?
Tip-down storage destroys brush points permanently. Other killers include overcrowding, extreme temperatures, and storing wet brushes. Cross-contamination between paint types also damages brush performance. Avoid rubber bands that compress ferrules and cause bristle loss.
Should I use plastic caps on stored brushes?
Remove plastic caps after painting sessions. Trapped moisture promotes mold growth and ferrule rust. Use caps only during active painting for temporary protection. For long-term storage, choose breathable covers or open-air systems instead.
How often should I check stored brushes?
Inspect brush collections monthly for damage signs. Look for loose ferrules, bent bristles, or pest activity. Quarterly deep cleaning prevents paint buildup. Regular maintenance catches problems early before they become irreparable brush damage.
What’s the ideal storage temperature for paintbrushes?
Maintain 65-75°F with stable conditions. Avoid heat sources, direct sunlight, and cold basements. Temperature fluctuations expand and contract materials, loosening ferrules. Consistent climate control extends brush life significantly while preserving bristle responsiveness.
How do I organize a large brush collection?
Group brushes by size and function rather than randomly. Use modular storage systems that expand with growing collections. Label sections clearly by paint type. Keep frequently used brushes at comfortable working height for easy access.
Conclusion
Mastering how to store paintbrushes transforms your art practice from frustrating tool failures to consistent creative flow.
Proper storage systems protect investments while maintaining brush performance across different painting mediums and techniques.
The fundamentals remain simple: clean thoroughly, dry completely, and store appropriately for each brush type.
Whether you’re preserving expensive natural bristles or organizing synthetic brush collections, consistent care routines prevent costly replacements.
Artist workspace organization extends beyond mere tidiness. Smart storage solutions improve workflow efficiency while protecting delicate bristles from environmental damage, pest infiltration, and accidental contact with other studio materials.
Professional artists understand that brush longevity directly impacts creative output quality.
Small investments in proper storage containers, climate control, and maintenance schedules pay dividends through extended tool life and reliable paint application performance throughout your artistic journey.


