Run your finger along a Van Gogh reproduction and you’ll feel nothing. Stand in front of the real thing and the paint practically reaches out at you.
That physical presence is impasto. And it’s not reserved for oil painters or museum-level work.
Understanding what impasto is in acrylic painting opens up a technique that adds real tactile texture, surface relief, and light interaction to your work. Acrylics handle it differently than oils, with faster drying times, different mediums, and specific support requirements that affect how the raised paint surface holds up long-term.
This article covers the full picture: the technique itself, the right tools and acrylic mediums, how to build and finish impasto work, and the artists who defined it.
What is Impasto in Acrylic Painting

Impasto in acrylic painting is a technique where paint is applied thickly enough that it physically stands off the surface. The dried result is tactile. You can see the ridges, feel the peaks, and watch light shift across the raised paint surface depending on where you’re standing.
The word comes from Italian. “Impasto” translates literally to “dough” or “paste,” derived from the verb impastare, meaning to knead. That etymology is actually pretty accurate to the process.
Heavy body acrylic works best here. Standard fluid acrylics are too thin to hold any raised paint surface once dry. The goal is a paint consistency that retains the shape it was applied in, including brush marks, palette knife ridges, and directional strokes.
Acrylic impasto is not the same as simply using a lot of paint. The distinction matters. Impasto is intentional, the texture is part of the composition, not a byproduct of heavy-handed brushwork. The raised surface relief becomes a visual and structural element of the piece itself.
According to Future Market Insights, heavy body acrylics hold a 54.2% share of the acrylic paint market in 2025, largely because of demand for textured and layered techniques like impasto.
How Impasto Differs from Standard Acrylic Application

Most acrylic painting techniques aim for a flat or lightly textured surface. Glazing, blending, washing – these all keep the paint relatively thin. Impasto does the opposite on purpose.
Key structural differences:
- Paint volume: Standard application sits flat. Impasto builds up millimeters of raised material above the support surface.
- Tool marks: In flat painting, marks are smoothed out. In impasto, palette knife lines and brush ridges are left visible and are part of the result.
- Light behavior: A flat acrylic surface reflects light uniformly. A raised impasto surface catches and deflects light differently depending on angle, creating shadows within the paint itself.
- Drying behavior: Thin layers dry in minutes. Thick impasto layers can take hours to days depending on paint volume and humidity.
There is a common misconception that any thick paint equals impasto. It does not. Overloading a brush and laying down a sloppy stroke is not impasto. The technique requires intent.
Think about what separates someone painting like Van Gogh from someone who just loaded the brush too much. One controls direction, pressure, and surface relief. The other just has a mess.
| Application Type | Surface Result | Light Effect | Drying Time |
|---|---|---|---|
| Standard acrylic | Flat, minimal texture | Uniform reflection | Minutes |
| Light impasto | Visible brushwork, low relief | Soft shadow variation | 1-3 hours |
| Heavy impasto | Bold ridges, sculptural peaks | Strong directional shadow | Hours to days |
Tools Used for Impasto in Acrylic Painting
Tool choice in impasto is not cosmetic. It directly controls what texture pattern gets locked into the surface when the paint dries.
Palette Knives

The most common impasto tool. A palette knife has a flat or slightly angled metal blade with no bristles. Because of this, it picks up large amounts of paint and deposits it cleanly, leaving sharp ridges and defined edges.
Trowel-shaped knives work well for broad coverage and layering. Narrower knives give tighter, more controlled lines. You can drag, press, scrape, or flick. Each motion leaves a different mark.
Liquitex and Golden both sell dedicated palette knife sets designed for heavy body work. Worth noting: cheap plastic knives flex too much and don’t deposit paint evenly. Metal is better.
Stiff Bristle Brushes
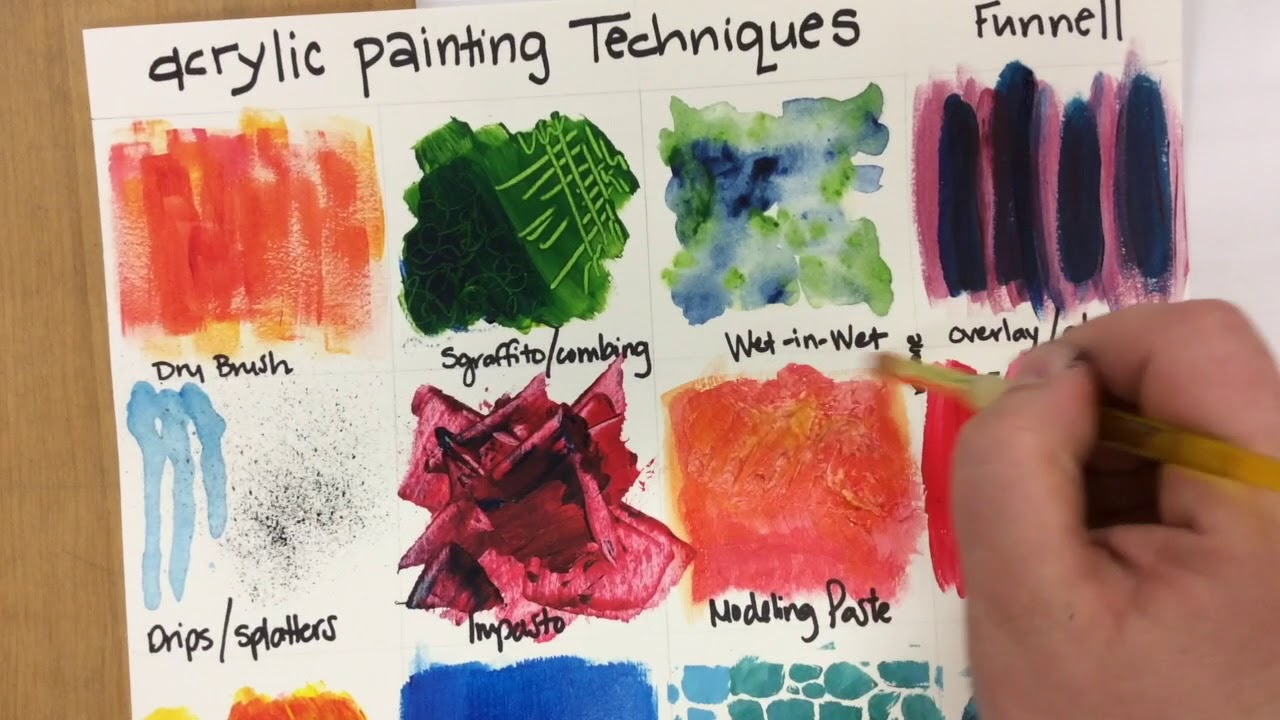
Hog hair and synthetic stiff brushes can hold enough paint for impasto if loaded well. They leave a distinctly different mark than a knife, because the bristles create parallel ridges within each stroke rather than a single clean edge.
Fan brushes create fine textural effects within thicker paint layers. Flat stiff brushes work well for directional impasto strokes in landscapes, particularly grass, water movement, and sky texture.
A brush vs. knife rule of thumb: knives for bold structural texture, brushes for directional movement within the paint surface.
Unconventional Applicators
Silicone tools, credit cards, palette scraper blades, and even fingers all get used for impasto work. Each leaves a different surface pattern.
- Silicone tools: smooth, smear-based texture with soft edges
- Card edges: sharp pull lines across the surface
- Fingers: broad, unpredictable marks with natural variation
A lot of contemporary palette knife painters on YouTube use modified tools or hardware-store putty knives. Works fine, honestly.
Acrylic Mediums and Additives for Impasto
Pure acrylic paint used alone for impasto has a problem: it shrinks as it dries. Water evaporates from the paint film, and the raised texture can flatten out by 20-30% or more depending on paint quality and application thickness. Mediums fix this.
Heavy Gel and Extra Heavy Gel
The most widely used impasto mediums for acrylics. Heavy gel medium from Liquitex, Golden, and Winsor & Newton adds body to paint without reducing color strength. Mixed at roughly 1:1 with paint, it holds peaks well after drying. Extra heavy gel takes this further, with a consistency closer to stiff butter.
Golden’s Extra Heavy Gel (Gloss or Matte) is probably the most referenced product in this category among professional painters. It dries clear, holds texture reliably, and doesn’t crack under normal conditions.
Mixing ratio matters. Too much gel dilutes pigment and shifts the color. Too little and you’re back to the shrinkage problem. Most working artists land around 50/50 as a starting point and adjust from there.
Modeling Paste vs. Heavy Gel Medium
These two get confused a lot. They are different products with different outcomes.
| Property | Modeling Paste | Heavy Gel Medium |
|---|---|---|
| Finish | Matte, opaque | Gloss or matte options |
| Flexibility | Less flexible, can crack on canvas | More flexible, safer on canvas |
| Best support | Rigid boards, wood panel | Canvas and rigid surfaces |
| Texture depth | Very high, holds sharp detail | High, slightly softer edges |
Modeling paste is the better choice for very heavy, sculptural texture on a rigid support. Heavy gel medium is safer on stretched canvas because it stays flexible after curing.
Using modeling paste on unstretched or lightweight canvas is a known cause of cracking. I’ve seen this go wrong enough times that it’s worth stating plainly: match the medium to your support.
Specialty Impasto Mediums
Brands like Liquitex and Golden sell products specifically labeled as “impasto medium.” These are usually silica or calcium carbonate-based, opaque white, and designed to add bulk without the cost of using straight paint. They keep texture well, are cheaper per volume than heavy gel, and work for underpainting layers before color application.
The tradeoff: they affect color mixing slightly differently than gel. Some painters dislike the matte white base. It depends on how you’re working.
Techniques for Building Impasto Texture
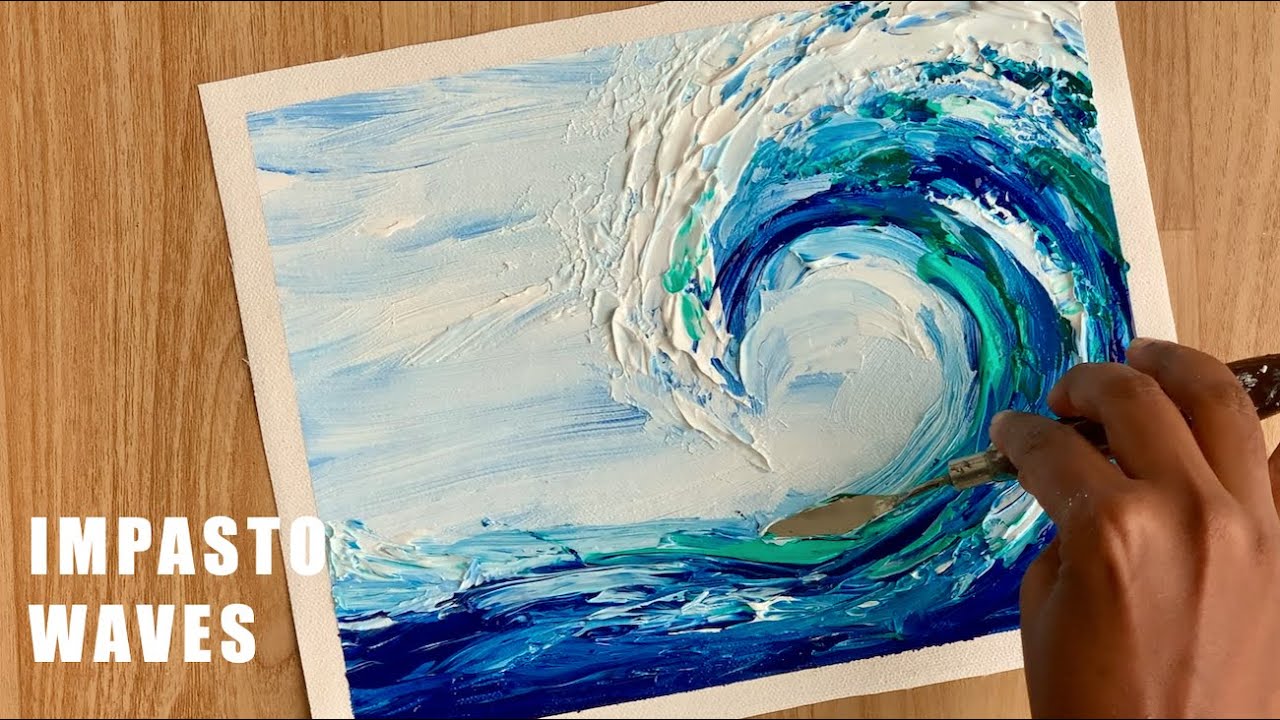
There is no single right method. But there are approaches that work consistently and mistakes that waste paint and time.
Loading and Applying with a Palette Knife
Loading a palette knife correctly is the most common beginner problem. Most people don’t load enough paint. For real impasto texture, you need a thick bead of paint sitting on the flat edge of the knife.
Basic knife application approaches:
- Drag stroke: Pull the loaded knife flat across the surface in one direction. Leaves a smooth-ish layer with a sharp lifted edge at the end.
- Press and lift: Press the knife flat onto the surface and pull straight up. Creates a peak. Van Gogh-style dots are done this way.
- Scrape back: Apply a thick layer, then drag a clean knife back across it to reveal lower layers. Creates depth in a single session.
Angle matters. A knife held at roughly 30-45 degrees to the canvas deposits paint more cleanly than one held perpendicular, which tends to smear.
Wet-Into-Wet vs. Layered Drying

Wet-into-wet impasto means applying paint directly into still-wet previous layers. This blends colors on the surface and can create interesting color mixing within the texture. The tradeoff is loss of sharp definition, as peaks partially merge.
Layered drying is slower but gives cleaner structural texture. Each layer is fully dry before the next is applied. This lets you build height without the lower layers collapsing. For layering acrylic paint in impasto specifically, thin fast-drying layers as a base, then build up with progressively thicker applications on top.
Most experienced palette knife painters use a combination. Fast wet-into-wet for large background areas, layered approach for foreground focal points where texture clarity matters most.
Underpaintings Before Impasto
Starting impasto directly on raw gesso is fine for small pieces. For larger works, an underpainting helps. A thin color layer blocked in first gives visual reference while applying thick paint on top. Since thick impasto often covers the support completely, knowing where your values sit before going in heavy makes color placement more deliberate.
I always do a value underpainting first on anything larger than 12×12 inches. It just keeps things from going sideways once the palette knife comes out.
Surfaces and Supports for Impasto Acrylic Work

Heavy impasto applies serious physical stress to the support. Choosing the wrong surface is probably the most common reason impasto cracks or falls apart over time.
Canvas Considerations
Not all canvas handles impasto equally. Lightweight canvas (under 8 oz) flexes too much as it dries, and that movement causes cracking in heavy paint layers. Medium to heavyweight canvas (10 oz and above) works better.
Stretched canvas with deep bars handles flex better than shallow-bar stretchers. Even so, canvas is always second choice to rigid supports for very heavy impasto work. The paint wants a stable surface. Canvas moves.
According to industry data, specialty canvas and high-grade paper sales grew by about 11% in 2023 as studio and plein air painting activity increased (Industry Research Biz, 2025). More artists are making support decisions more deliberately as techniques like impasto become more widely taught online.
Rigid Supports
Wood panel, MDF, and hardboard are the preferred supports for serious impasto work. They don’t flex. The paint dries against a stable surface, and thick layers cure without the stress fractures that canvas movement creates.
Support options compared:
- Birch plywood panel: Lightweight, strong, takes gesso well. Good for medium-heavy impasto.
- MDF board: Dense, very stable, slightly heavier. Excellent base for very thick impasto layers.
- Hardboard (Masonite): Smooth side takes gesso cleanly. Popular with palette knife painters for large works.
- Cradled wood panel: Best option overall for heavy impasto. The cradle structure prevents warping under thick paint weight.
Painting on wood panels for impasto work is one area where the extra cost is actually worth it. A cracked impasto painting on cheap canvas is not recoverable.
Priming for Impasto
The gesso primer layer matters more for impasto than for any other acrylic technique. Thin or single-coat gesso gives the heavy paint less to grip. Two to three coats of gesso, lightly sanded between coats, gives the support the tooth needed for impasto adhesion.
Some painters add a layer of modeling paste directly to the support as an additional textured base before any paint is applied. This is optional but works well for very deep sculptural impasto.
Drying and Curing Behavior of Acrylic Impasto
Acrylic impasto dries from the outside in. A skin forms on the surface first, sometimes within an hour for medium-thickness applications, while the paint underneath stays wet much longer than it looks.
This is probably the most misunderstood thing about thick acrylic work. Touch-dry and fully dry are completely different states.
Drying Time Expectations
Golden Artist Colors technical notes confirm that thick acrylic films can take a full day or more just to skin over, and full drying of the interior takes considerably longer depending on paint depth, humidity, and airflow.
General drying ranges for acrylic impasto:
- Light texture (under 2mm): touch-dry in 1-3 hours, fully dry in 24-48 hours
- Medium build (2-5mm): skin forms in several hours, full dry in 2-7 days
- Heavy sculptural impasto: Golden recommends waiting a week or two before any isolation coat or varnish
PlasticRanger research notes that high humidity above 70% can double or triple normal drying times, while low humidity below 40% speeds the process noticeably. Studio temperature between 70-80°F is optimal.
Shrinkage and Cracking
Acrylics shrink as they dry. Water leaves the paint film through evaporation, and that volume loss pulls the surface inward. With thin layers, shrinkage is negligible. With heavy impasto builds, shrinkage can flatten peaks and blur defined edges.
Main cracking causes:
- Applying a fast-drying top layer over a still-wet interior
- Wrong medium ratio (too little gel, too much water dilution)
- Using modeling paste on flexible canvas without a rigid base layer
The “crust over wet interior” problem is what ruins most fast-moving impasto sessions. A palette knife dragged through paint that looks dry one day later will reveal wet material underneath. This traps moisture and causes surface failure.
Dry vs. Cured: Why the Difference Matters
Dry to touch means the surface skin has formed.
Fully cured means all water and coalescent solvents have left the paint film, and the acrylic polymer has fully formed its structural bonds. According to PlasticRanger, full cure for standard acrylic can take 24 hours to 30 days depending on layer thickness and conditions.
Varnishing before full cure traps remaining moisture and causes cloudiness in the final varnish layer. This is a common and frustrating mistake. Once it happens, the only fix is removing the varnish entirely.
Finishing and Varnishing Impasto Acrylic Paintings
Varnishing impasto is trickier than varnishing a flat acrylic surface. The raised texture creates physical obstacles: peaks that catch brush bristles, valleys that pool liquid varnish, and recessed areas that a brush can’t always reach.
Getting this step right matters. A poorly varnished impasto painting looks uneven, with glossy patches in the recesses and matte peaks where the varnish couldn’t settle properly.
When to Varnish
Golden’s Varnish Application Guidelines state clearly: for thick impasto areas, wait one to two weeks before applying an isolation coat or varnish.
For very heavy builds, three to six weeks is safer. The back-of-the-canvas cold test helps: if the canvas feels cool to the touch on the reverse side, water is still in the paint. Don’t varnish yet.
Spray vs. Brush Varnish for Textured Surfaces

Golden’s technical team and Jackson’s Art Blog both recommend spray varnish for impasto specifically, because it doesn’t pool in valleys the way brush application does.
| Method | Best For | Main Risk |
|---|---|---|
| Spray varnish | Heavy impasto, deep texture | Thin coverage, needs 3-4 coats |
| Brush varnish | Flat to lightly textured surfaces | Pools in valleys, brush drag marks |
| Stippling brush | Medium texture, controlled coverage | Slower application, more effort |
Spray from at least 30cm away. Too close and you deposit too much varnish at once, which creates blobs and bubbles as it dries. Multiple thin coats outperform one thick application every time.
Isolation Coat Before Varnishing
An isolation coat is a permanent, non-removable clear layer applied between the paint and the final varnish. For impasto work, it’s particularly useful because it protects paint layers if the final varnish ever needs removal or replacement.
For textured impasto surfaces, apply isolation medium slightly thicker than usual (roughly 1.5-2.5mm) to ensure recessed areas are covered and high peaks have adequate protection. Golden Soft Gel Gloss diluted 2:1 with water is the standard recommendation.
Wait 24-72 hours after the isolation coat before applying final varnish.
UV Protection for Raised Surfaces
The peaks of impasto texture receive more direct UV exposure than a flat painted surface. Over time, this causes faster fading in raised areas than in the recesses, creating an uneven color shift across the painting.
A UV-protective varnish with UVLS (UV light stabilizers) addresses this. Products like Golden’s Archival Varnish with UVLS or Liquitex’s Soluvar Varnish with UV protection are worth using on any impasto work that will be displayed in a well-lit or sun-exposed environment.
Notable Artists Known for Impasto Technique
Impasto has appeared across every major movement in Western painting since the 16th century. The technique connects painters as different in style as Titian and Jackson Pollock, which says something about how fundamental the raised paint surface has been as an expressive tool.
Understanding how specific artists used impasto gives practical context that pure technique guides don’t provide.
Vincent van Gogh

The most referenced impasto painter by far. Van Gogh used thick, directional paint application not just for texture but to convey emotional intensity. His brushstrokes in works like Starry Night (1889) are themselves compositional elements, creating the swirling movement visible in the sky.
He sometimes squeezed paint directly from the tube onto the canvas. No palette knife, no medium. Just pure pigment pressed into the surface with a brush or his fingers.
What makes his impasto distinct: the marks are always directional and intentional, following the forms he was depicting rather than being applied randomly for general texture effect.
Frank Auerbach and Leon Kossoff
Both were central figures in the School of London and both took impasto further than almost any other painters of the 20th century.
Frank Auerbach (1931-2024) built paint layers so thick on some works that his surfaces reportedly never fully dried. According to Tate and Luhring Augustine gallery, his technique involved daily sessions of heavy paint application followed by complete scraping down, building up over weeks or months until the composition satisfied him.
Leon Kossoff (1926-2019) worked similarly: dense, gestural impasto across figurative subjects, with a palette of greys and browns that made the physical presence of the paint itself carry the emotional weight. His work is held in MoMA, the Metropolitan Museum of Art, and the Tate.
What both demonstrate: impasto as process, not just surface. The accumulation of paint layers was part of how they thought through a painting.
Impressionist Use of Impasto
Impasto became a defining feature of Impressionist painting in the late 19th century. Claude Monet used thick, decisive brushwork to capture moving light on water in the Water Lilies series. His approach was architectural: impasto applied in structured layers to build surface relief.
Edgar Degas and Renoir also used impasto selectively, particularly to emphasize light sources and texture in fabric.
The Impressionist use of thick paint was partly practical. Working outdoors, often quickly, applying paint directly from the tube without extended blending was faster. The resulting texture became a stylistic signature rather than a limitation.
Abstract Expressionism and Contemporary Work
Jackson Pollock and Willem de Kooning used impasto as part of a broader push to make the physical act of painting visible. For them, thick paint was evidence of gesture, the trace of the artist’s movement recorded in the surface.
De Kooning’s expressionist painting technique involved heavily loaded brushes and palette knives applied at speed, creating surfaces where color and texture were inseparable.
Today, palette knife painters with large followings on YouTube and Instagram carry the same approach into acrylic work. Artists like Erin Hanson work in oil impasto on a large scale, building thick surfaces with structured underpaintings before committing to the final texture layer. The acrylic equivalent is alive and growing, particularly as heavy body acrylics and gel mediums have made the technique more accessible and significantly faster to execute than oil.
Art Paints market data shows acrylic paints surged 42% in global volume between 2022 and 2023 (360 Research Reports, 2024), with mixed-media and textured techniques growing by 25% over the same period. Impasto is a significant part of that growth.
FAQ on What Is Impasto In Acrylic Painting
What does impasto mean in acrylic painting?
Impasto is a technique where paint is applied thickly enough to stand off the surface. The word comes from Italian, meaning “paste” or “dough.” In acrylics, the result is a raised, tactile surface where brush and palette knife marks stay visible after drying.
Can you do impasto with regular acrylic paint?
Standard acrylics are too thin to hold peaks reliably. Heavy body acrylic works much better. For regular acrylics, mix in a heavy gel medium or modeling paste to add enough body to retain texture after the water evaporates from the paint film.
What medium do you add to acrylic paint for impasto?
Heavy gel medium is the most common choice. Brands like Liquitex, Golden, and Winsor and Newton all make extra heavy gel formulas. Modeling paste works well too, though it’s less flexible and better suited to rigid supports like wood panel than stretched canvas.
Does acrylic impasto crack over time?
It can, but usually because of avoidable mistakes: using modeling paste on flexible canvas, applying fast-drying layers over wet interiors, or skipping rigid support for very thick builds. With correct materials and supports, acrylic impasto stays stable far longer than oil impasto typically does.
How long does acrylic impasto take to dry?
Light texture dries to the touch in a few hours. Heavy sculptural builds can take days to fully cure inside. Golden Artist Colors recommends waiting one to two weeks before varnishing thick impasto areas to avoid trapping moisture under the final protective layer.
What tools do you use for impasto in acrylic painting?
A palette knife is the most common tool. It deposits thick paint cleanly and leaves sharp ridges. Stiff hog hair brushes create directional texture within strokes. Silicone tools, card edges, and even fingers all work depending on the mark you want.
What is the difference between impasto in oil and acrylic?
Oil impasto holds peaks without shrinking but takes months to fully cure and can crack as it ages. Acrylic impasto dries faster and stays more flexible long-term. The tradeoff is that acrylics shrink slightly as they dry, so gel mediums are needed to maintain texture height.
What surface is best for acrylic impasto painting?
Rigid supports like wood panel, MDF, or cradled board are best for heavy impasto work. They don’t flex as the thick paint dries, which reduces cracking risk. Stretched canvas works for lighter texture but can cause problems with very thick paint buildup over time.
Which famous artists used impasto technique?
Van Gogh’s famous paintings are the most referenced examples. Rembrandt, Monet, and Titian all used it across different periods. In the 20th century, Frank Auerbach, Leon Kossoff, Jackson Pollock, and Willem de Kooning pushed the technique toward extreme sculptural and gestural territory.
How do you varnish an impasto acrylic painting?
Spray varnish is better than brush application on textured surfaces. A brush pools liquid in the recesses and drags across peaks unevenly. Apply multiple thin spray coats rather than one thick pass. Always apply an isolation coat first and wait until the paint is fully cured.
Conclusion
This conclusion is for an article presenting what is impasto in acrylic painting, a technique that rewards patience and deliberate material choices far more than raw talent.
The right heavy body acrylic, the correct support, and a proper understanding of drying and curing behavior determine whether your raised paint surface holds its shape or cracks over time.
Palette knife application, gel medium ratios, and rigid supports are not optional details. They are what separates durable acrylic texture painting from work that deteriorates within a few years.
Study how artists like Auerbach and Van Gogh used directional brushstrokes and paint volume as expressive tools, not decorative ones.
Apply that thinking to your own process, and impasto stops being a technique and starts being a language.