A single brushstroke can capture the essence of a cardinal’s brilliant red crest or the delicate curve of a sparrow’s wing. Learning how to paint birds opens up a world of artistic possibilities that challenges both technical skill and creative observation.
Birds present unique painting challenges that differ significantly from other wildlife subjects. Their complex feather structures, diverse color patterns, and dynamic poses require specific techniques and understanding.
Whether you’re working in watercolor, oils, or acrylics, this guide provides practical methods for painting both resting and flying birds. You’ll master essential skills including feather painting techniques, accurate color mixing for different species, and creating convincing bird anatomy.
From setting up your workspace with the right brushes and paints to capturing the intricate details of bird eyes and wing structures, these techniques will transform your avian art. You’ll learn to paint everything from backyard songbirds to majestic raptors with confidence and accuracy.
Essential Painting Supplies and Setup

Choosing Your Medium
The foundation of successful bird painting starts with selecting the right painting mediums. Each medium offers distinct advantages for capturing avian subjects.
Watercolor excels at creating soft, translucent feather effects and atmospheric backgrounds. The medium flows naturally, mimicking how light filters through delicate wing membranes.
Oil painting allows extended working time for blending subtle color transitions. You can build up rich, luminous layers that capture the depth of bird plumage.
Acrylic painting dries quickly and offers vibrant colors perfect for tropical bird species. The medium works well for both detailed feather work and bold background washes.
Paint Selection for Avian Art
Your palette needs both primary colors and specialized pigments for realistic bird painting. Start with quality reds, blues, and yellows as your foundation.
Burnt umber and raw sienna create natural brown tones found in sparrow and finch plumage. Payne’s gray mixed with white produces the subtle grays in dove and pigeon feathers.
Add cadmium orange for robin breasts and ultramarine blue for blue jay crests. These pure pigments can’t be mixed accurately from other colors.
Brush Types for Feather Work
Detail brushes with fine points handle intricate feather patterns and eye details. Round brushes sizes 0-4 work best for small songbirds.
Flat brushes lay in broad color areas and background washes efficiently. They’re perfect for initial color blocking and sky treatments.
Fan brushes create natural feather textures when dragged lightly across the surface. This technique works especially well for soft down feathers on bird bellies.
Canvas and Surface Preparation
Smooth surfaces work better than heavily textured canvases for bird painting. Fine detail gets lost in rough canvas weave.
Priming a canvas with quality gesso creates the ideal painting surface. Two thin coats beat one thick application every time.
For watercolor work, stretch paper properly to prevent warping. Well, nobody likes painting on buckled paper that won’t lay flat.
Color Theory for Realistic Bird Painting

Understanding Natural Bird Colors
Birds display an incredible range of colors that challenge even experienced painters. Many species show iridescent feathers that shift color depending on light angle.
Male cardinals aren’t simply red. Look closely and you’ll see warm oranges in the highlights and deep crimsons in the shadows.
American Robins have complex breast coloration. The “red” breast actually contains oranges, russets, and even subtle yellows that create warmth.
Mixing Accurate Feather Tones
Most bird colors require careful color mixing rather than straight-from-tube pigments. Brown isn’t just brown when you’re painting a sparrow.
Create realistic grays by mixing complementary colors instead of using straight black and white. Blue and orange make beautiful neutral grays.
For black feathers like those on crows, add tiny amounts of blue or purple to pure black. This prevents the flat, lifeless look that straight black creates.
Seasonal and Gender Variations
Many bird species change colors throughout the year. Male goldfinches transform from bright yellow breeding plumage to dull olive winter colors.
Female birds often display more subdued colors than their male counterparts. These subtle variations require careful observation and restrained color choices.
Young birds frequently show different coloration than adults. Juvenile red-winged blackbirds have streaky brown plumage instead of the adult’s bold black and red.
Working with Light and Feathered Surfaces
Light behaves uniquely on feathered surfaces compared to smooth skin or fur. Contour feathers create distinct light and shadow patterns.
Individual feathers catch light along their edges while creating small shadows beneath. This creates the layered appearance that gives birds their three-dimensional form.
Iridescent feathers like those on hummingbirds require special handling. Paint the base color first, then add the iridescent effect with glazing techniques.
Value Relationships in Bird Painting
Getting your value relationships right matters more than perfect color matching. A bird painted with correct values but slightly off colors will look more convincing than perfect colors with wrong values.
Study how light and shadow fall across bird forms in different lighting conditions. Morning light creates different shadow patterns than harsh midday sun.
The darkest darks and lightest lights usually appear in small areas. Most of your painting should occupy the middle value range.
Painting Birds at Rest

Composition and Reference Gathering
Successful bird paintings start with strong reference material and thoughtful composition planning. I’ve learned this lesson through plenty of failed attempts.
Multiple reference photos work better than relying on a single image. Birds move constantly, so combining several shots gives you more complete information.
Sketch birds from life whenever possible. Even quick gesture sketches capture movement and personality that photos sometimes miss.
Creating a Strong Focal Point
Every bird painting needs a clear focal point that draws the viewer’s attention. Usually, this is the bird’s eye or head area.
Keep backgrounds simple and supportive rather than competing with your subject. A busy background destroys the impact of even the best bird painting.
Use the rule of thirds to position your bird within the composition. Placing the bird dead center creates static, boring arrangements.
Step-by-Step Painting Process
Start with a light sketch to establish proportions and placement. Don’t worry about details yet, just get the basic shapes right.
Block in your major color areas using flat washes or broad brushstrokes. This establishes your overall color scheme and value pattern.
Work from general to specific, adding details gradually. The biggest mistake? Jumping into fine details too early before establishing the overall form.
Capturing Resting Postures
Perched birds assume natural, relaxed positions that differ significantly from alert or feeding poses. Study how birds actually sit when they’re comfortable.
Sleeping birds tuck their heads in characteristic ways. Some species bury their beaks in back feathers, while others simply lower their heads.
Preening birds create interesting compositional opportunities. The curved neck and raised wing positions add dynamic elements to otherwise static poses.
Common Challenges and Solutions
Proportion problems plague many bird paintings. Bird heads are usually larger relative to body size than most people expect.
Wing anatomy trips up lots of painters. When folded, wings don’t just disappear – they create specific overlapping patterns along the bird’s side.
Feet and legs cause trouble too. Study how different species grip branches and position their feet when perched.
Adding Environmental Context
Including natural habitat elements strengthens your bird paintings without overwhelming the main subject. A simple branch or a few leaves provide context.
Consider the bird’s actual environment when choosing background elements. Don’t put a water bird on a desert cactus, no matter how interesting the composition might be.
Weather conditions affect how birds behave and appear. Fluffed feathers on cold days create different silhouettes than sleek summer plumage.
Final Details and Finishing Touches
Save the finest details for last, after all major forms and colors are established. This includes individual feather markings and eye highlights.
The bird’s eye deserves special attention in most paintings. It’s often the focal point and needs to look alive and aware.
Step back frequently while painting to assess your work from a distance. Details that look perfect up close might disappear when viewed normally.
Capturing Birds in Flight

Understanding Flight Dynamics
Bird flight creates complex visual challenges that require understanding basic aerodynamics. Wings don’t just flap up and down in simple motions.
During the upstroke, wings fold slightly and rotate to reduce air resistance. The downstroke provides most of the lifting power with fully extended wings.
Different species fly at varying speeds and wing-beat frequencies. Hummingbirds beat their wings up to 80 times per second, while hawks can glide for minutes without a single flap.
Wing Positions Through Flight Cycles
The wing position determines your painting’s energy and believability. Caught at the wrong moment, a flying bird looks frozen or awkward.
Peak upstroke positions show wings nearly vertical above the bird’s back. This creates dramatic silhouettes but requires careful attention to wing anatomy.
Mid-downstroke captures wings at their most powerful moment. The fully extended wings show maximum span and create strong compositional lines.
Gliding poses offer the most stable reference points. Wings remain relatively static, making them easier to paint accurately.
Creating Motion Through Paint
Static paint must suggest dynamic movement through visual tricks and painting techniques. Movement in art relies on more than just wing position.
Directional brushstrokes following the bird’s flight path help viewers feel the motion. Horizontal strokes for straight flight, curved strokes for banking turns.
Background blur effects suggest speed without overpowering the main subject. Keep the bird sharp while softening surrounding elements progressively.
Wing tip blur works well for fast-flying species. Sharp body details with slightly blurred wing tips create the perfect balance.
Painting Different Flight Styles
Soaring birds like eagles and hawks present different challenges than rapid-wing birds like finches. Each requires specific approaches.
Large raptors show individual feather details even during flight. Their slower wing beats allow viewers to see wing structure clearly.
Small songbirds become almost abstract during rapid flight. Focus on overall shapes and color masses rather than individual feathers.
Hovering hummingbirds create figure-eight wing patterns that blur into translucent ovals. Paint the suggestion rather than literal wing shapes.
Compositional Considerations
Flying birds need space to “fly into” within your composition. Never crowd them against picture edges.
Asymmetrical balance works better than centered compositions for flight scenes. Birds naturally create dynamic, off-center focal points.
Consider the bird’s eye line and flight direction. Viewers unconsciously follow these directional cues throughout your painting.
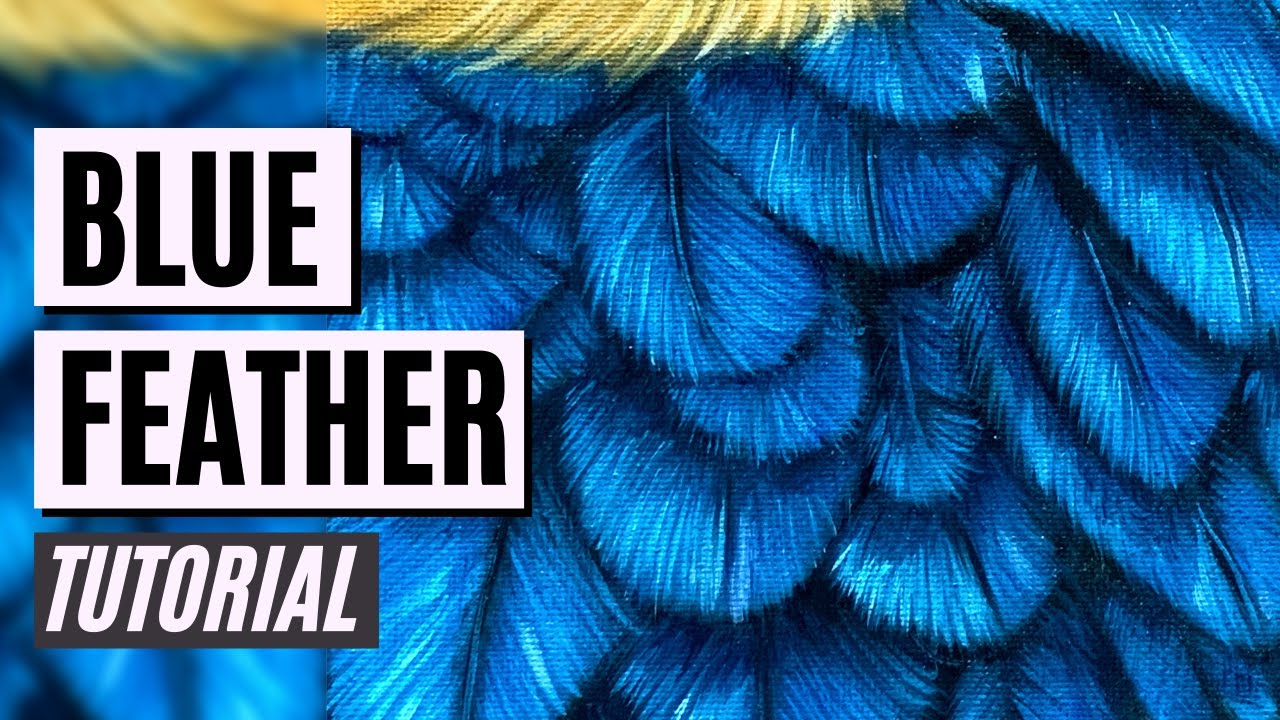
Feather Painting Techniques

Understanding Feather Structure
Feathers aren’t simply colored shapes. They have complex structures that affect how light interacts with their surfaces.
Contour feathers form the bird’s outer layer and create the silhouette we recognize. These show the most detail and require careful attention.
Down feathers underneath provide insulation and create soft, fluffy textures. Paint these with gentle, broken brushstrokes rather than hard edges.
Flight feathers have strong central shafts with parallel barbs. Each barb catches light differently, creating subtle value variations across the feather.
Layering Methods for Realistic Texture
Build feather textures gradually through multiple paint layers. Rushing this process always shows in the final result.
Start with base colors that represent the overall feather tone. Don’t worry about individual feather shapes yet.
Add shadow shapes to establish form and dimension. These shadows fall between feather layers and define the bird’s three-dimensional structure.
Work individual feathers into wet or semi-wet paint. This creates soft edges that look more natural than hard-edged feathers painted on dry surfaces.
Different Feather Types and Techniques
Head feathers on most birds are small and smooth. Use short, precise brushstrokes that follow the feather growth patterns.
Breast feathers overlap like shingles on a roof. Paint the back feathers first, then work forward, overlapping each new layer slightly.
Wing feathers require the most precision. Study how they fold and overlap when wings are closed versus extended.
Tail feathers spread in fan shapes and show individual feather separations clearly. These make good practice subjects for beginners.
Creating Specific Feather Effects
Iridescent feathers like those on grackles or hummingbirds need special handling. Base color first, then add the color-shift effects sparingly.
Use color contrast to make iridescent areas pop. The contrast between base color and iridescent highlights creates the magical effect.
Barred patterns on hawk and owl feathers follow specific rhythms. Study real feathers to understand these natural patterns.
Speckled breast feathers on thrushes require a light touch. Too heavy and the bird looks diseased rather than naturally marked.
Brush Techniques for Feather Work

Dry brush techniques work perfectly for soft down feathers. Load your brush lightly and drag it gently across the surface.
Fan brushes create natural feather textures when used properly. Light pressure and quick strokes work better than heavy, slow movements.
Liner brushes handle fine feather details and separations. Keep these brushes in perfect condition for the best results.
Common Feather Painting Mistakes
Over-detailing every single feather creates busy, unrealistic results. Some areas should remain soft and suggestive.
Painting feathers as separate entities rather than part of the whole bird. Feathers grow in specific patterns and directions.
Making all feathers the same value. Natural feathers show subtle value variations that create depth and dimension.
Working with Light and Atmosphere

Understanding Natural Lighting
Light quality changes throughout the day and affects how birds appear. Morning light differs dramatically from harsh midday sun.
Golden hour lighting warms bird colors and creates appealing rim lighting effects. This is why wildlife photographers prefer early morning and late afternoon.
Overcast conditions provide even, diffused lighting that’s perfect for showing subtle feather details without harsh shadows.
Backlighting creates dramatic silhouettes but obscures surface details. Use this effect sparingly for maximum impact.
Creating Atmospheric Effects
Atmospheric perspective helps separate your bird subject from background elements. Distant objects appear cooler and less distinct.
Morning mist and fog create natural separation between your bird and background. These effects work especially well in wetland scenes.
Weather conditions like rain or snow add environmental context but shouldn’t overwhelm your main subject.
Light Source Consistency
Every element in your painting must respond to the same light source direction. Inconsistent lighting destroys believability instantly.
Cast shadows from your bird should fall in logical directions based on your light source. Study how real shadows behave.
Reflected light bounces into shadow areas and prevents them from going completely black. This is especially important under the bird’s belly and wings.
Color Temperature and Bird Painting
Cool morning light emphasizes blues and purples in bird plumage. Warm evening light brings out reds and yellows.
Color temperature affects not just your bird but the entire painting environment. Keep your temperature consistent throughout.
Mixed lighting situations require careful handling. Avoid having both warm and cool light sources without clear environmental justification.
Environmental Integration
Your bird shouldn’t look pasted onto the background. Both subject and environment must work together harmoniously.
Use similar color harmony principles in both bird and background. This creates visual unity throughout your painting.
Seasonal lighting affects bird appearance and behavior. Winter light is cooler and harsher than summer’s warm glow.
Habitat accuracy matters more than most painters realize. Research where your bird species actually live and feed.
Advanced Atmospheric Techniques
Edge quality variations help create atmospheric depth. Sharp edges bring elements forward, soft edges push them back.
Use gradation to show distance and atmospheric effects. Values and colors should shift gradually from foreground to background.
Dust particles and atmospheric haze scatter light and create subtle color shifts. These effects are subtle but important for realism.
Species-Specific Painting Approaches
Small Songbirds
American Robins require careful attention to their orange-red breast coloration. This isn’t a single flat color but contains subtle variations from warm orange to deeper rust tones.
Blue Jays present unique challenges with their bright blue crests and complex wing patterns. The blue appears almost electric in sunlight but shifts to duller tones in shadow.
Cardinals demand precise red color mixing. Males show brilliant reds while females display warm brown tones with subtle red highlights on wings and tail.
Techniques for Tiny Subjects
Small birds like finches and sparrows require different approaches than larger species. Details that work on hawk paintings look ridiculous on goldfinch studies.
Proportional accuracy becomes critical when working small. A slightly oversized beak or wrong head shape destroys the species identification instantly.
Use smaller brushes but don’t get caught up in microscopic details. Sometimes suggestion works better than literal representation.
Large Birds and Raptors

Bald Eagles command respect through their impressive size and bearing. Their white head feathers have subtle gray undertones that prevent them from appearing flat.
Red-tailed Hawks show incredible feather complexity on their wings and backs. Each feather has distinct barring patterns that follow specific rhythms.
Great Blue Herons require understanding of their unique posture and elongated proportions. Their necks create S-curves that define their elegant silhouettes.
Capturing Powerful Presence
Large birds need bold, confident brushwork. Timid paint handling makes them look weak rather than majestic.
Wing span proportions often surprise beginners. Eagle wings stretch much wider than most people expect.
Beak and talon details separate raptors from other bird species. These features deserve extra attention and precision.
Water Birds and Specialized Features
Mallards and other waterfowl have waterproof feather coatings that create distinct visual effects. Water beads up rather than soaking in.
Streamlined body shapes distinguish water birds from land species. Their forms follow function perfectly for aquatic life.
Webbed feet require careful observation. The skin texture and color differ significantly from the scaled legs of perching birds.
Tropical and Exotic Species
Parrots present incredible color challenges with their brilliant plumage. These saturated colors require clean color mixing to avoid muddy results.
Toucans combine bold patterns with subtle texture variations. Their oversized beaks dominate compositions but shouldn’t overpower the entire bird.
Hummingbirds demand understanding of iridescent color effects. The throat patches shift dramatically based on viewing angle and light direction.
Migration and Seasonal Variations
Many species change appearance seasonally. Male goldfinches transform from bright yellow breeding plumage to dull olive winter colors.
Molt patterns create patchy appearances during transition periods. These temporary states offer interesting painting challenges.
Winter plumage often shows more muted colors and different proportions due to fluffed feathers for insulation.
Common Mistakes and Problem Solving
Proportion and Anatomy Errors
Bird heads are typically larger relative to body size than most beginners expect. This proportion varies significantly between species.
Wing attachment points confuse many painters. Wings don’t just stick out from the sides but emerge from specific anatomical locations on the back.
Leg placement problems occur when painters don’t understand how bird legs actually attach to the body. The knee joint stays hidden within the body cavity.
Scale and Size Relationships
Getting relative sizes right matters enormously for species identification. A robin painted sparrow-sized loses its essential character.
Reference photos can distort proportions depending on camera angle and distance. Use multiple references to verify proportions.
Tail length varies dramatically between species and affects the overall bird silhouette significantly.
Color and Value Problems
Overusing pure black creates flat, lifeless feather areas. Real black feathers contain subtle color variations that prevent this dead appearance.
Color saturation mistakes happen when painters use colors straight from the tube without appropriate mixing.
Shadow areas require careful color temperature control. Cool shadows work better than warm ones in most lighting situations.
Value relationships often get ignored in favor of color accuracy. Wrong values with right colors look worse than right values with slightly off colors.
Technical Painting Issues
Overworking feather details destroys the fresh, natural appearance that makes bird paintings convincing. Know when to stop.
Hard edges throughout a painting create cardboard cutout effects. Natural feathers have soft transitions between light and shadow areas.
Background competition happens when painters make environments too detailed or contrasted. Backgrounds should support, not compete with bird subjects.
Common Beginner Traps
Starting with details before establishing overall forms leads to paintings that look like collections of parts rather than living birds.
Perfect symmetry rarely occurs in nature. Real birds have subtle asymmetries that make them look alive.
Painting what you think you see rather than actually observing leads to generic “bird” paintings that lack species-specific character.
Problem-Solving Strategies
Step back frequently to assess your work from normal viewing distance. Problems obvious from across the room disappear when you’re focused up close.
Squint test helps evaluate value relationships by eliminating color distractions. Your painting should read clearly when squinted at.
Compare your painting to your reference frequently, but don’t become a slave to copying every photographic detail.
Advanced Techniques and Finishing Touches
Creating Convincing Eye Details

Bird eyes deserve special attention since they often serve as the painting’s focal point. The eye structure includes more than just the colored iris.
Pupil placement within the iris affects where the bird appears to be looking. Slight adjustments change the entire painting’s mood.
Eye highlights need careful placement to look natural rather than artificial. Real highlights follow the eye’s curved surface.
Surrounding eye areas include small details like eye rings and lash-like feathers that add realism when handled properly.
Advanced Feather Rendering
Individual feather shapes follow specific patterns that vary by body location. Wing coverts overlap differently than breast feathers.
Feather edges show subtle variations from sharp to soft depending on feather type and condition. New feathers have crisp edges while worn feathers appear frayed.
Color saturation changes across individual feathers create natural depth and dimension effects.
Mastering Edge Quality
Sharp focus areas should remain limited to the most important parts of your painting. Usually this means the head and eye area.
Soft edges suggest form turning away from light or moving into atmospheric distance. This sfumato effect adds sophistication.
Lost and found edges create visual interest and prevent paintings from looking stiff or overworked.
Light Integration Techniques
Rim lighting separates subjects from backgrounds naturally and adds dramatic appeal. This works especially well with backlit subjects.
Reflected light bounces into shadow areas and prevents them from going completely black. Study how this affects bird undersides.
Chiaroscuro effects can add drama to bird portraits when used thoughtfully rather than as mere technique display.
Final Detail Work
Texture variety across different body areas prevents paintings from looking monotonous. Smooth head feathers contrast with fluffy breast down.
Highlight placement for form definition requires understanding of how light travels across curved surfaces like bird bodies.
Final color adjustments might involve subtle glazing to unify color temperature or adjust saturation levels.
Professional Finishing Standards
Critical evaluation from fresh eyes helps identify remaining problems. Take breaks between painting sessions to see your work clearly.
Photography of finished work often reveals issues invisible while painting. Digital images show color and value relationships objectively.
Framing and presentation choices affect how viewers perceive your finished bird paintings. Simple frames usually work better than ornate ones.
FAQ on How To Paint Birds
What paint medium works best for bird painting?
Watercolor painting excels at capturing soft feather textures and translucent effects. Acrylic paint dries quickly and offers vibrant colors perfect for tropical species like parrots.
Oil paints allow extended blending time for smooth color transitions in bird plumage.
How do I get bird proportions right?
Study real bird anatomy through field guides and reference photos. Bird heads are typically larger relative to body size than beginners expect.
Use simple geometric shapes to block in proportions before adding details. Practice gesture drawing to capture essential bird forms quickly.
What colors do I need for realistic bird feathers?
Start with primary colors plus burnt umber, raw sienna, and Payne’s gray. These mix most natural bird colors effectively.
Add cadmium orange for robin breasts and ultramarine blue for blue jay crests. Avoid using pure black for dark feathers.
How do I paint individual feathers without overworking?
Work from general shapes to specific details gradually. Block in overall feather masses before painting individual feathers.
Use dry brush techniques for soft down feathers and precise liner brushes for flight feather details. Know when to stop adding texture.
Should I paint birds from photos or life?
Combine both approaches for best results. Live observation captures movement and personality that photos miss.
Reference photos provide detailed feather patterns and color accuracy. Use multiple photo angles to understand complete bird anatomy and structure.
How do I make flying birds look natural?
Study wing positions throughout flight cycles. Wings fold during upstroke and extend fully during downstroke phases.
Create motion through directional brushstrokes and selective background blur. Give birds compositional space to “fly into” rather than crowding picture edges.
What’s the secret to painting realistic bird eyes?
Bird eyes often serve as the painting’s focal point and deserve special attention. Study eye structure including iris, pupil, and surrounding details.
Highlight placement on the curved eye surface creates lifelike appearance. Include subtle eye rings and surrounding feather textures for complete realism.
How do I paint different bird species accurately?
Research specific species characteristics through field guides and ornithology resources. Each species has unique proportions, colors, and behavioral traits.
American robins need warm orange breast tones, while cardinals require precise red color mixing. Study species-specific feather patterns and markings carefully.
What brushes work best for bird painting?
Round brushes sizes 0-4 handle detailed feather work and small bird features. Flat brushes efficiently lay in background washes and broad color areas.
Fan brushes create natural feather textures when dragged lightly across surfaces. Maintain separate brushes for different color families to prevent muddying.
How do I fix common bird painting mistakes?
Step back frequently to assess proportions and values from normal viewing distance. Most problems become obvious when viewed from across the room.
Avoid overworking feather details and making backgrounds too busy. Soft edges in less important areas prevent cardboard cutout effects that destroy natural appearance.
Conclusion
Mastering how to paint birds requires patience, observation, and consistent practice with proper techniques. Success comes from understanding bird anatomy, selecting appropriate painting supplies, and developing your color mixing skills.
Each species presents unique challenges that reward careful study. From the iridescent throat patches of hummingbirds to the complex wing patterns of hawks, every bird offers learning opportunities.
Wildlife art demands both technical precision and artistic sensitivity. Your brush control, feather painting methods, and composition choices all contribute to creating convincing avian subjects.
Start with common backyard species like robins and sparrows before attempting more challenging subjects. Build your skills gradually through regular sketching sessions and paint studies.
The journey from basic bird shapes to detailed, lifelike paintings takes time. Focus on accurate proportions, natural color relationships, and believable light effects rather than rushing toward complex compositions.
With dedicated practice using these fundamental techniques, you’ll develop the confidence to tackle any bird species that captures your artistic interest.