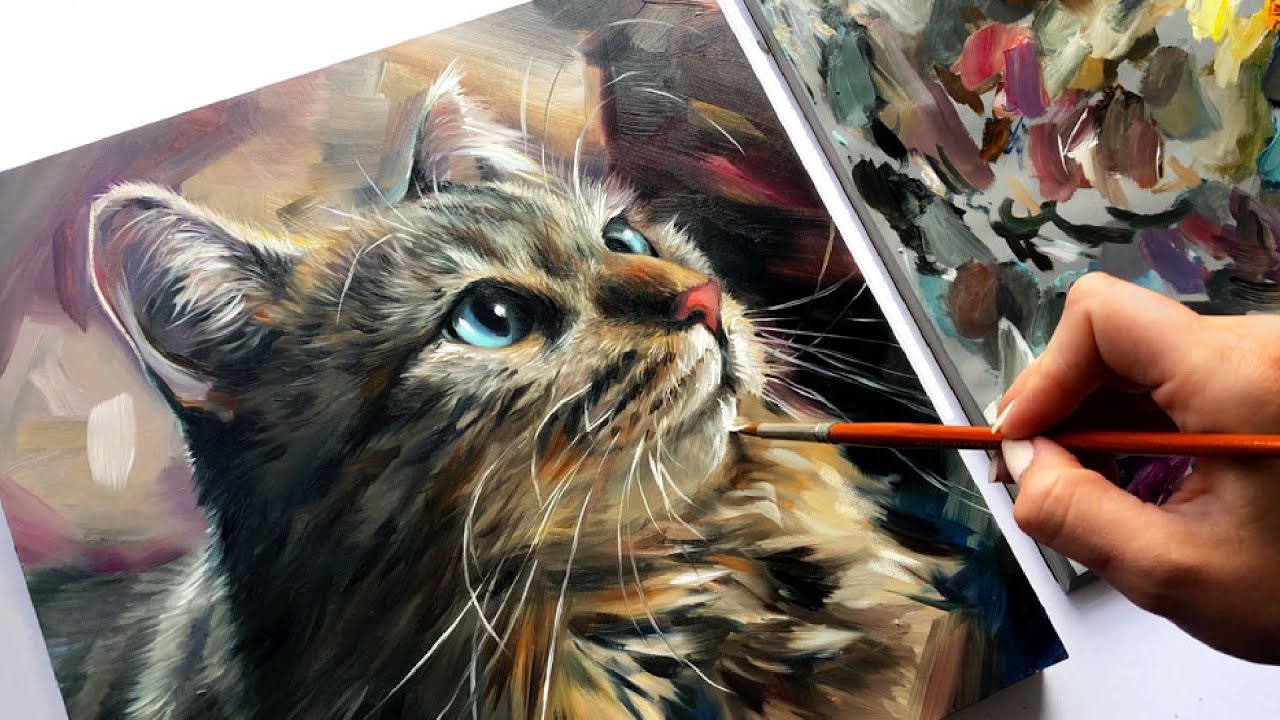
Every cat owner has stared into those mesmerizing feline eyes and wondered how to paint a cat that captures their pet’s unique personality and soul.
Painting realistic cats requires understanding both animal anatomy and artistic techniques that bring fur texture, whiskers, and expressive eyes to life on canvas.
This comprehensive cat painting tutorial will guide you through essential skills including color mixing for authentic fur patterns, brush techniques for different coat types, and methods for capturing those captivating feline expressions.
You’ll master pet portrait painting fundamentals from initial sketching through final details. Learn to work with various painting mediums including oils, acrylics, and watercolors.
By the end, you’ll confidently create custom pet portraits that showcase your cat’s distinctive character and charm through professional-quality brushwork and color application.
Observing and Capturing Cat Eye Expressions

Common Cat Expressions Through Eyes
Alert and curious wide eyes reveal rounded pupils and raised upper lids. The iris appears fully visible with bright, focused attention.
Sleepy half-closed lids create gentle curves across the eyeball. Lower lids relax upward while pupils often dilate slightly in dim conditions.
Playful vs. Defensive Eye Changes
Playful squinted eyes show crescent shapes with relaxed facial muscles. The surrounding whisker pads often push upward during happy expressions.
Defensive dilated pupils expand dramatically regardless of lighting. Tense eyelid positioning creates angular shapes around enlarged black centers.
Affectionate Slow Blinks
Slow blinks signal trust and contentment in feline behavior. Upper and lower lids close gradually, then reopen with soft, relaxed positioning.
This expression requires careful observation of timing. The entire blink cycle takes 2-3 seconds compared to normal rapid blinking.
Lighting Effects on Eye Expression
Natural window light creates the most authentic feline expressions. Side lighting from windows shows dimensional depth in the eye socket and surrounding fur texture.
Artificial lighting for dramatic effect works well with tabby cat painting and Persian cat portraits. Position your light source at a 45-degree angle to avoid harsh shadows.
Backlighting for Rim Effects
Backlighting creates luminous edges around the cat’s head silhouette. This technique works especially well for long-haired breeds where fur creates soft halos.
The rim lighting effect helps separate your subject from background elements. Siamese cat art benefits from this dramatic approach due to their angular facial features.
Reference Gathering Techniques
Photographing live cats safely requires patience and proper equipment. Use a telephoto lens to maintain distance while capturing detailed eye expressions.
High-quality reference images should show clear iris patterns and pupil shapes. British Shorthair breeds provide excellent circular eye examples for practice studies.
Creating expression mood boards helps organize different emotional states. Group similar expressions together to understand subtle variations in eyelid positioning.
Choosing the Right Medium and Materials
Oil Paint Advantages
Oil painting excels for blending smooth iris transitions and creating luminous eye effects. The slow drying time allows extended working periods for detailed fur texture around the eyes.
Professional cat portrait painting often uses oil mediums for their rich color depth. The paint remains workable for hours, perfect for capturing subtle whisker details and fine eyelashes.
Acrylic Paint Benefits
Acrylic painting dries quickly for immediate layering techniques. This speed helps when building up iris patterns and adding final highlight details.
Pet portrait artists frequently choose acrylics for commission work. The medium handles both thin glazes and thick impasto applications effectively.
Watercolor for Soft Effects
Watercolor painting creates ethereal, dreamy cat portraits with soft edges. The transparent medium works beautifully for kitten painting guide subjects with delicate features.
Wet-on-wet techniques produce natural fur blending around the eye area. Custom pet portraits in watercolor capture gentle, affectionate expressions effectively.
Brush Selection for Eye Details

Fine detail brushes (sizes 0-2) handle pupil edges and iris patterns with precision. Round brushes maintain sharp points for individual eyelash strokes.
Flat brushes apply base iris colors smoothly across curved eyeball surfaces. The chisel edge creates clean lid lines and tear duct definition.
Specialized Cat Painting Brushes
Fan brushes excel at painting realistic cat fur radiating from the eye corners. Gentle dabbing motions create natural hair texture without harsh lines.
Liner brushes draw whiskers and fine facial hair with consistent width. Cat painting supplies should include various liner sizes for different detail levels.
Canvas and Paper Considerations
Smooth canvas surfaces work best for detailed eye work and fine fur textures. Rough textures can interfere with precise pupil shapes and highlight placement.
Cat painting canvas preparation affects final results significantly. Proper priming creates ideal paint adhesion for layering techniques.
Paper texture choices impact watercolor cat portraits differently than oil or acrylic work. Cold-press papers provide moderate texture for controlled bleeding effects.
Color Theory for Realistic Cat Eyes

Understanding Cat Eye Colors
Green variations range from yellow-green to blue-green in most domestic cats. Cat eye painting requires understanding these subtle hue differences for accurate representation.
Yellow and amber tones appear in many breeds including British Shorthairs and Persians. These warm colors create glowing effects under proper lighting conditions.
Blue Eye Genetics
Blue eyes occur primarily in Siamese, Ragdoll, and white cats. The lack of iris pigmentation creates unique painting challenges for realistic representation.
Siamese cat art showcases intense blue coloration with subtle violet undertones. These cool colors require careful temperature balance with surrounding warm fur tones.
Heterochromia Color Combinations
Odd-eyed cats present fascinating color contrasts for artistic interpretation. One blue eye paired with green or amber creates striking visual interest.
Turkish Angora and white domestic cats commonly display this trait. Pet art tutorial sessions often focus on balancing these contrasting temperatures effectively.
Color Temperature Balance
Color theory principles guide realistic eye painting through warm and cool relationships. Cat eyes typically contain both temperature ranges within individual irises.
Reflected light influences eye color appearance dramatically. Window light adds cool tones while artificial lighting introduces warm color casts.
Primary and Secondary Color Applications
Primary colors form the foundation of natural eye color mixing. Blue, yellow, and red combine to create realistic amber and green variations.
Secondary colors provide intermediate hues for complex iris patterns. Orange, violet, and green appear naturally in many feline eyes.
Advanced Color Mixing Techniques
Creating natural iris variations requires understanding tertiary colors and their relationships. Yellow-green and blue-green provide subtle transitions within individual eyes.
Color mixing fur tones around the eyes affects overall color harmony. Complementary relationships between eye and fur colors create vibrant, engaging portraits.
Pupil and Highlight Colors
Pupil blacks rarely appear as pure black in realistic paintings. Mix warm or cool grays depending on lighting conditions and surrounding color temperatures.
Highlight color selection depends on light source characteristics. Cool daylight creates blue-white highlights while warm tungsten lighting produces yellow-white reflections.
Shadow Color Strategies
Animal painting guide principles suggest using color complements for natural shadow areas. Green eyes pair with subtle red-violet shadows for dimensional depth.
Avoid using straight black for shadow areas around the eyes. Mix dark versions of surrounding colors for more natural, integrated results.
Step-by-Step Eye Painting Process

Initial Sketch and Proportions
Mapping eye placement starts with basic head construction lines. Draw a vertical center line and horizontal eye line to establish proper spacing.
Cat eyes sit roughly one eye-width apart in most breeds. Mark these positions lightly before adding detailed shapes.
Drawing Basic Eye Shapes
Feline eyes vary from round to almond-shaped depending on breed characteristics. Persian cat portrait work requires rounder shapes while Siamese cats need angular, elongated forms.
Establish the outer eye corners first, then connect with smooth curves. The inner corners sit slightly lower than outer edges in most cats.
Marking Pupil Positions
Pupil placement affects gaze direction and overall expression dramatically. Center pupils create direct eye contact while off-center positioning suggests looking away.
Realistic cat painting requires accurate pupil size for the lighting conditions. Bright light creates small pupils while dim conditions produce large, dilated circles.
Base Color Application
Block in iris base colors using flat brushes and middle-value tones. Avoid details at this stage, focusing only on overall color temperature.
Establish pupil darkness with deep browns or grays rather than pure black. This creates more natural depth and prevents harsh contrasts.
Adding Initial Eyelid Tones
Upper lids typically appear darker due to shadow from the brow ridge. Pet portrait painting benefits from subtle gradation between lid and surrounding fur.
Lower lids catch more light and appear warmer in color temperature. Paint these areas with slightly lighter values than the upper lid regions.
Building Depth and Dimension
Layer iris pattern details gradually using smaller brushes and varied values. Real cat eyes contain radial lines and concentric circles around the pupil.
Animal painting guide techniques suggest building these patterns from dark to light. Add the deepest shadows first, then work toward highlight areas.
Creating Pupil Depth Illusion
The pupil appears as a deep hole rather than flat black surface. Use subtle gradation to suggest this three-dimensional quality.
Blend the pupil edges softly into surrounding iris colors. Sharp boundaries create artificial, lifeless appearances.
Painting Eyelid Thickness
Upper and lower lids have measurable thickness that casts subtle shadows. Tabby cat painting showcases these dimensional details effectively.
The eyelid rim appears as a thin line separating the eyeball from surrounding fur. This detail adds significant realism to finished portraits.
Final Details and Refinement
Catchlight reflections require precise placement and appropriate size relationships. These highlights should reflect your chosen light source position accurately.
Individual eyelashes grow from lid margins in small clusters. Paint these with liner brushes using quick, confident strokes.
Creating Expression Through Painting Techniques

Pupil Size and Shape Control
Round pupils indicate relaxed, comfortable cats while elliptical shapes suggest alertness or mild stress. The degree of dilation communicates emotional states effectively.
Painting pupil edges with varying sharpness creates different moods. Soft edges suggest sleepy contentment while crisp boundaries indicate focused attention.
Size Variations for Different Moods
Large, dilated pupils convey excitement, fear, or dim lighting conditions. Custom pet portraits often capture these dramatic expressions for emotional impact.
Small pupils suggest bright light or aggressive posturing. British Shorthair cats frequently display this expression during alert observation.
Positioning for Gaze Direction
Centered pupils create direct viewer engagement while offset positioning suggests distraction. Siamese cat art often utilizes dramatic gaze directions for dynamic compositions.
The white sclera visible around pupils affects expression significantly. More visible white creates wider-eyed, surprised appearances.
Eyelid Positioning Techniques
Upper lid curves determine alertness levels in feline expressions. High, arched curves suggest surprise while lowered positions indicate sleepiness.
Professional cat painting tips emphasize subtle lid adjustments for expression control. Small changes create dramatically different emotional readings.
Lower Lid Relaxation Effects
Relaxed lower lids curve upward slightly, partially covering the lower iris. This positioning creates content, peaceful expressions common in indoor cats.
Tense lower lids remain flat or curve downward, exposing more eyeball surface. This technique works well for painting alert, outdoor hunting poses.
Partial Closure Techniques
Kitten painting guide methods often feature partially closed eyes for sleepy, innocent expressions. The upper lid covers 20-30% of the visible iris.
Asymmetrical closure creates playful winking effects. One eye remains open while the other closes partially or completely.
Surrounding Fur Direction Impact
Fur growth patterns around eyes affect perceived expression through directional lines. Upward-angled fur suggests alertness while downward growth indicates relaxation.
Animal art fundamentals include understanding how fur direction supports or contradicts eye expressions. Consistent directional flow creates believable emotional states.
Creating Depth Through Fur Shadows
Strategic shadow placement in surrounding fur creates dimensional eye socket depth. Persian cat portrait work relies heavily on these shadowing techniques.
Vary shadow intensities based on fur length and density. Longer fur creates softer, more diffused shadow edges around the eye area.
Working with Different Cat Breeds

Persian and Long-Haired Breeds
Long-haired cats present unique challenges with facial fur obscuring eye details. The dense coat requires careful value relationships to maintain eye prominence.
Painting around facial fur involves understanding how hair layers build up around the eye socket. Each fur layer catches light differently, creating complex shadow patterns.
Managing Hair Obscuring Details
Strategic use of contrast helps eyes read clearly through heavy facial fur. Increase value differences between eye and surrounding hair areas.
Calico cat painting guide techniques work well for multi-colored long-haired breeds. Color temperature shifts help separate overlapping fur sections from eye regions.
Creating Depth Through Fur Layers
Build fur in logical layers from skin outward to surface hair. Cat painting for beginners should focus on major fur direction changes before adding fine details.
Use atmospheric perspective principles to push back deeper fur layers. Cooler, lighter colors recede while warmer, darker values advance forward.
Siamese and Oriental Features
Siamese cat art showcases distinctive almond-shaped eyes with pronounced angular characteristics. The elongated eye shape requires different proportional relationships than round-eyed breeds.
Oriental breeds share similar eye shapes with Siamese cats but offer wider color variations. Blue eyes remain standard, but some lines produce green or yellow variations.
Almond-Shaped Eye Painting
Begin almond shapes with accurate angle measurements at inner and outer corners. Realistic cat painting tutorial methods emphasize these foundational proportions.
The upper and lower lid curves create shallow arcs rather than pronounced circles. Paint these subtle curves with careful brush strokes and smooth color transitions.
Intense Color Representation
Siamese blue eyes require understanding color saturation principles for accurate representation. High-intensity blues demand careful temperature balance with surrounding warm point colors.
Mix Siamese eye colors using pure blues with subtle violet undertones. Avoid adding gray or brown which creates muddy, unrealistic results.
British Shorthair and Round-Eyed Breeds
British Shorthair cats display large, perfectly round eyes with wide spacing. These breeds offer excellent practice subjects for circular eye construction.
The breed’s dense coat creates full cheeks that push against the eye area. Paint these full cheek forms to support rather than compete with eye prominence.
Circular Eye Shape Techniques
Perfect circles require careful initial construction and consistent curve maintenance. Use compass guidelines initially, then paint freehand over the framework.
Professional pet artist techniques include checking circle accuracy frequently during the painting process. Small deviations from perfect circles create immediately noticeable problems.
Wide-Set Eye Spacing
British Shorthairs display approximately 1.5 eye-widths between inner eye corners. This spacing creates their characteristic sweet, open facial expression.
Measure these proportions carefully during initial sketching phases. Pet painting services depend on accurate breed characteristic representation for client satisfaction.
Copper Eye Color Mixing
Traditional British Shorthair eye colors range from deep amber to bright copper. These warm colors require understanding complementary color relationships for proper mixing.
Create copper tones using orange and red bases with yellow highlights. Add small amounts of complementary blue for natural shadow areas within the iris.
Troubleshooting Common Problems
Proportion and Placement Issues
Misaligned eyes create immediately noticeable problems in pet portrait paintings. Use a ruler to check equal distances from the nose bridge to each inner eye corner.
Eye size discrepancies happen frequently when working freehand. Compare each eye’s width and height measurements against the other throughout the painting process.
Fixing Eye Spacing Problems
Wide-set eyes make cats appear startled or unnatural. Cat painting workshop instructors recommend measuring one eye-width between inner corners for most breeds.
Close-set eyes create cross-eyed appearances that destroy portrait credibility. Adjust positioning during early sketch phases rather than attempting corrections over dried paint.
Repositioning Pupils for Better Expression
Off-center pupils can salvage poorly positioned eyes by redirecting the gaze. Pet art commission work often benefits from subtle pupil adjustments to improve engagement.
Pupil size corrections change entire expression dynamics. Smaller pupils suggest alertness while larger ones indicate relaxation or dim lighting conditions.
Color and Lighting Problems
Muddy colors result from mixing too many pigments or using dirty brushes. Clean brushes between colors and limit color mixtures to three pigments maximum.
Color mixing techniques for realistic eyes require understanding color harmony principles. Stick to analogous or complementary relationships for natural results.
Unrealistic Highlight Placement
Catchlights must reflect actual light source positions to appear believable. Animal painting course materials emphasize consistent light direction throughout the entire portrait.
Multiple conflicting highlights destroy eye realism instantly. Choose one primary light source and stick with it for all reflective surfaces.
Shadow Inconsistencies
Eye socket shadows should match the overall lighting scheme established in your painting. Warm light creates cool shadows while cool light produces warm shadow colors.
Digital cat painting allows easy shadow adjustments, but traditional media requires planning. Establish your light source early and maintain consistency.
Detail and Finish Concerns
Overworked surfaces lose their natural spontaneity and freshness. Step back frequently to assess whether additional details actually improve the painting.
Sometimes less detail creates more convincing results than labored overworking. Cat art community feedback often highlights this common beginner mistake.
Lost Brushwork Spontaneity
Confident brush strokes convey energy and life in painted eyes. Practice decisive mark-making on separate studies before working on finished pieces.
Timid, hesitant brushwork creates lifeless, mechanical appearances. Professional cat painting tips emphasize bold mark-making for authentic results.
Harsh Edge Management
Blend harsh transitions gradually using clean, slightly damp brushes. Cat painting business success depends on polished edge quality and smooth color transitions.
Sfumato techniques soften unwanted hard edges effectively. This Renaissance method works particularly well for fur-to-skin transitions around eyes.
Advanced Techniques for Professional Results

Glazing and Layering Methods
Transparent glazes build luminous depth in cat eyes through multiple thin layers. Each glaze modifies underlying colors while maintaining transparency.
Allow each layer to dry completely before applying subsequent glazes. Pet painting inspiration comes from studying how masters like Leonardo da Vinci used these techniques.
Building Color Depth Through Glazes
Start with lighter base colors and gradually build toward darker glazes. Animal art studio professionals often use this method for rich, complex eye colors.
Warm glazes over cool bases create vibrant optical mixing effects. This technique works particularly well for amber and green cat eye variations.
Creating Luminous Eye Effects
Internal light effects require understanding how light behaves within translucent materials. Real cat eyes glow due to the tapetum lucidum reflecting light back through the iris.
Custom cat portrait painting can simulate this effect through careful glaze application. Build up translucent layers to achieve natural luminosity.
Texture and Surface Quality
Paint wet eye surfaces differently from dry, matte areas around them. Realistic animal painting requires distinguishing between these surface qualities.
Fresh tear film creates subtle reflections and soft highlights. Dry areas appear more textured with visible fur patterns and skin details.
Creating Realistic Tear Film
Apply thin, transparent layers over completed eye surfaces to simulate tear film. Use mixing medium to create the proper consistency for smooth application.
Cat painting reference photos help identify where tear film naturally occurs. The lower eyelid typically shows more moisture than upper areas.
Age-Related Surface Changes
Older cats develop different eye surface characteristics than kittens. Kitten painting guide techniques don’t translate directly to senior cat portraits.
Cloudy lens areas and reduced tear production create different painting challenges. Research age-appropriate reference materials for accuracy.
Atmospheric Perspective Applications
Deep-set eyes benefit from atmospheric perspective techniques that push eye sockets back into the skull. Cooler, lighter colors recede while warm, dark values advance.
This principle applies even within individual eyes. Use subtle temperature shifts to create convincing three-dimensional form.
Environmental Reflection Integration
Cat eyes reflect surrounding colors and shapes from their environment. Pet art tutorial advanced sessions cover incorporating these subtle environmental influences.
Window reflections, room colors, and nearby objects all contribute to realistic eye appearance. Study how Claude Monet captured these reflected color relationships.
Professional Mood Creation
Atmospheric perspective techniques control emotional impact through subtle environmental effects. Misty, soft atmospheres create dreamy moods while crisp clarity suggests alertness.
Cat art exhibition pieces often employ these advanced atmospheric techniques for maximum visual impact and emotional resonance.
Finishing Touches and Final Assessment

Critical Evaluation Process
Step back at least six feet to assess overall impact and balance. Details that seem important up close may become invisible at viewing distance.
Photograph your work to identify problems invisible to your adapted eye. Pet painting services professionals use this technique to catch issues before client delivery.
Checking Expression Accuracy
Compare your painted expression to reference materials and original intentions. Small changes in eyelid position or pupil size can completely alter the emotional reading.
Animal art fundamentals include understanding how minor adjustments affect major expression changes. Be prepared to make corrections even in final stages.
Verifying Anatomical Correctness
Double-check eye placement, size relationships, and breed-specific characteristics. British Shorthair proportions differ significantly from Siamese cat art requirements.
Anatomical errors become more obvious as paintings near completion. Address structural problems before adding final details and highlights.
Testing Emotional Impact
Show your work to others and note their immediate emotional reactions. Cat painting gallery success depends on instant emotional connection with viewers.
If responses don’t match your intentions, identify which elements need adjustment. Sometimes small highlight or shadow changes create dramatically different impacts.
Final Adjustments
Refine highlight positions for maximum sparkle and life in the eyes. These small bright spots often make the difference between good and extraordinary results.
Adjust contrast levels gradually using subtle glazes or careful opaque touches. Professional pet artist techniques emphasize restraint during final adjustment phases.
Color Temperature Final Tweaks
Evaluate overall color temperature relationships between eyes and surrounding elements. Cat painting color palette harmony affects viewer comfort and painting success.
Make final temperature adjustments using thin glazes rather than opaque color applications. This approach maintains existing work while refining color relationships.
Edge Quality Refinement
Some edges need sharpening while others require softening for proper focal point emphasis. Cat face painting success depends on directing viewer attention appropriately.
Use clean, slightly damp brushes for edge softening and dry brushes for sharpening techniques. Practice these skills on separate studies first.
Protective Finishing
Oil paintings require proper varnishing after six months of drying time. Use appropriate varnishes designed for your specific painting medium.
Acrylic works benefit from protective acrylic medium applications. Cat art community resources provide specific product recommendations for long-term preservation.
Portfolio Documentation
Photograph finished works using consistent lighting and neutral backgrounds. Professional cat painting portfolios require high-quality documentation for marketing and archival purposes.
Record painting details including dimensions, materials, and completion dates. This information proves valuable for insurance purposes and future reference needs.
FAQ on How To Paint A Cat
What paint medium works best for cat portraits?
Acrylic painting offers the best balance for beginners. It dries quickly, allows for easy corrections, and handles both detailed fur work and smooth color blending effectively for realistic cat paintings.
How do I paint realistic cat fur texture?
Use fan brushes for soft undercoat and liner brushes for individual guard hairs. Build fur in layers from dark base colors to lighter surface details, following natural growth patterns around the face.
What’s the hardest part about painting cat eyes?
Creating believable pupil depth and accurate iris patterns challenges most artists. The key is understanding how light reflects within the eye and using subtle gradation rather than flat black pupils.
Should I use photos or paint from life?
High-quality reference photos work better than live subjects for detailed work. Cats move constantly, making precise eye and whisker details nearly impossible to capture during live painting sessions.
How do I mix realistic cat eye colors?
Green eyes need yellow-green bases with blue undertones. Amber eyes require orange and red mixtures with yellow highlights. Avoid pure colors and add subtle complementary shadows for natural depth.
What brush sizes do I need for cat painting?
Essential sizes include flat #8-12 for base colors, round #2-4 for details, liner #0-1 for whiskers, and fan brushes for texture. Quality matters more than quantity for professional results.
How do I paint different cat breeds accurately?
Study breed-specific features like Persian flat faces versus Siamese angular structures. British Shorthair cats have round eyes while Oriental breeds display almond shapes requiring different proportional approaches.
What’s the best way to start a cat painting?
Begin with accurate gesture drawing to capture pose and proportions. Map major shapes first, then gradually refine features. Establishing proper composition prevents major corrections later.
How do I avoid muddy colors in cat fur?
Limit color mixtures to three pigments maximum and clean brushes frequently. Use separate palettes for warm and cool colors. Build colors through glazing rather than mixing everything together.
How long does a cat portrait typically take?
Professional pet portrait artists spend 15-25 hours on detailed paintings. Factor in drying time between layers, reference study, and multiple refinement sessions for gallery-quality results.
Conclusion
Mastering how to paint a cat requires patience, observation, and consistent practice with fundamental techniques. The journey from basic sketches to professional-quality feline portraits rewards dedicated artists with deeply satisfying creative accomplishments.
Your understanding of color theory, brush handling, and cat anatomy will continue developing with each painting session.
Pet art commissions become achievable goals once you’ve mastered these core skills through regular practice and experimentation with different breeds.
Remember that successful animal art studio work builds on strong foundational knowledge combined with personal artistic vision.
Each cat presents unique characteristics and personality traits that make every portrait a fresh creative challenge. Whether working with watercolor painting techniques or bold acrylic cat art approaches, focus on capturing the essence of your feline subject.
Professional cat painting business success stems from technical competence paired with genuine appreciation for these fascinating creatures and their individual characteristics.