Every painting decision flows from one source. Literally.
The light source in painting composition determines where shadows fall, how forms read, and whether a scene feels spatially convincing or flat. It shapes value structure, contrast, mood, and the viewer’s entire experience of depth.
From Caravaggio’s single candle casting dramatic shadow across a biblical scene to Vermeer’s steady north window light modeling quiet domestic interiors, the greatest painters in history treated light source direction as a foundational structural choice, not an afterthought.
This guide covers how light source type, angle, shadow behavior, color temperature, and composition work together, and why committing to that decision early changes everything.
What is a Light Source in Painting Composition

A light source in painting composition is the defined origin point from which illumination falls across a scene. It determines where shadows land, how form reads, and how the viewer’s eye moves through the work.
This is not a passive detail. It is one of the first decisions an artist makes, and it shapes everything that follows: value relationships, contrast, mood, and spatial depth.
Unlike actual physical light, the light source in a painting is a compositional choice. The artist decides its position, intensity, and quality. Those decisions stay fixed while the rest of the painting is built around them.
A painting can have a single dominant light source, multiple competing sources, or an implied ambient light with no clear origin. Each produces a structurally different result. Most experienced painters will tell you: pick one and commit to it early. Mixing them without intention is one of the fastest ways to make a painting feel confused.
Light source placement also directly affects how a composition communicates. It creates focal points, separates subjects from backgrounds, and guides the viewer’s attention without a single visible line doing the work.
It connects to almost every other element of painting: color, tone, form, space, and even visual hierarchy. Understand light source, and most of the other compositional decisions start making more sense.
Types of Light Sources Used in Painting

Not all light behaves the same way, and choosing the right type is just as important as knowing where to place it.
Natural vs. Artificial Light Sources
Natural light comes from the sun, moon, or open sky. It shifts in color temperature throughout the day, from the cool blue-white of midday to the warm orange of golden hour. For painters, this variability is both an opportunity and a challenge.
Artificial light includes candles, oil lamps, torches, and modern electric sources. These tend to emit warmer, more localized illumination. The falloff is sharper and the shadows harder.
| Light Source Type | Technical Logic | Color Temperature | Shadow Quality | Strategic Application |
| Direct Sunlight | Point Source: Parallel rays from a distant, intense source. | Warm to Neutral: Shifts from golden to white. | Hard Edges: High contrast; sharp “Termination Lines.” | Plein Air: Best for establishing clear geometric form. |
| Diffused Daylight | Large Area Source: Light scattered by clouds or north-facing glass. | Cool / Blue-shifted: The “North Light” standard. | Soft Edges: Gradual “Penumbra”; subtle transitions. | Academic Studio: Ideal for portraiture and form-modeling. |
| Candlelight | Near-Point Source: High intensity at short range with rapid decay. | Very Warm: Rich oranges and yellows (1,800K). | Hard / Rapid Falloff: Deep “Chiaroscuro”; shadows dissolve quickly into black. | Baroque Nocturnes: Best for high drama and mystery. |
| Ambient / Flat | Omni-Directional: Light reflecting off all surfaces equally. | Neutral / Flat: Lacks a dominant hue. | Minimal / Absent: No clear “Core Shadow” or “Cast Shadow.” | Graphic / Decorative: Best for flat design and icon systems. |
Ambient and Reflected Light
Ambient light has no single origin. It fills a scene evenly and creates little to no shadow. Painters working in Impressionism often dealt with this in outdoor light conditions, where scattered sky light softens shadows considerably.
Reflected light is secondary illumination. It bounces back from surfaces into shadow areas. This is what keeps deep shadows from going completely black. Rembrandt van Rijn was meticulous about this: the subtle warm glow inside a cast shadow in his portraits comes from reflected light off nearby surfaces, not from the primary source.
Reflected light is easy to overdo. A common mistake is painting it too bright, which flattens the shadow and destroys the sense of depth.
How Light Source Direction Affects Composition

Where the light comes from changes everything about how a subject reads. Angle and position are not stylistic preferences. They are structural decisions.
Front, Side, and Back Lighting
Front lighting hits the subject head-on. Shadows fall directly behind the form and are mostly hidden from view. The result is flat, with little sense of three-dimensional volume. It works in some realist contexts but is rarely used in dramatic compositions.
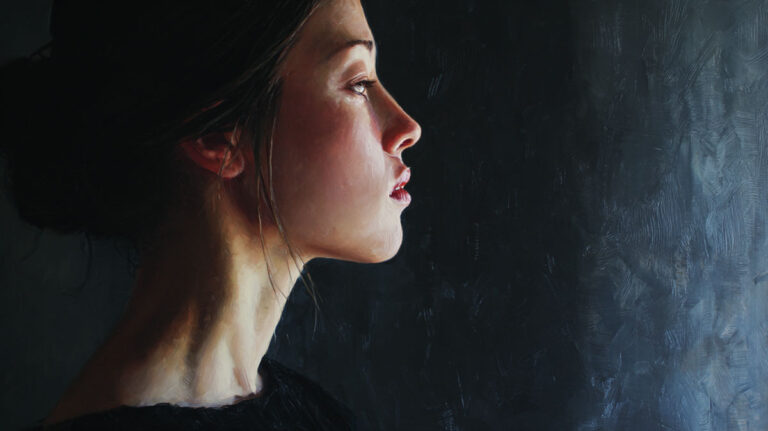
Side lighting is where things get interesting. It rakes across the surface of the subject and reveals texture, form, and depth. This is the most common directional choice in figurative painting. The lit side and shadow side create clear visual separation, and the gradation between them describes the form’s curvature.
Back lighting places the primary source behind the subject. The result is a silhouette or a rim of light around the edges, called rim lighting. Used deliberately, it creates strong separation between subject and background.
Caravaggio almost always worked with a single, unseen light source positioned above and to one side, creating dramatic illumination across figures against near-black backgrounds. His consistent use of this directional choice is what makes his compositions so immediately recognizable.
Top and Under Lighting

Top lighting falls from above. This mirrors natural outdoor light and reads as normal. Used at a steep angle, it creates pronounced shadows under brow ridges, noses, and chins.
Under lighting is the opposite. It produces shadows that run upward across the face and form, which reads as unnatural and often unsettling to a viewer. Horror imagery uses it for exactly this reason. The reason it feels wrong is grounded in lived experience: we almost never encounter upward-directed light in nature.
The psychological response to light direction is not just convention. It is tied to how humans process visual information developed through exposure to natural light over a lifetime.
Shadow as a Compositional Tool

Shadows do not just indicate where light is not. They are active elements in composition. Used well, they create depth, direct attention, and shape mood in ways that lit areas cannot.
Core Shadow vs. Cast Shadow
Core shadow is the darkest area on the form itself, where the surface turns away from the light source. It sits between the lit area and the shadow side, and it defines the contour of the form. Without it, objects look flat.
Cast shadow is the shadow a form throws onto another surface. It communicates the distance between the object and the surface it rests on, the angle of the light source, and the shape of the object casting it.
These are different tools with different jobs. I’ve seen a lot of student work that paints the cast shadow correctly and completely ignores the core shadow. The object ends up looking like it’s floating.
| Shadow Type | Technical Logic | Location | Strategic Application |
| Core Shadow | Turning the Form: The area where light can no longer “reach” around the curve. | On the form itself, adjacent to the halftone. | Volume: This is the primary tool for creating a 3D “pop” on a 2D surface. |
| Cast Shadow | Obstruction of Path: Where the object physically blocks light from hitting a surface. | On surrounding surfaces (floor, walls). | Anchor: Prevents the object from “floating”; communicates the light’s angle. |
| Reflected Light | Indirect Illumination: Light bouncing off the floor/environment back into the shadow. | Inside the shadow areas, near the edge of the form. | Luminosity: Prevents shadows from looking like “black holes”; adds depth. |
Hard and Soft Shadow Edges
Shadow edge quality depends on the size and distance of the light source. Small, close, or distant point sources produce hard-edged shadows. Large diffused sources produce soft, gradual transitions.
Chiaroscuro relies on this relationship. The hard edges in Caravaggio’s work come from a small, focused light source. The soft edges in Vermeer’s interior scenes come from large, diffused window light. Same compositional concept, completely different emotional register.
Edge hardness is one of the most expressive tools in a painter’s kit. Vary it. A painting where every shadow edge has the same hardness reads as mechanical.
Value, Contrast, and the Light Source Relationship

Value is the language of light in painting. It is how the artist communicates the presence, intensity, and direction of a light source through the distribution of light and dark across a composition.
A value map is how most experienced painters approach this: plan the large tonal zones before adding color. Where is the light? Where is the dark? Where are the midtones? Lock those decisions in early. Color is secondary to this structure.
The value scale in painting runs from pure white to pure black, with a range of grays in between. No painting uses all of them. The artist selects a limited range within that scale based on the lighting conditions they are representing.
Research published in PMC found that in the first 20 seconds of viewing, color captures roughly 80% of visual attention, but as viewing continues beyond two minutes, the structural elements including light and value become increasingly dominant in how people interpret what they see. This suggests value structure matters more in sustained viewing than in initial impact.
| Technique | Technical Logic | Value Range | Emotional Register |
| Chiaroscuro | Modelled Volume: Uses light and dark to create the illusion of 3D weight. | Full Range: Deep darks to brilliant highlights. | Stability: Reality, volume, and classical presence. |
| Tenebrism | Theatrical Spotlighting: “Darkness” as a physical presence that consumes the scene. | Extreme Contrast: Sudden shifts from black to light. | Drama: Tension, mystery, and spiritual intensity. |
| Sfumato | Edge Dissolve: Removing the “Hard Line” to mimic human peripheral vision. | Narrow Transitions: Soft, smoky mid-tones. | Mystery: Softness, intimacy, and atmospheric haze. |
| High-Key | Luminous Compression: Pushing all values toward the white end of the scale. | Upper Range: Minimal darks; shadow-less light. | Optimism: Calm, clarity, and ethereal openness. |
The sfumato technique of Leonardo works by keeping value transitions imperceptibly gradual, as if the forms dissolve into surrounding tone. Tenebrism does the opposite: it cuts forms out of near-black backgrounds with sharp, high-contrast light. Both are responses to the same fundamental problem of representing a light source on a flat surface. They just solve it differently.
Color Temperature and Light Source in Painting

Color temperature is how an artist communicates the quality and origin of a light source through color rather than just value. It is what makes a painting feel like sunlight versus firelight versus overcast sky.
Warm and Cool Light Sources

The fundamental principle: warm light sources produce relatively cooler shadows, and cool light sources produce relatively warmer shadows.
This is not a fixed rule and actually depends on what is bouncing reflected light into the shadow area. But as a working principle, it holds up consistently. Sunlight in direct overhead conditions reads as warm yellow-white. The shadows it casts often carry a cool blue-violet quality, partly from sky light filling them from above.
Key color temperature associations:
- Candlelight and firelight: orange-yellow, 1800-2000K equivalent
- Tungsten indoor light: warm yellow, around 3000K
- Daylight, overcast: neutral to cool, 5000-7000K
- Open blue sky: very cool, 10000K and above
Research on studio lighting from a 2024 study published in the Journal of Architecture found that spaces lit with lower color temperatures were perceived as warmer, more motivating, and more open to creativity. This maps directly to why painters have long preferred the cooler, consistent quality of north-facing window light for studio work. It reduces the emotional charge of the light itself and lets the painting control the mood instead.
Color Temperature in Outdoor vs. Indoor Scenes

Claude Monet spent years painting the same subjects under different light conditions specifically to capture these temperature shifts. The Haystacks series, painted between 1890 and 1891, documents how a single form reads completely differently as the quality of natural light changes across time and season. Warm golden hour light versus cool winter morning light produces fundamentally different paintings of the same object.
Johannes Vermeer worked in the opposite direction: he controlled his light source by using a north-facing studio window that produced consistent, diffused, cool illumination throughout the working day. Research from Essential Vermeer documents that approximately 40% of his studio wall was occupied by windows, allowing a steady, predictable light source that he could manipulate compositionally by opening and closing sections of the window.
Indoor artificial light scenes follow different rules. Baroque painters like Georges de La Tour specialized in candlelit nocturnes where the warm light source creates a distinct warm-to-cool temperature gradient moving away from the flame.
The color theory principle underlying all of this is simultaneous contrast: colors look different depending on what surrounds them. A neutral gray shadow next to a warm-lit surface will read as cool. The same gray next to a cool surface reads as warm. This is perception, not physics, which is why so much of good light painting is about managing relationships rather than matching absolute colors.
Consistency of Light Source Across a Composition

A painting with an inconsistent light source does not just look technically wrong. It feels wrong. Viewers may not articulate why, but the spatial logic falls apart and the composition loses its grip.
Research published by MIT Press on the history of shadow representation found that by 1467, artists like Fra Carnevale had mastered consistent linear perspective but still struggled with consistent lighting. Shadow angles and light source positions were routinely mismatched within the same composition, often going unnoticed because the human visual system tolerates a surprising degree of physical impossibility in pictures.
The tolerance gap is real, and it cuts both ways: viewers do not always catch errors, but inconsistency still erodes a painting’s sense of believability at a subconscious level.
Common Errors and How to Check
The most frequent light source consistency mistakes, according to painting instructors at Draw Paint Academy:
- Shadow angles pointing in different directions on the same surface
- Highlights placed on the wrong side of a form relative to the stated light direction
- Reflected light painted too bright, which destroys shadow integrity
- Using black for shadows rather than adjusting color temperature, which flattens the entire value structure
The practical fix is straightforward. Before adding detail, draw an arrow on a corner of the canvas or paper indicating the light source direction. Everything then gets checked against that decision.
Handling Multiple Light Sources

Multiple light sources are not impossible to manage. But they require a clear dominant source hierarchy.
Primary light: strongest, sets main shadow direction.
Secondary light: softer, fills shadows, often a different color temperature than the primary.
Reflected light: weakest, bounces into shadow areas from nearby surfaces.
Problems arise when all three compete at equal intensity. The composition reads as lit from everywhere and nowhere. Academic portrait painters enforced a strict rule: one dominant source, one fill, no exceptions. That discipline is worth keeping even outside strictly academic work.
Psychological and Emotional Effects of Light Source Placement

Light source position is one of the most direct ways a painter communicates emotional content. Not through subject matter. Through the direction and quality of light itself.
High-Key vs. Low-Key Lighting
High-key lighting compresses the value range toward the lighter end of the value scale. Shadows are soft. The overall feeling is open, calm, or optimistic. Vermeer’s interior scenes sit in this range. So do most Impressionist landscapes.
Low-key lighting does the opposite. The value range sits in the darker half. Shadows dominate. The emotional register shifts toward tension, mystery, or weight.
| Lighting Mode | Technical Logic | Dominant Values | Psychological Effect |
| High-Key | Value Elevation: Shadows are subordinated to midtones and highlights. | Light: Whites, creams, and pale grays. | Optimism: Calm, clarity, and ethereal openness. |
| Low-Key | Value Suppression: Highlights are subordinated to deep grays and blacks. | Dark: Charcoals, deep browns, and blacks. | Mystery: Tension, weight, and introspection. |
| High Contrast | Polarization: Removing the “Bridge” of midtones between light and dark. | Extremes: Pure black and pure white. | Urgency: Shock, theatricality, and visual “Noise.” |
| Low Contrast | Value Squeeze: Compressing the range into a narrow band of midtones. | Muted: Soft grays and subtle transitions. | Subtlety: Quiet, misty, and atmospheric haze. |
Symbolic Use of Light Source in Historical Painting

Light from above carries centuries of symbolic weight in Western painting. In religious contexts, it represents divine presence. The ceiling of the Sistine Chapel, angels in Renaissance altarpieces, the shaft of light descending in Raphael’s compositional structures. All use overhead light as theological language.
Light from below reads as unnatural and unsettling. The perceptual reason is simple: we almost never encounter light originating below eye level in nature. The brain registers it as wrong, which is why it reads as threatening or eerie.
Edward Hopper understood this at a practical level. Wikipedia documents that Hopper and his wife kept detailed working notes on individual paintings, with entries like “electric light from ceiling” and “sad face of woman unlit,” treating light source not as a technical afterthought but as a primary emotional decision made before the brush touched canvas.
Hopper’s Nighthawks (1942) uses harsh overhead artificial light to isolate figures inside a diner, the bright interior contrasting with the darkened street outside. Research from Lindenwood University analyzing Hopper’s work describes how the artificial overhead lighting in that painting generates cast shadows that extend into the street, and how this lighting contributes directly to the painting’s sense of loneliness and psychological separation.
The Baroque period treated light source placement as narrative theology. Caravaggio‘s use of a single, unseen light source in religious works made the illumination itself feel like divine intervention, an effect consistent with tenebrism‘s core purpose.
Plein Air vs. Studio Light: Compositional Differences

The light source question looks completely different outdoors versus in a controlled studio. Not just in quality, but in how the artist makes decisions about it.
Plein Air: The Moving Light Problem
Outdoors, the light source never stops moving.
According to painting educators at Evolve Artist, plein air painters have roughly a three-hour window before light changes too drastically to continue a session accurately. The shadows laid down in the first 20 minutes of a session will not match the scene two hours later.
The standard plein air strategy is to block in shadows first and treat them as anchors. Once the cast shadows and core shadow shapes are mapped, the painter works within that locked structure even as the scene shifts. The shadows become the painting’s armature.
For plein air work, the early Impressionists also used large umbrellas to control how much light hit the canvas and palette directly. Wikipedia documents that John Singer Sargent used two umbrellas when painting outdoors in Switzerland, diffusing the overhead light to get closer to the even, controllable conditions of a studio environment.
Studio Light: Controlled Conditions and Their Tradeoffs
Studio light offers what plein air does not: repeatability.
A north-facing window was the traditional solution for painters who needed steady, consistent, non-shifting illumination throughout the working day. Wikipedia documents that this practice reached professional importance as early as the Dutch Golden Age, with Rembrandt and Vermeer both relying on controlled north-facing window light. Leonardo da Vinci is credited as the first to write about it in detail, noting around 1492 that softer, indirect light better revealed the subtleties of form.
Research from Essential Vermeer confirms that Vermeer’s studio had approximately 40% of its wall area occupied by windows. He could open and close sections to adjust the quality and direction of light, essentially using the window itself as a compositional tool.
| Feature | Technical Logic | Plein Air (Field) | Studio (Controlled) |
| Light Stability | Solar Pathing: The Earth rotates at $15^\circ$ per hour. | Shifts Rapidly: Shadows “travel” and change shape every 20 mins. | Constant: North light or LEDs provide 8+ hours of stability. |
| Color Temp | Atmospheric Filtering: UV levels and light scattering. | Dynamic: Ranges from 2000K (Golden Hour) to 6500K+ (Noon). | Fixed: Controlled by setup (Standardized North Light). |
| Shadow Behavior | Vector Movement: The angle of incidence changes constantly. | Moving: Requires a “Memory-based” commitment to early shapes. | Stationary: Allows for deep, sustained modeling of form. |
| Key Discipline | Temporal Commitment: The decision-making speed. | Lock & Commit: Capture the “Light Mass” and stop chasing the sun. | Setup Integrity: Maintain props and light for multi-day sessions. |
John Singer Sargent navigated both worlds. His commissioned portraits relied on controlled studio conditions and a carefully managed value structure built around a single dominant light source. His plein air watercolors and outdoor studies operated under completely different terms, where speed, instinct, and a fast commitment to the light’s direction replaced the measured decision-making of the studio.
Both approaches produced strong work. But they required different habits of mind around the single most important structural decision in painting: where the light comes from, and how to stay committed to it.
FAQ on Light Source in Painting Composition
What is a light source in painting composition?
A light source is the defined origin point from which illumination falls across a painted scene. It is a compositional decision that controls shadow placement, value contrast, and spatial depth. Every other element in the painting is built around it.
Why does light source direction matter in a painting?
Light source direction determines how form reads on a flat surface. Side lighting reveals texture and volume. Front lighting flattens it. The angle you choose shapes the entire visual hierarchy and guides where the viewer looks first.
What is the difference between chiaroscuro and tenebrism?
Chiaroscuro uses light and shadow to model three-dimensional form gradually. Tenebrism takes it further, using near-black backgrounds with a harsh spotlight effect. Caravaggio pioneered tenebrism. Rembrandt preferred the subtler, more psychological range of chiaroscuro.
How does color temperature relate to the light source?
Warm light sources produce relatively cooler shadows, and cool light sources produce relatively warmer shadows. This principle, rooted in color theory, is what makes painted light feel convincing rather than flat. Ignoring it is one of the fastest ways to make shadows look dead.
How do I keep my light source consistent across a painting?
Mark the light direction with an arrow before you start. Check every shadow angle and highlight placement against that decision as you work. Inconsistent shadow angles are the most common mistake, and they break spatial believability even when viewers cannot name the problem.
What is reflected light in painting?
Reflected light is secondary illumination that bounces from nearby surfaces into shadow areas. It keeps shadows from going completely black and adds depth. Paint it too bright and it destroys shadow integrity. Keep it noticeably darker than any lit area on the same form.
What is the best light source for portrait painting?
A single diffused light source at roughly 45 degrees above and to the side of the subject, often called Rembrandt lighting, is the most reliable choice. It reveals facial form clearly, produces a legible shadow pattern, and has been the standard in portrait painting for centuries.
How did Impressionist painters handle outdoor light sources?
Impressionism dealt with shifting natural light by committing to a specific moment and locking in the shadow pattern early. Claude Monet painted the same subject repeatedly across different light conditions to study how color temperature and intensity changed throughout the day and season.
What is the difference between a hard and soft light source in painting?
Hard light comes from a small or distant source and produces sharp shadow edges. Soft light comes from a large or diffused source and produces gradual transitions. Gradation between the two controls mood. Vary shadow edge hardness across a painting or it starts reading as mechanical.
How does light source placement affect the mood of a painting?
Light from above reads as natural and reassuring. Light from below feels unnatural and unsettling. High-key lighting with soft shadows creates calm. Low-key lighting with deep shadows creates tension. Edward Hopper used harsh artificial overhead light deliberately to produce psychological isolation in otherwise ordinary scenes.
Conclusion
This conclusion is for an article presenting light source in painting composition as one of the most consequential decisions a painter makes before a single stroke lands on canvas.
From sfumato’s soft tonal transitions to the stark directional light of Baroque masters, every approach starts with the same commitment: pick a source and build everything around it.
Shadow placement, tone, pictorial space, and emotional register all follow from that single choice.
Whether working from a north-facing studio window or locking in shadows during a fast plein air session, the principle holds across every painting style and medium.
Understand light source direction, and the rest of the composition starts making sense.