

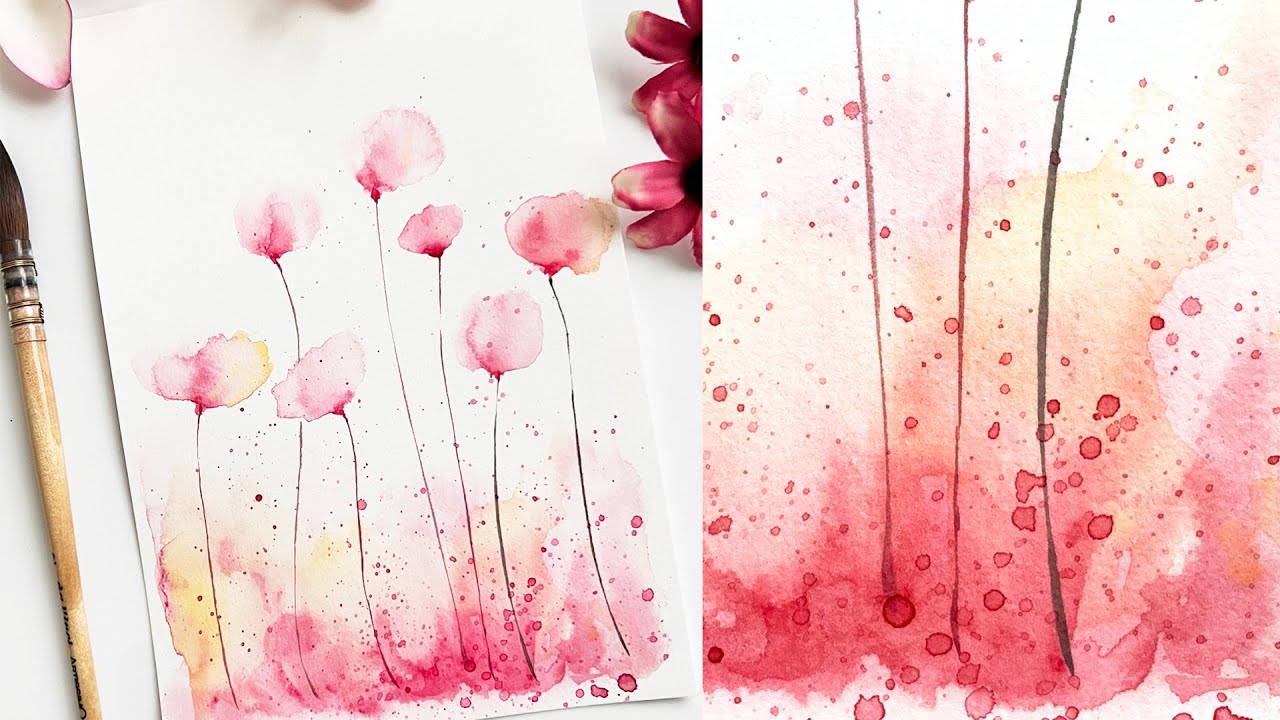
Water does something strange in watercolor. Drop a wet brush into a drying wash and watch the pigment push outward, forming a flower-like ring with hard edges and a soft center.
That is the blooming technique in watercolor painting, and whether it appears by accident or on purpose, it is one of the most distinctive effects the medium produces.
This article covers what blooming is, why it happens, the different bloom types, which papers and pigments affect it, and where it fits naturally in your paintings. You will also learn how to create it deliberately and how to stop it when you don’t want it.
What Is the Blooming Technique in Watercolor

The blooming technique in watercolor painting is a method where wet pigment or water spreads into a still-wet wash, creating irregular, feathered shapes with darkened outer edges and softer interiors.
Also called backruns or cauliflowers, blooms happen when there is a significant difference in wetness between two surfaces. A wetter area pushes into a less-wet one, displacing pigment outward as the water seeks balance.
The result is an organic, flower-like pattern. The edges are harder and more defined than the center, which stays diffused and soft. It’s one of the few watercolor effects that looks controlled even when it isn’t.
Used deliberately, it produces atmospheric texture that is nearly impossible to replicate with any other method. Used carelessly, it can ruin a wash you’ve spent 20 minutes building.
Blooming sits at the heart of watercolor painting techniques because it forces a painter to work with water behavior rather than against it. The technique belongs firmly in the wet-on-wet family, but it is a specific event within that family, not a general approach.
How Blooming Works
Water moves toward equilibrium. That single rule explains every bloom.
When a wetter drop touches a drying wash, the higher water pressure in the drop pushes outward. It carries pigment particles along with it, depositing them at the leading edge of the spread. That concentration of pigment at the outer ring is what creates the characteristic dark border of a bloom.
Research published via ResearchGate on watercolor fluid dynamics confirms that backruns form when water spreads back into a damp region, pushing pigment outward into branching shapes with darkened edges. The mechanism is purely physical, driven by surface tension and capillary action in the paper fibers.
Timing is everything. A bloom requires the wash underneath to be at a specific stage: damp but not fully wet. Too wet, and the new water simply merges without creating defined edges. Bone dry, and nothing moves at all.
The narrow window between those two states is where blooms form. Experienced painters describe it as the moment when the surface sheen has just started to disappear but the paper still looks damp.
Three variables control the outcome:
- Water-to-pigment ratio in both the base wash and the drop being added
- Paper absorption rate, which determines how fast the drying window closes
- Pigment particle size, since lighter particles travel further and faster than heavier sedimentary ones
A drop of clean water into a damp pigment wash tends to produce softer, wider blooms. A concentrated pigment drop into a lighter wash produces sharper, more defined edges with stronger color contrast at the boundary.
Types of Blooms in Watercolor

Not all blooms look the same. The visual outcome changes based on what is being dropped in, the base color, and how far into the drying window you are.
Color Blooms
Two pigments meeting wet-on-wet. Both are still moving when they interact, so the edges are softer and the spread is more symmetrical.
These work well for foliage, skin shadows, and gradient skies. The colors mix partially at the boundary and stay separate closer to their origins, creating a natural two-tone transition.
Clear Water Blooms
Clean water dropped into pigment. This is the most dramatic type visually. The water pushes all the pigment to the outer ring, leaving a near-white center surrounded by a concentrated ring of color.
Daniel Smith’s quinacridone pigments (like Quinacridone Rose and Quinacridone Gold) produce especially crisp clear-water blooms because they are fine, mobile, and highly transparent. Dropping water into a damp wash of either color creates a visible halo within seconds.
Granulation Blooms
These occur with heavy, sedimentary pigments like French Ultramarine, Cerulean Blue, or Burnt Sienna. The pigment separates from the water as it settles, creating a rough, textured bloom with a grainy outer edge rather than a smooth one.
According to Daniel Smith’s pigment data, Cerulean Blue Chromium is both granulating and extremely low-staining, making it one of the most reliable pigments for producing granulation blooms on demand. The graininess adds tactile realism to rocks, bark, and stone surfaces in a painting.
Accidental Backruns
The bloom nobody wanted. These form when a wash dries unevenly and a wetter area at the edge flows back into a drier section of the same wash. They typically show up in large flat washes and around the edges of puddles left on paper.
The shape is less controlled than deliberate blooms. Angular rather than circular, with branching edges that interrupt the wash in ways that can be tricky to correct without lifting or re-wetting the whole area.
Papers and Pigments That Affect Blooming
The paper matters as much as the paint. I’ve seen perfectly executed bloom attempts fail on the wrong paper, and accidental ones turn stunning on the right one.
Cold Press vs. Hot Press Paper
Paul Rubens research shows that roughly 80% of watercolorists choose cold press paper. The textured surface holds moisture longer, giving a wider blooming window.
| Paper Type | Surface | Bloom Behavior | Best For |
|---|---|---|---|
| Cold Press | Textured, “toothy” | Balanced: Holds water in its valleys, giving you a generous window of time to drop in pigment and watch it expand. | Organic landscapes, soft foliage, and misty atmospheric transitions. |
| Hot Press | Smooth, flat | High Velocity: Since there is no “tooth” to slow it down, pigment moves rapidly across the surface, creating crisp, defined “cauliflower” edges. | Botanical illustrations, graphic design elements, and high-contrast abstract textures. |
| Rough Press | Heavy texture | Erratic: Water is sucked into deep craters quickly. Blooms tend to follow the “valleys” of the paper, highlighting granulation. | Rugged stone textures, weathered wood, and aggressive, expressive backgrounds. |
The choice between cold press or hot press watercolor paper changes how much control you have over bloom timing. Cold press is more forgiving for beginners learning to work within the wet window.
Cotton vs. Wood Pulp Paper
Cotton paper absorbs differently than wood pulp, and the difference shows up most clearly in wet-on-wet work.
100% cotton papers like Arches, Fabriano Artistico, and Saunders Waterford have long fibers that hold water without becoming saturated quickly. This keeps the damp window open longer and gives blooms more time to spread and define themselves.
Wood pulp (cellulose) papers absorb faster and dry faster. Blooms on cellulose paper tend to be smaller and less defined. They work fine for studies and practice but can frustrate painters trying to produce large, sweeping bloom effects.
Pigment Behavior
Lighter, finer pigments bloom more readily. Quinacridones and phthalo pigments move fast in water and travel far from the drop point. Granulating pigments like French Ultramarine and Burnt Sienna produce heavier, shorter blooms with visible particle texture at the edges.
Staining pigments (Winsor & Newton marks these with “St” on tube labels) resist lifting once dry. They bloom when wet but leave a permanent mark at the outer ring that cannot be softened or corrected after drying.
How to Create a Bloom Deliberately
The biggest mistake beginners make is trying to create a bloom on paper that’s too wet or too dry. Neither works. The bloom only forms in that specific damp stage.
The Basic Process
Lay a flat wash and wait. That’s most of the work, honestly.
Start with a standard wash of any color. Using a mop brush gives you more water control across large areas. Watch the surface. When the bright wet sheen starts to fade but the paper still looks damp (not dry), you’re in the bloom window.
At that moment, you have a few options:
- Drop clean water from a loaded brush tip onto the damp surface
- Touch a brush loaded with a more concentrated pigment into the wash
- Drag the edge of a wet brush lightly across the damp area
- Use a spray bottle for scattered, multiple small blooms at once
Paper angle also matters. A flat surface keeps blooms round and even. Tilting the paper slightly pushes the bloom in one direction and creates elongated, flowing shapes.
Common Mistakes When Trying to Create Blooms
Paper too dry: Nothing happens. The water you drop in just sits there and dries without spreading.
Too much water in the base wash: The drop merges into the wash without pushing pigment. You get diffusion, not a bloom.
Wrong pigment type: Heavy granulating pigments in the base wash can resist bloom formation. They settle quickly and stop moving before a bloom can develop. Transparent, non-staining pigments bloom far more easily.
J.M.W. Turner, whose atmospheric watercolors are some of the most studied in the medium, is believed to have used wet-on-wet diffusion and controlled backruns extensively to build the soft, glowing edges in his sky and water passages. Whether deliberate or observed and then repeated, the results show a clear understanding of how moisture timing affects pigment spread. You can explore his approach and other techniques through famous watercolor paintings across art history.
How to Prevent Unwanted Blooms
Blooms are beautiful on purpose. They’re a problem when they appear in a flat sky wash you spent 10 minutes getting even.
Control Through Drying
The simplest fix: let things dry fully before adding adjacent color.
Most unplanned blooms happen when painters add a second color too soon next to a wash that hasn’t fully dried. The two wet areas interact at the edge, and the wetter one bleeds into the drier one. Patience solves this almost entirely.
A hairdryer speeds up drying but can cause its own problems. Directing hot air unevenly can push a still-wet wash and create flow marks. Keep it moving and hold it at a distance from the paper surface.
Water Ratio Consistency
Uneven water loading on the brush causes most accidental blooms within a single wash. If one part of a stroke carries more water than another, the wetter section flows back into the drier one as both begin to dry.
Consistent brush loading matters more than brush size or type. Load the brush, then blot it lightly on a cloth before applying. This removes the excess water that causes uneven pooling.
Fixing a Bloom Mid-Painting
If you catch a bloom forming before the paper dries fully, you have a short window to act.
- Blot the wet area immediately with a dry brush or clean cloth corner
- Re-wet the entire surrounding area to equalize moisture levels and let the bloom diffuse naturally
- If dry, gently lift with a damp brush using short strokes from the center outward, then re-apply the wash
Trying to paint over a dried bloom with a new wash usually makes it more visible. The pigment ridge at the bloom’s edge resists fresh paint and creates a double edge. Re-wetting and lifting is almost always the better path.
Understanding how to blend watercolor paint smoothly gives you better instincts for catching these moments before they set. The same water-control habits that produce clean blends also prevent most accidental backruns.
Blooming in Specific Subject Matter
Blooming is not a universal tool. It fits some subjects perfectly and actively fights others. Knowing which is which saves a lot of frustration.
The watercolor paints market was valued at $4.8 billion in 2024, according to Exactitude Consultancy, with fine art applications as the dominant segment. The subjects that drive the most demand among professional artists, including landscapes, botanicals, and abstracts, also happen to be the ones where blooming has the most natural role.
Skies and Atmospheric Effects
Best subject for deliberate blooming. A sky wash is wide, wet, and needs soft transitions between tones. That is exactly where blooms belong.
Drop a slightly wetter, darker mix into the upper portion of a damp sky wash and the bloom spreads downward, mimicking the gradient of a real sky without any brushwork. Using a cooler blue dropped into a warmer yellow-grey produces cloud edges that look three-dimensional.
Artists studying J.M.W. Turner‘s skies often note how the tonal transitions in his atmospheric washes could not have been produced entirely with dry brush or controlled wet-on-wet. The soft radiating edges in paintings like “Rain, Steam, and Speed” point to deliberate use of pigment diffusion during the damp stage.
Botanical and Floral Subjects
Blooming is arguably most at home in flower and plant painting. Petals are soft-edged, slightly translucent, and full of subtle color shifts. A bloom replicates all three of those qualities at once.
The technique works in two ways here:
- Within a single petal: dropping a warmer tone into a cooler base wash creates natural petal gradation
- Between adjacent petals: letting washes from two petals touch slightly at the edge, producing a soft bleed that reads as shadow or overlap
Artist Carol Carter is widely cited in watercolor circles for using blooms deliberately in her plant paintings to produce vivid, high-contrast organic textures.
Abstract Watercolor
Blooming becomes the main event rather than a supporting effect in abstract work. The pigment spread, the irregular edges, and the color blending that blooms produce are exactly the language abstract watercolor speaks.
Artists like Emma Larsson (documented by The Art of Education University) build entire compositions by embracing wet-on-wet diffusion and letting pigment blooms define edges and shapes without forcing them.
Key advantage in abstract work: the bloom removes the painter’s hand from the equation. The result looks genuinely uncontrolled and organic in a way deliberate brushwork rarely achieves.
Portraits and Skin Tones
Tricky. Not impossible, but much harder to manage.
Daniel Smith’s portrait tutorial (led by artist Joanna Barnum) explicitly advises painters to accept blooms in portrait work rather than fight them, treating them as organic texture rather than defects. Blooms in hair passages or in soft shadow areas of a face can add naturalistic variation.
But in skin tone washes covering the face itself, unplanned blooms are destructive. The hard ring of a backrun cutting across a cheek or forehead reads immediately as a technical error, not a stylistic choice. Here, wet-on-dry control with careful skin tone mixing is the safer path.
Blooming vs. Related Watercolor Techniques

Blooming gets grouped with other wet-on-wet effects frequently, which causes real confusion for painters trying to understand which technique to apply and when.
The global watercolor market is projected to grow at a CAGR of 8.5% through 2034, according to Global Market Insights, driven in large part by the surge in online art tutorials. A side effect of that growth: more people are learning technique vocabulary from different sources, and the terms backrun, bloom, and wet-on-wet get used interchangeably when they shouldn’t be.
| Technique | Requires Wet Surface? | Produces Defined Edges? | Intentional or Accidental? |
|---|---|---|---|
| Wet-on-Wet | Yes: Paper must have a consistent “mirror” shine. | No: Creates soft, fully diffused transitions and “lost” edges. | Intentional: Used for atmospheric depth and soft-focus backgrounds. |
| Blooming | Damp: Paper has a “satin” glow but is no longer dripping. | Yes: Produces a distinct, hard outer ring as pigment is pushed. | Either: Can be used for “bokeh” effects or appear as a mistake. |
| Backrun | Damp: Occurs when the core of the paper is still moist. | Yes: Creates irregular, “cauliflower” or branching jagged edges. | Usually Accidental: Often the result of a brush being too “juicy” for the drying wash. |
| Glazing | No: Surface must be 100% bone-dry. | Yes: Creates controlled, sharp-edged layers of transparent color. | Intentional: Used to build deep color saturation and mechanical precision. |
Wet-on-Wet vs. Blooming
Wet-on-wet means paint applied to a fully saturated wet surface. Both colors move freely and merge without producing a defined outer edge. The result is a soft, seamless diffusion.
Blooming is a specific event within wet-on-wet conditions, not a synonym for them. It only forms when there is a significant wetness difference between the incoming drop and the existing wash. If both surfaces are equally wet, you get diffusion, not a bloom.
Watercolor Affair describes this clearly: blooms happen when the difference in moisture between two areas is large enough to generate outward movement, whereas standard wet-on-wet merging occurs when moisture levels are similar.
Backrun vs. Bloom
Same physical mechanism. Different context.
Bloom: typically intentional, created by dropping liquid into a damp wash from outside the painted area.
Backrun: typically accidental, caused by uneven drying within a wash that causes a wetter section to flow back into a drier one. The branching, angular shape of a backrun is less circular and less controlled than a deliberate bloom.
Most working watercolor artists use the terms interchangeably in conversation, but the distinction matters when troubleshooting. A backrun problem is fixed by improving water consistency and drying management. A bloom problem is fixed by changing timing.
Glazing vs. Blooming
These sit at opposite ends of the wet-dry spectrum.
Glazing requires the paper to be fully dry before adding a new layer. The goal is to build color depth through transparent overlapping washes without disturbing what is underneath. No bloom can form because there is no moisture interaction between layers.
Common beginner error: adding a glaze layer before the previous wash is completely dry. The incoming wet layer hits a still-damp surface and creates an unintended bloom or backrun. Watercolor instructor resources consistently identify “painting before dry” as the most frequent glazing mistake.
To understand how the wet-on-wet technique compares structurally across different watercolor approaches, it helps to see it alongside glazing and dry-brush methods. Each serves a different stage of a painting and requires a different relationship with the paper’s moisture level.
Granulation vs. Blooming
Both create visible texture in a finished wash. The mechanisms are completely different.
- Granulation: heavy pigment particles settle into paper valleys during drying, creating a speckled surface texture regardless of moisture timing
- Blooming: a fluid event driven by moisture imbalance, creating a distinct ring shape at the outer edge of a spread
They can happen simultaneously. A granulating pigment like French Ultramarine dropped into a damp wash will both bloom outward (fluid movement) and granulate at the outer ring (particle settlement), producing a bloom with a rough, textured edge rather than a smooth one. Daniel Smith labels this behavior in their pigment guides for Cerulean Blue Chromium specifically.
FAQ on What Is Blooming Technique In Watercolor Painting
What is the blooming technique in watercolor painting?
Blooming is when wet pigment or water spreads into a drying wash, pushing pigment outward and forming an organic, flower-like shape with a hard outer ring.
Also called a backrun or cauliflower effect, it is driven by surface tension and moisture imbalance between two areas of the paper.
What causes blooms in watercolor?
Blooms form when a wetter drop contacts a damp but not fully wet wash. The higher water pressure in the drop pushes pigment outward toward the drying edge.
The key trigger is a significant wetness difference between the two surfaces. Equal moisture levels produce diffusion, not a bloom.
Is blooming a mistake or a technique?
Both, depending on context. Unplanned blooms inside a flat sky wash are usually unwanted. Deliberate blooms dropped into botanical or abstract work produce organic texture that brushwork cannot replicate.
Most working watercolorists treat blooming as a tool once they understand its timing.
What is the difference between a bloom and a backrun?
Same physical mechanism, different context. A bloom is typically intentional, created by dropping liquid into a damp wash. A backrun is usually accidental, caused by uneven drying within an existing wash.
The shape differs too. Backruns tend to branch and angle; blooms are rounder.
Which watercolor papers are best for blooming?
Cold press cotton paper works best. Its textured surface holds moisture longer, keeping the damp window open wider and giving blooms more time to spread and define themselves.
Hot press paper produces faster, sharper blooms. Rough press closes the drying window quickly, limiting bloom size.
Which pigments bloom most easily?
Transparent, non-staining pigments like quinacridones and phthalo colors bloom readily because their fine particles travel far in water. Daniel Smith’s Quinacridone Rose and Quinacridone Gold are reliable choices.
Heavy granulating pigments like French Ultramarine produce shorter, textured blooms with visible particle edges.
How do you create a bloom deliberately?
Lay a wash and wait until the surface sheen just starts to fade. At that damp stage, drop clean water or a more concentrated pigment into the wash using a loaded brush tip.
Paper angle, brush load, and pigment concentration all shape the result.
How do you prevent unwanted blooms?
Let each wash dry fully before adding adjacent color. Consistent brush loading removes the excess water that causes pooling and uneven drying within a single stroke.
Working wet-on-dry instead of wet-on-wet eliminates most accidental bloom formation entirely.
Can blooming be used in portrait watercolor painting?
Yes, but carefully. Blooms work well in hair passages and soft shadow areas. In skin tone washes covering the face directly, an unplanned backrun reads as an error rather than a stylistic choice.
Most portrait artists accept blooms in backgrounds and reject them on skin.
How is blooming different from glazing in watercolor?
Glazing requires fully dry paper. New paint sits on top of a dried layer without disturbing it, building color depth through transparent overlaps. No bloom can form because there is no moisture interaction.
Blooming requires damp paper. The two techniques sit at opposite ends of the wet-dry spectrum.
Conclusion
This conclusion is for an article presenting the blooming technique in watercolor painting as both a physical process and a practical skill worth mastering.
Understanding the wet window, pigment behavior, and paper absorption turns an unpredictable backrun into a deliberate tool.
Cold press cotton paper, transparent pigments like quinacridones, and careful timing give you consistent control over pigment diffusion and bloom formation.
Used well, the cauliflower effect adds organic texture to skies, foliage, and abstract watercolor work that no amount of dry brushwork replicates.
Avoid it in portrait skin washes. Lean into it everywhere else where soft edges, feathered color spread, and natural pigment dispersion serve the painting.
Water control is the whole game in watercolor. Blooming is just one of its most visible lessons.


