

Most acrylic painters hit a wall early on, not from lack of skill, but from not understanding how paint builds.
Layering in acrylic painting is the technique of applying multiple coats of paint over one another, each dry before the next goes on, to create color depth, texture, and visual complexity that a single application simply cannot produce.
It is the foundation behind glazing, underpainting, dry brushing, and scumbling. All of it connects back to how you build paint layers.
This guide covers what layering is, how it works mechanically, which acrylic mediums support it, and what goes wrong when painters skip the basics.
What is Layering in Acrylic Painting
Layering in acrylic painting is the process of applying multiple coats of paint over one another, each coat dry before the next is added, to build color depth, texture, and visual complexity on a surface.
It is distinct from wet-on-wet blending. With layering, each coat dries first and locks in place as a stable acrylic film before the next application goes on top.
This technique takes full advantage of one of acrylics’ most useful properties: fast drying time. Thin films of acrylic paint can be touch-dry in as little as 10 to 20 minutes, according to Winsor and Newton, making rapid overpainting more practical than with oil-based mediums.
Layering applies to acrylic painting across every subject and style, from loose landscape work to tight photorealistic detail.
What a “layer” actually means

A layer is any single application of paint that is left to dry before the next coat is added. But that definition is broader than it sounds.
Layers can be:
- A thin, transparent wash diluted with water
- A semi-opaque mid-tone applied with a flat brush
- A thick, textured stroke laid down with a palette knife
- A glazing medium mixed with pigment for a translucent color shift
Each one counts as a layer. The method you choose for each coat changes the result dramatically.
Why acrylics work so well for layering
Stable film formation: When acrylic paint dries, the water evaporates and acrylic polymer spheres pack together in a honeycomb-like structure, forming a cohesive, flexible film. That film is chemically stable and accepts additional paint on top without dissolving or lifting.
According to Golden Artist Colors, there are no practical limits on how many acrylic layers you can apply. An artist can paint over a layer that dried an hour ago or one that has been dry for years.
Full cure vs. touch-dry: These are not the same thing. Touch-dry happens in minutes. Full cure, where the polymer network has completely solidified, takes 24 to 72 hours. For light overpainting, touch-dry is enough. For heavy pressure or varnishing, wait for full cure.
How Layering Works with Acrylic Paint

The mechanics behind acrylic layering come down to one thing: each dried layer becomes a stable platform for the next.
Because each coat locks down as a plastic-like film, you can apply a completely different color, opacity, or consistency on top without the layers mixing or bleeding into each other. That control is what makes layering useful in the first place.
Transparency vs. opacity in layers
This is where most of the visual decision-making happens.
| Layer type | Effect on previous layer | Typical use |
|---|---|---|
| Opaque | Covers completely | Blocking in shapes, corrections |
| Semi-opaque | Partially covers, shifts color | Building mid-tones, softening edges |
| Transparent (glaze) | Tints without hiding | Color depth, luminosity, temperature shifts |
| Dry brush | Catches texture, broken coverage | Surface texture, highlights on texture |
Opaque layers give you control. Transparent layers give you depth. Most paintings use both, at different stages.
How paint consistency changes what layers do
Thin paint (diluted with water or a glazing medium) increases transparency and reduces drying time. It spreads easily and lets earlier layers show through clearly.
Thick paint (used straight from the tube or thickened with a gel medium) sits on the surface with body. It can obscure previous layers entirely or leave raised texture that catches light.
Worth knowing: over-diluting with water can break down the acrylic binder. A general guideline from Golden Artist Colors is to keep water additions below 25-30% of paint volume. For thin applications, using a glazing medium is safer than water alone.
How underlying layers influence the final surface
Layers interact optically. A warm orange underpainting showing through a thin blue glaze reads differently than a flat blue applied without any underpainting beneath it.
This is the principle behind color temperature work in acrylic painting techniques. Artists like David Hockney have used acrylic layering to create surface vibrancy that flat single-coat application cannot match.
The optical mixing that happens across transparent layers is also why glazed paintings tend to look richer than painted versions of the same color applied in one thick coat.
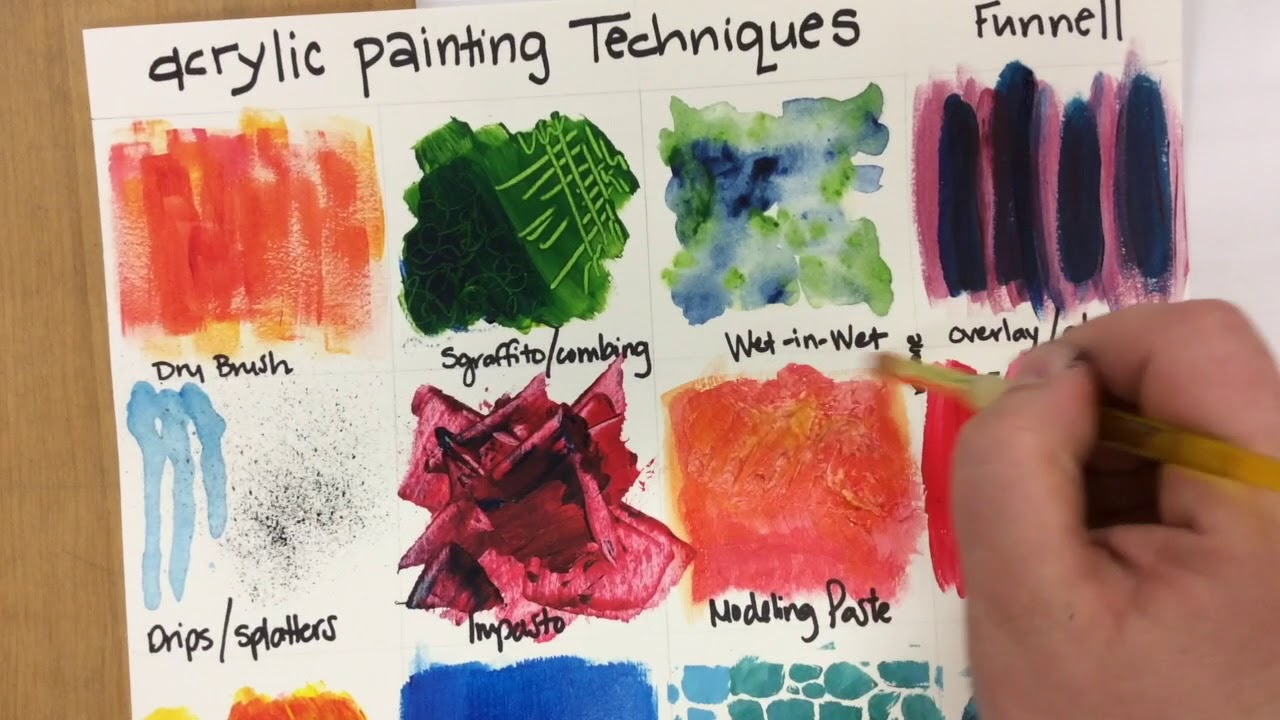
Types of Layers in Acrylic Painting

Not all layers work the same way. The structure you use for each coat changes what it contributes to the painting.
Underpainting
The first layer. It sets up the value structure and composition before any color work begins.
Most commonly done in a single color, often a neutral or earth tone. Grisaille (a monochrome underpainting in grays) is the classical approach, originally from Renaissance art practice. With acrylics, a monochrome base can be dry within an hour, ready for color layers on top.
To learn more about this specific technique, see what is underpainting in acrylic painting.
Opaque layering
Full-coverage applications. These are the workhorses of most acrylic paintings.
- Covers previous layers completely
- Used for blocking in shapes and correcting mistakes
- Good for establishing light areas over dark foundations
Opaque layers give you the ability to repaint anything. That freedom is one reason many artists start loose and dark, then work toward light and refined.
Glazing

A glaze is a thin, transparent layer mixed with a glazing medium that allows earlier colors to show through while shifting the overall hue or temperature.
Golden Artist Colors’ glazing medium increases paint transparency while extending working time. A single glaze over dry paint can shift a flat color reading into something that appears lit from within.
Read more in this detailed breakdown of what is glazing in acrylic painting.
Dry brushing
How it works: Load a brush with a small amount of paint, then remove most of it before touching the surface. The bristles drag across raised texture, depositing broken color rather than a solid coat.
The result is a layer that enhances texture rather than covering it. It works particularly well over previous impasto layers.
More on this in what is dry brushing in acrylic painting.
Scumbling
Similar to dry brushing but with slightly more paint and typically applied in broken, irregular strokes. Scumbling creates a hazy, softening effect over darker layers.
What is scumbling in acrylic painting covers this in full detail.
The Role of Paint Consistency in Layering
Consistency controls everything: how fast a layer dries, how much it covers, and how well it sticks to what is underneath.
Getting this wrong is one of the most common reasons layers go muddy or peel. It is also one of the most underexplained parts of working with acrylic painting materials.
Water vs. mediums for thinning
Water thins acrylic paint, but it also dilutes the binder. Thin enough and the pigment sits on the surface without proper adhesion. This is particularly visible in thin wash layers over a non-absorbent ground.
Acrylic mediums maintain or add to the binder content while still adjusting consistency. That is the key difference.
| Thinning method | Effect on binder | Best for |
|---|---|---|
| Water (up to 25-30%) | Minor dilution, safe range | Loose washes, quick base layers |
| Glazing medium | Maintains binder, adds transparency | Color glazing, transparent layers |
| Retarder medium | Slows drying, maintains film integrity | Blending within a layer |
| Gel medium (soft/regular) | Increases body and transparency | Thick transparent layers |
How thickness affects drying between layers
Thin layers (under about 1mm) can be touch-dry in 10 to 30 minutes. Thick impasto applications, like those built with a palette knife, can take hours before they are safe to overpaint.
According to Winsor and Newton, professional-grade acrylics in thin films dry in 20 to 30 minutes, while thicker films can take one to two hours. Heavy gel-based layers can take considerably longer, particularly in humid or cold environments.
Below 49 degrees Fahrenheit (9 degrees Celsius), acrylic polymer spheres cannot coalesce properly, which can result in film failure, including cracking and poor adhesion between layers. This is documented in Golden Artist Colors’ drying technical notes.
Layering Order: What Goes First
The sequence of layers determines what shows through, what gets covered, and how much control you have at each stage.
There is no single correct order. But most painters follow one of two logical approaches, and both have practical reasons behind them.
Dark to light
Start with dark values, work toward light.
- Mirrors the approach used in traditional oil painting
- Allows easy correction: lighter paint covers dark more easily than the reverse
- Pairs naturally with a dark underpainting or grisaille base
- Used in portrait and figure work where value accuracy matters most
This is the approach most associated with chiaroscuro in painting, where strong light-dark contrast builds form.
Light to dark (glazing approach)
Start with a light base, then build depth through transparent glazing layers.
This method relies heavily on transparent paint layers rather than opaque coverage. Each glaze adds depth without fully covering what is beneath. The cumulative effect creates color richness that is difficult to achieve with opaque painting alone.
It is the method used in classical oil painting glazing techniques, adapted here for acrylics.
Planning a layering sequence
Before starting: Decide which approach suits the subject. Portraits and figures usually benefit from dark-to-light. Landscapes and atmospheric work often suit light-to-dark glazing.
Once you are mid-painting and a layer has gone wrong, switching between the two approaches mid-process often creates muddy, confused results. Planning the sequence early saves a lot of corrections later.
Drying Between Layers
This is where patience and practical knowledge separate good layered work from frustrated, peeling, or muddy paintings.
Rushing layers is the single most common cause of problems in acrylic layering. Most of those problems are completely avoidable.
Touch-dry vs. fully cured
Touch-dry means the surface no longer picks up on your finger. Fully cured means the polymer network has completed its coalescence and the film has reached its final physical properties.
For light layers of paint, touch-dry is sufficient before adding another coat. For heavy impasto, thickly applied mediums, or before sealing with varnish, wait for full cure. The polymer network must fully solidify, which takes 24 to 72 hours depending on thickness and environment.
Environmental factors that affect drying
Temperature: Ideal range is 70 to 90 degrees Fahrenheit (21 to 32 degrees Celsius) for proper film formation.
Humidity: High humidity slows water evaporation, which extends drying time. Useful when working wet-on-wet within a layer, but not ideal when waiting for a layer to dry before overpainting.
Airflow: Gentle airflow speeds surface drying. Fans work well for thin layers. Avoid concentrating heat on one spot with a heat gun; temperatures above 100 degrees Fahrenheit can begin to break down acrylic polymers, according to Golden’s technical documentation.
What happens when you rush
Painting over a layer that is touch-dry but not stable can cause the wet paint above to reactivate and lift the skin below. The result is dragged, muddy color that cannot be corrected without scraping back.
A sealed surface offers a practical buffer. Golden’s testing showed that an uncoated paper surface gives only about 1 minute of working time, a gessoed surface extends that to under 5 minutes, and a gloss-sealed surface provides up to 15 to 20 minutes of active working time. That progression matters when timing layers.
Artists who rely heavily on tips for drying acrylic paint faster between sessions can gain useful time without compromising layer adhesion, as long as heat is applied carefully.
Mediums That Support Layering
Mediums are what separate controlled layering from guesswork. Using paint straight from the tube gives you one set of properties. Add the right medium and you get a completely different layer behavior.
Golden Artist Colors and Liquitex both publish extensive technical notes on how each medium changes paint film behavior. Worth reading before you buy.
Glazing medium
Primary use: increases transparency and extends open time without weakening the binder.
Golden’s Acrylic Glazing Liquid is a blend of acrylic polymers, water, and retarder. It was originally developed for decorative artists who needed oil-painting-style working time from a water-based product.
Liquitex Professional Glazing Medium works similarly, increasing color transparency and gloss for layered glazing effects. Both products dry clear, even though they appear milky when wet.
Retarder medium
Retarder slows the drying process of acrylic paint, which gives more time to blend within a single layer before it locks down.
Important limit: Golden recommends adding retarder in small amounts only. Too much leaves paint permanently tacky and can compromise paint film adhesion between layers. Testing on scrap material first is always the smarter move.
Gel mediums
Soft gel, regular gel, and heavy gel all add body while maintaining or increasing transparency. The heavier the gel, the more pronounced the texture.
- Soft gel: glazing, thin transparent layers with slight body
- Regular gel: moderate texture, collage work, impasto over layers
- Heavy gel: strong texture, palette knife work, thick impasto layers
Jackson’s Art Blog testing of Golden’s full gel range confirmed that each gel variant dries completely clear, making all of them useful for transparent layering without color contamination.
Gesso as a base layer
Gesso is technically the first layer in any acrylic painting on canvas. It seals the surface and controls how subsequent paint layers absorb and adhere.
Absorbency matters: a raw gessoed surface wicks moisture fast, which shortens working time on each layer. Sealing over gesso with a gloss medium before layering can extend active working time from under 5 minutes to 15-20 minutes, according to Golden’s substrate testing data.
Multiple gesso coats also give you control over surface texture, which affects how dry brush layers and scumbling interact with the ground. See more in what is gesso in painting.
| Medium | Main effect on layers | Brand examples |
|---|---|---|
| Glazing liquid | Extends open time, increases transparency | Golden AGL, Liquitex Glazing Medium |
| Retarder | Slows drying, use sparingly | Golden Retarder, Liquitex Slow-Dri |
| Soft gel (gloss) | Transparent body, good adhesion | Golden Soft Gel, Liquitex Gel Medium |
| Gesso | Surface seal, absorbency control | Winsor and Newton, Golden, Liquitex |
Common Layering Mistakes and How to Fix Them
Most layering problems are predictable. They come up the same way for beginners and experienced painters alike, and most have straightforward fixes.
Lachri Fine Art, one of the more widely followed acrylic technique educators, has noted that paint brand choice directly affects layering behavior. Some brands have formulations that lift previous layers during overpainting, regardless of technique.
Muddy colors from poor layer planning

Glazing complementary colors over each other without a plan is the fastest way to kill vibrancy.
Red and green, blue and orange, yellow and violet. Mix these optically through stacked transparent layers and they neutralize each other, producing brown or gray.
Fix: plan your glazing sequence around color temperature shifts rather than random color additions. Warm over cool or cool over warm reads as depth. Complementary over complementary reads as mud.
Paint lifting during overpainting
A wet or semi-cured layer gets reactivated by the moisture in the next coat.
Two causes: not waiting long enough between layers, or using too much water in the top coat. Both can be avoided. Wait until the underlayer is fully touch-dry, and thin subsequent coats with a medium rather than straight water.
Using a gloss isolation coat between layers is the most reliable way to protect a completed layer before adding more paint on top.
Cracking from inconsistent layer thickness
Building thin, flexible layers over thick, heavy ones creates structural stress as the painting ages.
The general rule from conservators: build from thin to thick. Thin washes first, heavier impasto work later. Reversing this traps moisture in thick underlayers and can cause the surface to crack as the painting cures and dries over time.
- Start thin (washes, glazes, underpainting)
- Build to medium opacity mid-layers
- Finish with thick impasto or heavy texture
Overworking a wet layer
Continuing to brush over a layer as it begins to dry is one of the most common problems new acrylic painters face.
Once an acrylic layer starts skinning over, brushing back into it causes the drying skin to ball up or streak. The paint loses its flow and starts to drag. At that point, the only option is to stop and let it dry completely before correcting.
Better approach: apply each layer with confident strokes and step back. Corrections are faster on a fully dry surface than on a partially dried one.
Read more on correcting mistakes in how to fix painting mistakes.
What Layering Achieves in a Finished Painting
Layering is not a technique you use for its own sake. The result is the point. A painting built through multiple layers reads differently from one produced in a single session.
The fine art acrylic paints market was valued at USD 2.32 billion in 2024 (Wise Guy Reports), driven in part by growing demand from artists working in technique-intensive styles. Layered acrylic work sits squarely in that category.
Color depth and optical richness

Light behaves differently through stacked transparent layers than it does over a single opaque coat.
According to Golden’s research on washes and glazes, optical color mixing through layered acrylic films creates visual depth and brilliance that physically mixed paint cannot replicate. The light travels through each layer, reflects off the surface below, and returns to the viewer carrying information from multiple color layers simultaneously.
That is why a glazed passage of shadow in a portrait painting looks warm and luminous rather than flat and dull. The color is being perceived as a stack, not as a single mixed tone.
Surface texture and dimension

Layering creates texture variation across the painting that no single application can match.
- Impasto layers build physical surface relief
- Dry brush over those layers creates broken color that reads as light catching texture
- Glazes settle into low areas differently from raised ones
The interaction between texture and transparent layering is why impasto technique in acrylic painting is often combined with subsequent glazing rather than used alone.
Corrections and refinement
Practical benefit that often gets overlooked: layers let you correct mistakes incrementally without starting over.
An area where the color went wrong can be corrected with an opaque layer, then refined with a glaze, then adjusted again with scumbling. No single-session painting gives you that flexibility.
Artists who work in portrait painting techniques rely heavily on this. Building skin tones in layers allows for very precise temperature and value adjustments that are nearly impossible in a single wet application.
Comparison: single-layer vs. layered approach
| Quality | Single-layer painting | Layered painting |
|---|---|---|
| Color depth | Flat, one-dimensional | Rich, optically complex |
| Correction ability | Limited while wet | Flexible at every stage |
| Texture range | Uniform surface | Varied across the surface |
| Time required | Fast, single session | Multiple sessions, more control |
Some subjects suit single-session direct painting. Most representational work benefits from building up through layers. Knowing which approach fits the subject is part of what separates planned acrylic paint layering from simply applying paint until it looks right.
FAQ on What Is Layering In Acrylic Painting
What is layering in acrylic painting?
Layering is the process of applying multiple coats of acrylic paint, each fully dry before the next is added. It builds color depth, texture, and visual complexity that a single coat cannot achieve. It is the basis of glazing, underpainting, and scumbling.
How many layers can you apply with acrylics?
There is no practical limit. According to Golden Artist Colors, acrylic paint can be layered over a coat dried an hour ago or one dried for years. The acrylic polymer film is stable and accepts new paint without breaking down.
Do you have to wait for each layer to dry?
Yes. Painting over a wet or semi-cured layer causes lifting and muddy color. Thin layers are touch-dry in 10 to 30 minutes. Full cure takes 24 to 72 hours depending on thickness and environment.
What is the difference between layering and blending?
Layering works wet-on-dry. Each coat dries before the next is applied. Blending works wet-on-wet, mixing colors while both are still open. They produce different results and serve different purposes within a painting.
What is glazing in acrylic layering?
Glazing is a transparent layer mixed with a glazing medium applied over dry paint. It shifts color temperature and creates optical color mixing without covering the layer below. Liquitex and Golden both make dedicated glazing mediums for this.
What causes muddy colors when layering acrylics?
Glazing complementary colors over each other without a plan. Red over green or blue over orange neutralizes both, producing brown or gray. Plan your layer sequence around color temperature shifts rather than stacking random colors.
Can you layer acrylic paint with water?
Water thins paint but dilutes the acrylic binder. Keep water additions below 25 to 30 percent of paint volume. For thin transparent layers, a glazing medium is safer and maintains film integrity better than water alone.
What is the correct order of layers in acrylic painting?
Most painters follow dark-to-light, starting with an underpainting to establish values before adding color. A light-to-dark approach using transparent glazes also works, depending on the subject. Build from thin layers to thick.
What acrylic mediums help with layering?
Glazing medium increases transparency and extends open time. Retarder slows drying for better blending within a layer. Gel medium adds body for textural layering. Gesso controls surface absorbency and affects how every layer above it behaves.
How is acrylic layering different from oil painting layering?
Acrylics dry in minutes rather than days, so layers build up much faster. Oil paint stays workable for hours, making wet-on-wet blending easier. Both use glazing and underpainting, but the pace and medium behavior differ significantly.
Conclusion
Understanding what is layering in acrylic painting changes how you approach every session at the canvas.
It is not a single technique. It is a system: underpainting sets the value structure, opaque layers build form, glazes shift color temperature, and dry brushing adds surface texture.
Each coat depends on the one beneath it. That relationship is what produces paintings with real depth rather than flat, one-dimensional color.
The tools are straightforward. Glazing medium, retarder, soft gel, gesso. Used correctly, they give you control over transparency, drying time, and paint film adhesion across every layer.
Start with a solid underpainting. Build thin to thick. Let each layer dry. The results speak for themselves.


