Some of the best texture in watercolor painting comes from the least controlled moments.
The splattering technique is one of watercolor’s most practical tools for creating organic texture effects: sand, stars, rain, foliage, seafoam. Things that brushwork alone simply cannot replicate convincingly.
It works by flicking paint-loaded bristles onto wet or dry paper, releasing drops that land, spread, or crisp up depending on surface conditions, paint consistency, and the tool you use.
This guide covers everything from tool selection and pigment behavior to masking methods, wet-on-wet versus wet-on-dry results, and how to fix splatter mistakes when they land where they shouldn’t.
What is the Splattering Technique in Watercolor Painting

The splattering technique in watercolor painting is the controlled or freeform flicking of paint-loaded bristles onto wet or dry paper to create random dots, specks, and texture clusters that standard brushwork simply cannot replicate.
It works by loading a brush or toothbrush with diluted pigment, then releasing that paint through a rapid motion, directing drops across the paper surface. The result ranges from tight, crisp spots to wide, bleeding blooms, depending on how the technique is applied.
Unlike most watercolor painting techniques, splattering relies on randomness as much as skill. That unpredictability is the point. No two splatter patterns are identical, which is why artists use it to simulate naturally irregular textures: stars, rain, sand, gravel, seafoam, rust, foliage.
The technique differs from spattering in acrylic or oil due to watercolor’s transparency and the way its pigments bleed into wet paper. A drop of watercolor on damp paper spreads outward with soft, feathered edges. The same drop on dry paper lands with a hard, defined rim. That behavior is what gives watercolor splattering its range.
The global fine art watercolor paints market was valued at approximately USD 1.67 billion in 2024, growing at a CAGR of 5.16% through 2032, driven largely by increasing interest in hobby painting and art therapy (Market Research Future, 2024).
Famous watercolor artists like J.M.W. Turner used loose, expressive mark-making, including spattered paint, to build atmospheric texture in his landscapes. While he predated the modern toothbrush method, his approach to pigment distribution shares the same underlying idea: controlled chaos on wet paper.
Tools Used for Splattering

The tool determines almost everything about the splatter outcome. Size, spread pattern, dot density, and edge quality all shift depending on what you use to release the paint.
| Tool | Splatter Type | Best For |
|---|---|---|
| Toothbrush | Fine & Misty: Produces a high-density “spray” of tiny, uniform dots. | The Milky Way/stars, fine sand beaches, and subtle atmospheric grain. |
| Round Brush | Varied & Heavy: Yields larger, organic droplets with diverse sizes based on water load. | Dramatic rain, ocean spray, and “poppy” foreground foliage. |
| Fan Brush | Wide & Scattered: Bristles act as multiple independent “launchers” for a broad spread. | Wildflower meadows, abstract backgrounds, and soft-focus forest floors. |
| Palette Knife | Coarse & Directional: Flicks heavy pigment in a specific trajectory with high velocity. | Gravel paths, rugged cliff textures, and weathered tree bark. |
Toothbrush
The most widely used splatter tool. Load the bristles with diluted paint, then drag your thumb across them toward the paper. The small, stiff bristles produce a fine, misty effect that round brushes struggle to match.
Watercolor artist Richard Sneary, whose work is featured in American Watercolor, notes that a toothbrush tends to produce overly even splatters compared to a loaded paintbrush flicked off-center, so the choice depends on whether you want regularity or variation.
Round Brush
Load the brush heavily, then tap the handle against a second brush or your finger to release drops. This gives larger, less uniform dots than a toothbrush.
Key difference: Stiffer bristles release paint more forcefully, creating a wider spread. Softer brushes tend to drip rather than splatter, so brush stiffness matters here more than size.
Switching between a round brush with low water content and one with high water content produces very different outcomes on the same paper surface.
Fan Brush
A fan brush loaded with paint and flicked or tapped produces a scattered, wide-area splatter effect. Useful for backgrounds where broad texture coverage is needed quickly.
The spread-out bristle arrangement means less paint concentration per drop, so the dots tend to be lighter and more dispersed than those from a toothbrush.
Palette Knife
Drag the edge of a loaded palette knife across taut brush bristles to produce coarse, directional splatter. The drops are larger and more irregular than with a brush-based method.
Good for: gravel paths, rough stone textures, and any subject that benefits from heavier, less refined dot patterns.
How Paint Consistency Affects Splatter
Paint-to-water ratio directly controls what happens when a drop lands on the paper. Get this wrong and the splatter either blobs, vanishes into the surface, or refuses to release from the brush at all.
Too thin: drops spread too far on wet paper, lose shape, and create uncontrolled puddles rather than distinct spots.
Too thick: paint sticks to the brush bristles instead of releasing cleanly, producing clumpy blobs instead of individual dots.
The practical range sits between these extremes. A mix that flows freely off the brush but holds together on impact is the target consistency. That usually means slightly more paint than a standard wash, but not so thick that it resists the flicking motion.
Pigment Type Changes the Result
Not all watercolor pigments behave the same way when splattered. This is where granulation becomes relevant.
Granulating pigments, including ultramarine blue, burnt sienna, and French ultramarine, contain larger, heavier particles that settle unevenly as the paint dries. When splattered, these pigments cluster and separate in the drop, creating a textured, speckled appearance inside each dot (Daniel Smith, Etchr Lab).
Smooth staining pigments, like quinacridones and phthalo colors, dry flat and even. Splattered dots from these pigments have clean, consistent color throughout.
Mixing granulating and non-granulating pigments in a single splatter session produces varied dot textures across the same surface, which can look intentional and interesting or muddy and confused. Worth testing on scrap paper first.
Water and Surface Interaction
Dry paper: drops land with crisp, defined edges. More control over dot placement.
Wet paper: drops bleed outward from the point of contact, creating soft-edged blooms. Spread is unpredictable and depends on how much moisture is already on the surface.
Partially dry paper gives mixed results. Some drops bleed, some stay sharp. Useful for layered texture effects, but harder to predict consistently.
Wet-on-Wet vs. Wet-on-Dry Splattering
These two approaches produce results that look like different techniques entirely, even though the only variable is paper wetness.
| Condition | Edge Quality | Spread | Control Level |
|---|---|---|---|
| Wet-on-Wet | Soft & Feathered: “Lost edges” that blend into the paper for a seamless look. | Wide & Unpredictable: Pigment travels as far as the water reaches, creating organic “blooms.” | Low: You provide the “ingredients,” but the water and gravity dictate the final shape. |
| Wet-on-Dry | Hard & Defined: “Found edges” that are crisp, technical, and high-contrast. | Contained: The paint stops exactly where the brush leaves the paper. | High: Total command over placement, saturation, and shape. |
| Partially Dry | Mixed: A combination of “stuttered” edges and soft fades. | Variable: Some areas “grab” the paint while others allow for slight diffusion. | Medium: Requires high sensitivity to the “sheen” of the paper to avoid unwanted backruns. |
Wet-on-Wet Splattering
Splattering onto a wet wash produces watercolor blooms. The dropped pigment pushes into the wet layer beneath it, spreading along the water on the surface. The result is a soft, organic-looking cluster rather than a tight dot.
Timing is critical. Splatter too early, while the paper is very wet, and drops disappear completely. Wait until the surface sheen begins to fade, and the drops will hold their general shape while still bleeding softly outward.
This method works well for galaxy backgrounds, stormy skies, and loose flower compositions where texture matters more than precision.
Wet-on-Dry Splattering
Dry paper gives the most predictable results. Drops land where they’re directed and stay within a defined radius of that point. Edges are clean. Dot size is consistent with the brush load and distance from the paper.
This is the approach to use when texture needs to stay in a specific area. Sand on a beach, gravel on a path, rust on metal. The precision makes it practical for detailed work where wet-on-wet spread would ruin adjacent painted areas.
Splattering wet-on-dry over a dry wash adds texture without lifting or disturbing the base color, which is one reason watercolor artists often use it late in the painting process.
Masking and Control Methods
Splattering is intentionally unpredictable. That’s fine for backgrounds and textures, but not when the splatter needs to stay away from a focal point or a carefully painted area. Masking solves this.
Masking Fluid
Masking fluid, also called liquid frisket, is a latex-based liquid applied to areas of the paper before splattering begins. It dries to form a protective barrier that watercolor paint cannot penetrate. After splattering and painting are complete, the dried fluid peels off cleanly, revealing the untouched paper beneath.
A toothbrush loaded with masking fluid can itself be used to splatter frisket onto the paper before painting, preserving random white dots that become stars, light reflections, or grain texture once the fluid is removed.
Key rule: let masking fluid dry completely before applying paint. Painting over wet frisket mixes the two materials and creates a sticky, unpaintable surface.
Paper and Stencil Masking
Torn paper edges placed over painted areas create soft, organic boundaries that keep splatter out of specific zones. The torn edge produces a natural-looking border, which suits landscape work particularly well.
Cut stencils from tracing paper, card stock, or acetate sheets give cleaner boundaries for geometric shapes or repeated patterns. Held flat against the paper during splattering, they block paint from reaching the covered area entirely.
Artist Janine Helton describes cutting tracing paper shapes to protect bird plumage while toothbrush-splattering fine masking fluid dots nearby, showing how masking and splattering work together in detailed subject painting.
Masking Tape
Low-tack masking tape works for straight edges and angular boundaries. It is less flexible than paper stencils but more reliable for clean lines.
Remove tape after the splatter dries fully to avoid tearing the paper surface, particularly on lighter-weight sheets below 300 gsm.
Common Subjects and Use Cases
Splattering fits naturally into subjects that already have irregular, random surface qualities. It reads as authentic texture rather than added decoration when the subject actually looks that way in real life.
Night Skies and Star Fields
White gouache or white ink splattered with a toothbrush over dried dark paint produces star fields. The opacity of gouache lets dots sit on top of the dark background rather than blending into it, which transparent watercolor cannot do on its own.
Vary the splatter density by testing brush load on scrap paper first. A heavily loaded toothbrush creates large, obvious stars. A lightly loaded brush produces a fine, misty scatter that reads as distant background stars. Layering both gives depth to the composition.
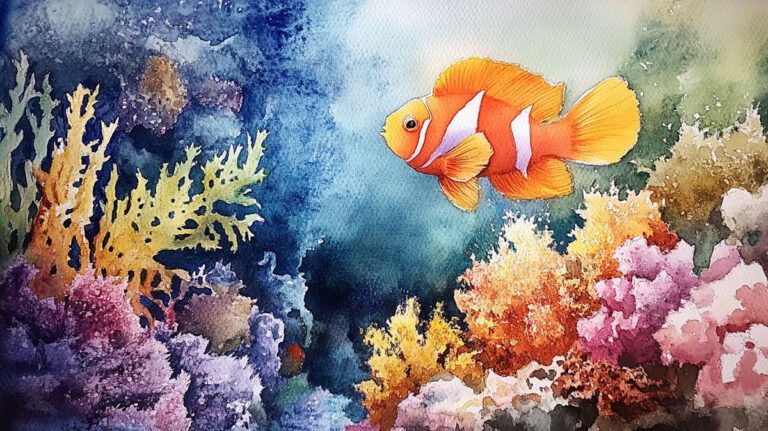
Sand, Gravel, and Natural Ground Textures
Warm browns and raw siennas splattered wet-on-dry over a dry base wash produce convincing sandy ground texture. The crisp edges of wet-on-dry drops mimic the hard, individual grain quality of sand and gravel better than brushwork can.
This is a technique where granulating pigments like burnt sienna add extra value. The textured interior of each drop, where pigment clusters unevenly as it dries, reinforces the irregular surface quality of the subject.
Water and Ocean Spray

Splattered pale blue or white drops over a darker ocean wash suggest seafoam and spray. The wet-on-wet approach works here because soft-edged drops read as mist rather than hard objects.
Watercolor artist Emily Wassell notes that splattering petal colors first in loose floral compositions, then painting detailed forms over the top, creates a sense of atmospheric depth without requiring labored brushwork in the background.
Foliage and Wildflower Backgrounds
Green and yellow splatters across a pale wash suggest distant foliage, meadow texture, or out-of-focus flowers behind a foreground subject. Applied early in the painting process, splattered background texture establishes depth before detailed work begins.
The technique also pairs well with wet-on-wet technique for soft, impressionistic flower and plant backgrounds where sharp detail would look out of place.
Layering Splatter with Other Watercolor Techniques

Splattering works best when it fits into a broader painting process, not when it is dropped on at the end as an afterthought. Where and when you splatter relative to other techniques changes the result completely.
The watercolor paints market is projected to grow at a CAGR of 5.9% from 2025 to 2035, driven partly by rising interest in mixed-technique and experimental watercolor practice (Wise Guy Reports, 2024). That growth reflects how artists are combining multiple approaches in a single painting rather than working in isolation with one technique at a time.
Splattering Over a Dry Wash

Most common layering approach. Apply a flat or graded wash first, let it dry completely, then splatter on top.
The dry base holds its color cleanly because the splatter drops land on a sealed surface rather than bleeding into a wet layer. The splatter texture sits visually above the wash, creating a sense of depth without disturbing what is already there.
This works especially well for adding sand or gravel texture over a dry ground-color wash, or placing star dots over a dried dark sky.
Splatter Combined with the Salt Technique
Salt sprinkled onto a wet wash absorbs water and pulls pigment outward, creating starburst or feathered patterns. Fine table salt produces small, tight highlights. Sea salt flakes pull color in larger, more irregular shapes (Jackson’s Art, 2025).
How these two work together:
- Apply a wet wash
- Sprinkle salt while the wash is still damp
- Let dry fully, then remove salt crystals
- Splatter a second color over the textured surface
The resulting surface has two distinct texture layers. The salt creates organic, irregular patterns at the wash level. The splatter sits on top with its own dot-based texture. Together they read as genuinely complex surface detail.
Splattering Before Glazing
Splatter a layer of dots, let them dry, then apply a transparent glazing technique wash over the top.
The glaze softens the splatter slightly, pushing the dots back into the picture plane. This gives them the appearance of texture that exists behind the painted surface rather than on top of it. Useful for suggesting depth in distant foliage or hazy atmospheric backgrounds.
Key rule: the glaze must be transparent. Opaque glazes kill the effect entirely by blocking the dots underneath.
White Gouache Splatter Over Dried Watercolor
Transparent watercolor cannot produce white dots over a dark surface. White gouache can.
Load a toothbrush or round brush with white gouache (kept in a separate container to avoid contaminating watercolor mixes), then splatter over a dried dark wash. The opaque dots sit on top of the surface rather than blending in.
Watercolor artist Yufen Zha uses this approach in animal paintings, flicking white gouache into wet backgrounds to create layered snow effects with multiple depth levels built into a single scene.
White ink works the same way and tends to produce finer, crisper dots than gouache due to its lower viscosity.
Combining Splattering with Wet-on-Wet Washes
Splattering into an active wet-on-wet wash creates blooms rather than dots. The dropped paint pushes the wet layer outward from the point of contact, forming soft, irregular halos around each drop.
Timing determines the result:
- Very wet surface: drops disappear into the wash
- Sheen just fading: soft-edged blooms form and hold
- Nearly dry: partially crisp dots with slight bleed
Skillshare instructor Aima Kessy notes that working quickly on large wet areas is critical, since parts of the wash dry at different rates and create uneven blooms if splattering is not timed consistently across the surface.
Common Mistakes and How to Fix Them
Most splattering problems come down to three variables: too much water, wrong distance from the paper, or no protection on areas that need to stay clean. Getting these right is mostly a practice problem, not a materials problem.
| Mistake | What Happens | Fix |
|---|---|---|
| Overloaded Brush | “The Splash”: Instead of a fine mist, heavy “blobs” hit the paper, often drowning out the underlying texture. | The Blot: Tap the brush on a paper towel once after loading to remove excess “bead” water before flicking. |
| Too Close to Paper | “The Merge”: Droplets land too densely in one spot, merging into a single puddle that ruins the “randomized” look. | The “Arc”: Maintain a distance of 20–30 cm. This allows gravity to separate the droplets into a natural spray. |
| No Masking on Focal Areas | “The Dirty Look”: Splatter lands on “clean” whites or facial details, making the subject look muddy or unintentional. | The Shield: Use a “negative space” mask (a piece of scrap paper with a hole) to protect everything except the target area. |
| Repetitive Flicking | “Mechanical Grid”: The dots look like a printed pattern because the hand movement was too consistent. | The Variance: Change your wrist angle, your distance from the page, and the “juice” level of your brush every few flicks. |
Overloading the Brush
Too much water in the brush produces large, uncontrolled drops that puddle on the paper rather than landing as individual dots. Blot the loaded brush on scrap paper first to check the drop size before bringing it near the painting.
Paint that is too thick creates the opposite problem: it sticks to the bristles and does not release at all. The right consistency flows freely off the brush under a flicking motion without dripping at rest.
Splattering Too Close to the Paper
Distance from the paper controls dot spread. Close range concentrates multiple drops in a small area, causing them to merge into a blob before drying. At 20-30 cm, drops land individually and stay separate.
Test distance on scrap paper first. What feels intuitively close enough is usually still too close, especially for toothbrush splattering where the drops release in a burst rather than one at a time.
Unprotected Focal Areas
Splattering has no natural boundary. Without masking, paint drops land anywhere within the flicking radius, including on carefully painted focal subjects.
Cover any area that should stay clean with torn paper, a cut stencil, or dried masking fluid before starting. This is especially relevant when using the masking technique in watercolor, where the splatter itself can be applied with masking fluid to protect specific dot patterns from subsequent paint layers.
Fixing Splatter Mistakes
While wet: press a paper towel or clean dry brush onto the unwanted drop immediately. Watercolor lifts cleanly when still wet.
After drying: lighter dots fade as the paint dries (watercolor always dries lighter than it appears wet). For darker staining drops that remain visible, mix a small amount of titanium white or white gouache to match the surrounding color and paint carefully over the dot (Solving Watercolour, 2022).
Emily Wassell recommends adding clean water to dilute an unwanted splatter while still wet, then lifting the diluted paint with a clean dry brush, working in gentle circular motions on textured paper to reach pigment sitting in the paper’s surface grain.
Fixing splatter mistakes on top of already complex, layered washes is genuinely tricky. Honestly, the most reliable fix is avoiding them in the first place with proper masking. Correction after the fact almost always leaves some trace.
Learning how to fix painting mistakes in watercolor generally is worth practicing separately from splattering itself, since the lifting and correction skills apply across every watercolor technique, not just splatter work.
FAQ on What Is Splattering Technique In Watercolor Painting
What is the splattering technique in watercolor painting?
Splattering is a watercolor texture technique where paint-loaded bristles are flicked onto paper to create random dots and specks.
It simulates organic textures like stars, sand, rain, and foliage that standard brushwork cannot replicate. Results vary based on paint consistency, tool choice, and paper wetness.
What tools do you need for watercolor splattering?
The most common tools are a toothbrush, round brush, fan brush, and palette knife.
A toothbrush produces fine, misty dots. A round brush gives larger, more varied drops. Each tool changes the dot size, spread pattern, and overall texture effect on the paper.
What is the difference between wet-on-wet and wet-on-dry splattering?
Wet-on-wet splattering produces soft, feathered blooms as drops bleed into the damp surface. Wet-on-dry splattering lands with crisp, defined edges.
Wet-on-dry gives more control over dot placement. Wet-on-wet suits atmospheric backgrounds where soft, unpredictable spread is the goal.
How does paint consistency affect splatter results?
Paint that is too thin produces large, uncontrolled puddles. Paint that is too thick sticks to the bristles and won’t release cleanly.
The right consistency flows freely off the brush under a flicking motion. A slightly thicker-than-wash mix works well for most watercolor splatter effects.
How do you control where the splatter lands?
Use masking fluid, torn paper, cut stencils, or acetate sheets to protect areas that should stay clean.
Distance from the paper also matters. Working 20-30 cm away spreads drops more evenly. Moving closer concentrates them, often causing merging and unwanted blobs.
Can you splatter white paint over dark watercolor?
Transparent watercolor cannot produce white dots over dark surfaces. White gouache or white ink can.
Both are opaque and sit on top of dried washes rather than blending in. A toothbrush loaded with white gouache is the standard approach for adding stars or ocean spray highlights.
What subjects work best with the splattering technique?
Splattering suits subjects with naturally irregular textures: night skies, sand, gravel, seafoam, rust, and wildflower backgrounds.
It also works well for night sky painting and loose floral compositions where scattered background texture adds depth without requiring detailed brushwork.
How do you fix watercolor splatter mistakes?
While still wet, press a clean dry brush or paper towel onto the unwanted drop to lift it immediately.
After drying, lighter dots often fade on their own. Darker staining drops can be covered carefully with titanium white or color-matched white gouache mixed to the surrounding tone.
How does splattering combine with other watercolor techniques?
Splattering pairs naturally with glazing, wet-on-wet washes, and the salt texture technique.
Splattering before glazing softens dots into the background for depth. Splattering over a dry wash adds surface texture without disturbing the base layer beneath it.
What watercolor paper is best for splattering?
Heavier paper, around 300 gsm, handles splatter best. It absorbs water without warping, keeping drop shapes consistent across the surface.
Cold-press paper with moderate texture gives a natural randomness to landing drops. Hot-press paper produces crisper, harder-edged dots due to its smoother surface.
Conclusion
This conclusion is for an article presenting the splattering technique in watercolor painting as a practical, learnable skill rather than a happy accident.
Getting consistent results comes down to understanding three things: paint dilution ratio, surface wetness, and tool selection.
A toothbrush and a round brush give you most of what you need. Masking fluid handles the rest.
Combine splattering with layering and blooming to build genuine depth into backgrounds. Use granulating pigments like ultramarine or burnt sienna when the subject calls for raw, uneven texture.
Practice on scrap paper first. Distance, brush load, and flicking angle all shift the outcome more than most beginners expect.